 STAY IN THE BUNGALOW KNOW!!!
Sign up for our newsletter & receive our FREE E-book, 7 VITAL Things to Do Before You Hire a Contractor.
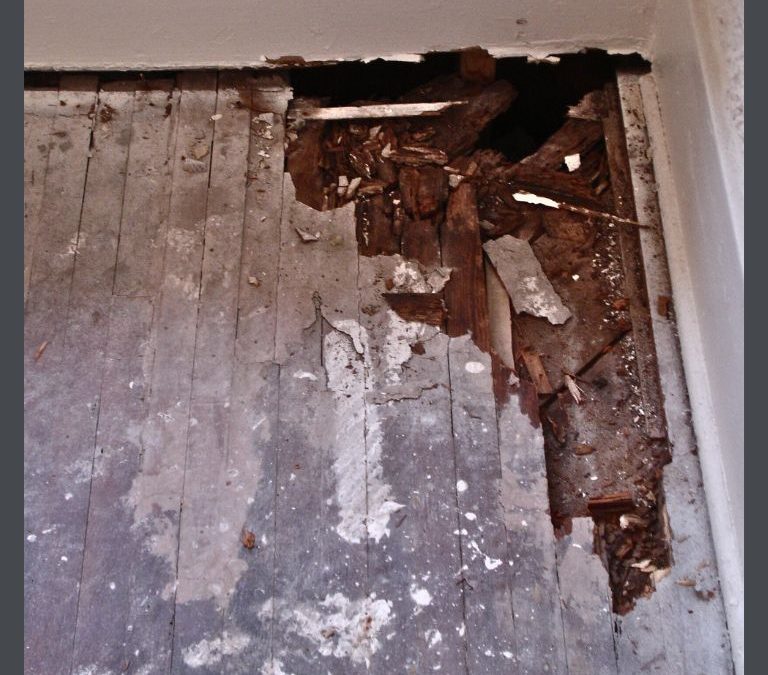
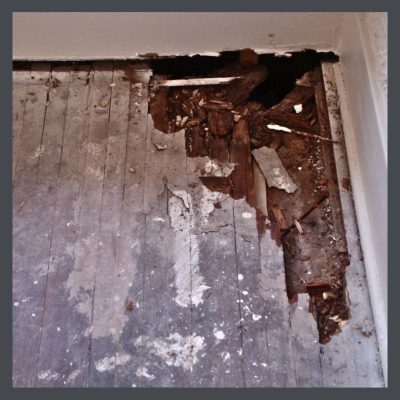 Wood flooring is a major, character-defining feature in a bungalow & I vigorously encourage their restoration. However sometimes, they are so worn or damaged that it requires installing new wood flooring in your old house to provide a surface that provides sufficient safety & functionality. Fortunately, more often, they require only patching. This article is about the types of materials available which you would choose for patching or replacement.
One of my followers is preparing to replace her floors so I have been answering many questions for her, which is what prompted this article, putting together all the pieces.
Here are the basics, in more detail than I have provided in the glossary. I will link to the wood flooring glossary when using terms that are covered there. It’s a really long article, so stay with me!
I write for you (& for my younger self, desperate to learn all these things to do right by my house) so any questions that you might have, I want them! If I have been unclear or omitted needed information, please let me know!
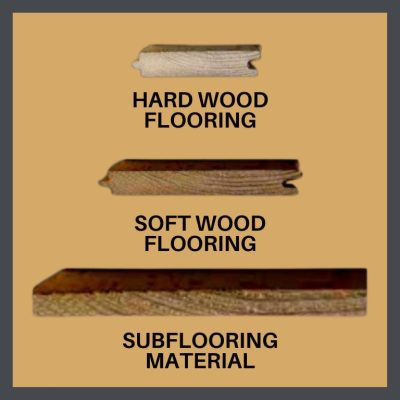
Wood flooring products are referred to as tongue & groove, or T&G because protruding tongue is cut in one side of the board & a groove is cut in the other at the mill, allowing the pieces to be fit together closely when installed. This was done so nails could be hammered into the tongue & hidden from view by the groove. Before the advent of T & G flooring, boards were nailed from the top and these nails were visible.
In unfinished wood, the area above the groove, the top or wear layer, is ¼” thick. If you purchase salvaged wood, you need to ensure that the top layer is at least 3/16″ thick.
Woods are categorized as hard or soft woods. The hardness of a wood is determined by its ability to resist indentation. Hardwood comes from broad leaved trees such as oak, ash, cherry, maple & poplar. Softwoods come from conifers, such as pine, fir, or spruce. To learn more about the hardness of woods, read this article by the National Wood Flooring Association here. You’ll see that there is great variation amongst the resistance of each category.
In many bungalows more than one species is used, either in patterns or in different rooms. Often the public areas were a more expensive hardwood & the private were a locally sourced softwood.
 The wood found in most bungalows is called strip flooring. Hardwoods are mostly 2 ¼” wide by ¾” thick. Softwoods can be wider, usually 3 1/4″.
Wood can be purchased in different lengths, with each gradation being more costly. Often, the boards used in public areas were longer than those used in private areas. However, in homes which have hardwood flooring such as oak in the public areas, with pine or fir (softwoods) floors in the private areas, the softwood floors were always longer in length than those of hardwood floors.
ORIGINAL
Hardwoods: 2′-8′, with an average of 4′.
Softwoods: 6′- room length, with the max at 16.’ It was common that many pieces would be 10′-15′ long.
TODAY
Hardwood solid, unfinished- (standard) 9″-7′ with an average of 2 1/2′ to 2 3/4″ wide. You can get specially milled flooring that is longer for more $$$.
Hardwood engineered, unfinished- better brands offer 1′ to 7′. 2 1/4″ width may not be available unless you have it custom milled at a much higher price.
Hardwood prefinished, solid today- varies between 9″-7′ for better products.
Hardwood prefinished, engineered today- no data. Varies greatly by manufacturer.
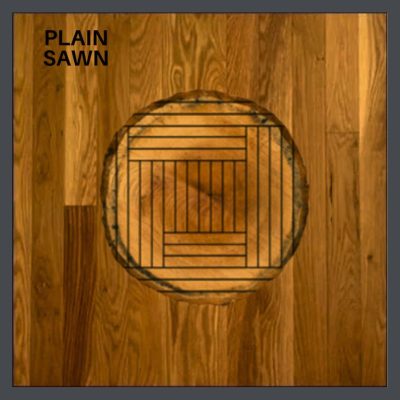 PLAIN SAWN
This cut utilizes the whole log, with the smallest amount of waste, making it the least costly of all the grain patterns. It results in a large, course, looping grain pattern. Plain sawn wood is less dimensionally stable (The degree with which wood shrinks & swells with changing moisture content) than quarter sawn or rift sawn so will tend to expand & contract more across the width of the boards than quarter sawn lumber.
Should you need to replace flooring in your house, I often recommend that oak be used because it is both reasonably hard and traditionally used. I suggest that this cut be chosen for the private areas because though it lacks the excitement of quarter sawn, it is still a workhorse.
Should you not be able to access quarter sawn or reclaimed, this is a fine type of oak to use in your public areas with all the beautiful rugs of the Arts & Crafts era. Unless you are a museum, your honoring the natural materials of the Movement counts with me.
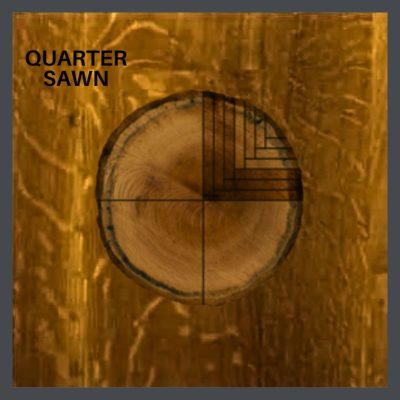 QUARTER SAWN
This is the wood of the Arts & Crafts Movement. When you gasp at the beauty of a Stickley piece, much of your awe & admiration are your reactions to the beautiful flecked graining, the Tiger Oak wood.
To produce the intense flame pattern, each log is sawed at a radial angle into four quarters. Then each quarter is cut along the center angles, near the center of the tree. (To better understand tree anatomy, read this article.) The wood from this cut twists & cups less than plainsawn, making for a more stable floor. It also wears more evenly under traffic.
Quarter sawn is more costly than plain sawn because it wastes more wood & is also more difficult to cut. I recommend its use in public areas where you want to impress your guests!
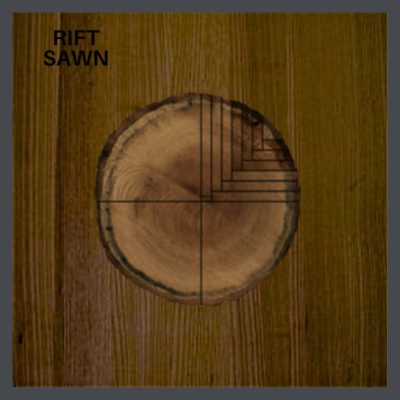 RIFT SAWN
Rift sawing is similar to quarter sawing, with many of the same advantages. The way that it is cut accentuates the vertical grain but minimizes the tiger stripe effect found in quarter sawn oak.
Also a pricey option, it mixes beautifully with quarter sawn in a public area. I think that a floor of all quarter sawn looks whiskery! Rift sawn flooring was not used in older homes by itself, but was usually mixed with quarter sawn in a cut sold as “rift & quarter sawn” flooring. Today, standard milled oak flooring is sold as rift & quarter sawn as a mixed grade. You get more rift, usually 70% of the bundle, than quartered boards. This is much more economical than purchasing, from a specialty mill, all quartered or all rift cut oak. Place the boards strategically so that it is varied throughout the floor.
There are more grades, but none that are appropriate for use in a bungalow. Some of the omitted grades are lacking in character (considered imperfections) & lose the look of real wood & some have too much character & appear too rustic.
Here’s straight from the big guys, the National Wood Flooring Association:
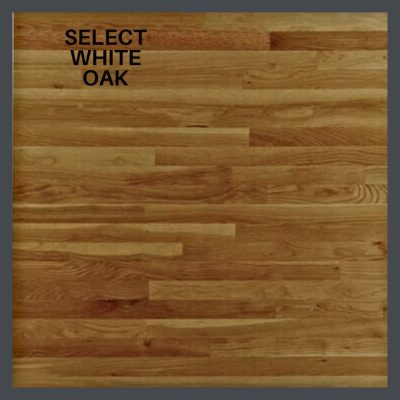 SELECT OAK
Contains all the variations in coloration produced by the contrasting differences of heartwood & sapwood. Also included are minimal character marks, such as small knots, worm holes, & mineral streaks, as well as slightly open characters.
The combination creates a floor where the light sapwood & dark heartwood are combined with small characters & other small color interruptions.
Should you be unable to access reclaimed wood or quarter sawn, in newly harvested wood, this grade, in plain sawn, is a good choice for your public areas. Arts & Crafts patterned rugs are perfect accents for bungalows & this grade of flooring will look beautiful with them in your home. Honest. View some beautiful ones I have collected for you on my Pinterest board, here.
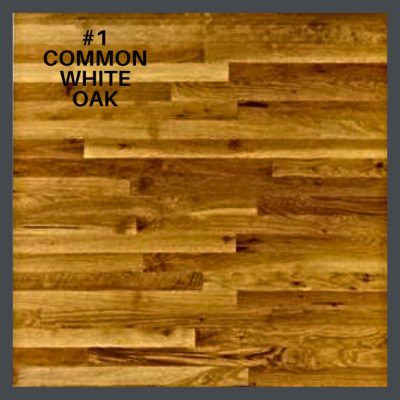
A flooring product characterized by greater color variation than Select, that also contains prominent characters (with size limits) such as knots, open checks, worm holes, along with machining & drying variations.
#1 Common is a tasteful floor where prominent variation is expected. I think it looks fine in private areas, but you need to make sure that the colors are well placed, so that the floor doesn’t look like a study in color-blocking! You can use the shorter, knottier pieces, or ones with more blemishes in your closets.
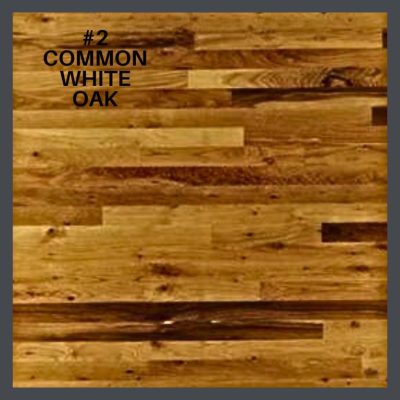 #2 COMMON OAK
#2 Common may contain sound natural variations of the forest product & is suitable for homes, general utility use, or where character marks & contrasting appearance is desired.
I like this choice in finished attics because I like them to look like what they are! In unfinished products, this is a material that you can paint without feeling bad about it. And don’t try to hide the character marks. It’s an attic!
This is your first choice. Reclaimed, old-growth wood is milled from lumber harvested from ancient forests that is either rescued as logs from the bottoms of rivers & milled into lumber for various uses, or is removed from old buildings & re-milled for other purposes. Sometimes old flooring is salvaged & employed again as flooring which often does not require milling. You can see some cool videos about it here.
Recycled wood is available in solid unfinished, solid prefinished & also in engineered, unfinished or prefinished.
Should your site finished (as opposed to factory finished) floor require patching, this is the type of wood that you will need to use, especially if your floors are old heart of pine. You can read about its properties & its value here.
 This is the type of wood that was installed in our old houses when they were built. It requires sanding & finishing on site after installation is completed. Today it is milled from newly harvested trees, generally grown on tree farms. It can also be milled from reclaimed material, or, salvaged as flooring from old buildings.
Unfinished wood flooring, either newly milled or reclaimed, is available in solid or engineered.
After unfinished wood is completely installed, it is sanded, sometimes stained, & then coated with a protective finish. This article explains many of the finish options available.
Unfinished flooring allows you to create a completely custom floor so that you can match or complement the other floors in your home.
A prefinished floor is one on which the stain & finish (a clear, protective coating) are applied at the factory. There are many tough finishes available from oil penetrating finishes which provide a matte finish, natural look, to polyurethanes which coat the wood & are available in matte to high gloss. Most of the finishes you can use on a site finished floor are avail in prefinished. You can read about them here. You are going to want to choose one with a medium gloss which mimics wax or shellac. As far as choosing a sheen level, a matte floor shows dust, dirt & fur & a shiny one obscures the grain & shows scratches & dust, dirt & fur.
The factory/manufacturer applied finishes, especially products at the higher end, are very tough, & are more durable than those applied on the job to unfinished wood. Many prefinished products can be sanded at least once. If you do not have to match existing flooring, it can be a good option, with a few caveats.
Here’s where prefinished floors can have a drawback. In your old floor, after the raw, unfinished wood was laid, several passes were made over it with a sanding machine to fully level all sides of the boards where they join the next rows. This sanding is not done on a prefinished floor. The boards are sanded at the factory before the finish is applied. Consequently, there may be some differences in leveling from board to board. There are several ways in which manufacturers cut the wood at the factory (mill) to make the final floor appear flat.
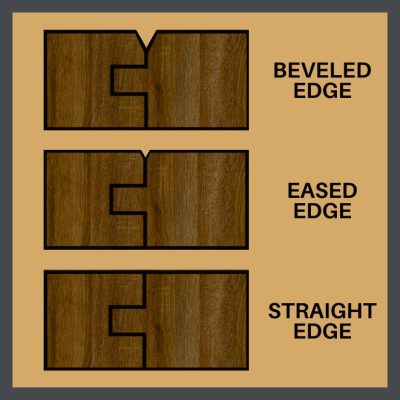 BEVELED EDGE
These products have a very distinctive groove in them.
This is the most common. Each board is just slightly beveled. Some manufacturers add an eased edge to both the length of the planks as well as the end joints. Even this small groove helps hide uneven plank heights. Eased edge is also called a micro-beveled edge.
The edges of all boards meet squarely creating a uniform, smooth surface that blends the floor together from board to board, giving it the same appearance as an old floor. High-end mills offer this option at a higher cost because each board must be cut with great precision. This floor will still not be as flat as a floor that has been sanded on site.
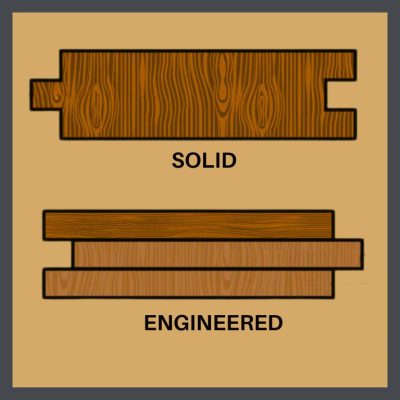 SOLID FLOORING
Your traditional floor, which you would find as the original flooring in your historic bungalow. This flooring is cut from one piece of wood. When you look at a piece of it from the side, you see no striations/layers.
This type is created in layers that are glued together. The veneer on the top is called the wear layer & can be of varying thicknesses.
The wear layer of engineered floors can be from 1/32″ to 1/4″ (1 mm to 6 mm) thick, again, affecting the price point.
This method of construction increases the stability of the boards. Especially in high moisture areas or situations, I think it can be a good choice. The majority of the time, these products are prefinished & have the 3 above edging characteristics. Square edged prefinished engineered floors are uncommon & at a much higher price point than are beveled ones.
Engineered wood can also be sold as square edged unfinished, but is more expensive than most prefinished flooring. Usually the wear layer is at least 3 mm on these products. I like this product in humid climates.
Engineered hardwood flooring is built up using layers of plywood or a high density fiber board then on the top a layer of wood veneer, to create the look of real hardwood. Veneer is a thin layer of wood or other material for facing or inlaying wood. Veneer is made of a particular material that is applied to a different material in order to create a more desirable surface appearance than that of the basic material of the object.
The dry-sawn face method creates a thicker layer (4 mm) of veneer than the other methods. This method creates a veneer with an appearance that is identical to solid hardwood in color, grain, & character. (See cut & grain examples above.) This method produces the least amount of usable veneer so it is more costly than the other two methods below.
Slice-cut is the second most common way to create a wood veneer. The finished wood presents a lovely face, like the sawn face above, but is in thinner layers (2mm or less) & is generally less pricey.
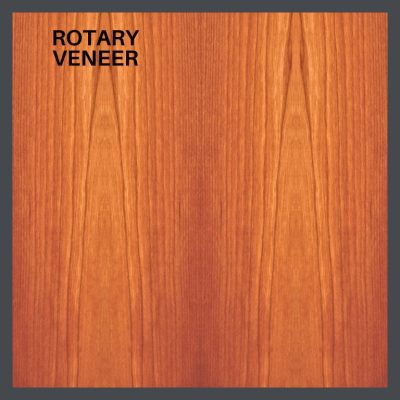 ROTARY PEELED VENEER
In this method, the log is put on a spit & peeled in a long, thin layer. The wood is then flattened which is damaging to its integrity & wearability. This cutting & flattening process produces an unnatural, repeating, unattractive grain pattern. It does create the maximum amount of product from the wood, so it is sold at the lowest price point.
That’s why there’s so much of it out there. I hate it! Be aware that, because of its low price, it is often chosen by flippers. If you see a floor that almost looks like wood, & is touted as being wood, this is likely what it is.
Engineered flooring has gotten a bit of a hit because the inferior products produced by this method. Engineered wood is a good, durable product & is quite suitable in a historic house- if- you choose the first method. I do not recommend the sliced veneer & do NOT choose rotary veneer flooring.
 PORCH FLOORS IN BUNGALOWS
We replaced a covered porch deck on a 1907 Folk Victorian that we restored & used pressure treated, 3/4″ by 3 & 1/8″ wide, yellow, T & G pine which at least in Florida, is available in a pressure treated product.
Pressure treated wood must dry 30 days before it can be primed & painted. We painted the bottom of the boards before installation & the top after. You might be able to get pressure treated decking which has been kiln dried after it is treated, so the 30 days can be omitted. Sanding is required to give you a smooth level surface, just like with any wood floor.
Porch boards are subject to much wear & water. It is really important to make sure that they are slightly angled so that the water runs off. It’s also a good idea to have a large squeegee on a long handle so that you can dry them after a rain.
In answer to the Good, Better, Best question of my follower:
BEST: 2 ¼” wide, reclaimed wood or salvaged old growth wood flooring, (with a 3/16” or thicker wear layer for 3/4″ T&G flooring, whether it be solid or engineered) of whatever species & grade was in your house originally. In any single house, there could have been more than one species, generally a pricier hardwood in the public areas & a less costly softwood (usually 3 1/4″ wide by 3/4″ thick) in the private. (This is the wood that you need for patching.)
Hire a qualified pro to sand & finish it. Reclaimed wood is $$$$$ & you don’t want to waste it.
BETTER: Select 2 ¼” wide, newly milled, farmed quarter sawn oak, either unfinished or prefinished (squared edged, please see above) solid or engineered with a thick veneer, for public areas. For private areas, 2 1/4” wide, in Select or #1 common oak. You do not want to use farmed softwoods. They are ridiculously soft.
If you want to finish it yourself, I recommend that you ensure that the equipment that you use is the latest & greatest & dust free, well maintained & calibrated. Then study these videos.
GOOD: A Select plainsawn wood floor that is either prefinished or unfinished, solid or engineered. Just no heavy bevels & no rotary veneer. (All are covered above.) Same instructions for sanding & finishing.
Installing it too, or farming it out to a carpenter or handy friend, make sure that they & that they wear the correct PPE & if you are living in the house, or even visiting, please understand the materials that are being used wear it too. Read this!
 This is not a DIY site. There are plenty of such sites & I applaud them!
Personally, I am not handy. But, I do like a project done correctly & have hired & supervised many tradespeople. Should you be of a similar mind, the more knowledge that you have of construction, the better you can judge competency & oversee your flooring project. These videos focus on the subject of wood flooring for your bungalow.
From books, I have taught folks whom I hired to work on my homes, about the care & feeding of the materials in old houses. I wish that I would have had these videos at the time!
And for those of you who are doing it yourself, my cloche is off to you. I hope these wood flooring videos are helpful & that your floors are smooth & beautiful!
And because I think I’m everybody’s mother: Installing & finishing wood floors is not rocket science, but they have their own precision technology. To become truly proficient takes years. I watched my husband work at mastering the skill over a period of 45 years & at retirement, he still did not feel he knew everything is to know.
How to Acclimate Hardwood Flooring (6:57)
RW Supply+Design
And don’t forget to acclimate your kitchen flooring in the kitchen! Yes, it will be a major pain, but cupping is more so!
How To Install Tongue and Groove Flooring (10:06)
Ask This Old House
An informative video that includes a written list of the tools & materials required.
Installing Engineered Wood Flooring (NWFA)
Greenleaf Floor
Because I’m a fan of some (not all!) engineered wood.
How to Repair a Tongue-and-Groove Wood Floor (4:53)
This Old House
Because a 100 year old floor always has some boo-boos!
How To Sand and Finish Wood Floors (28:03)
American Sanders
An overview only! Watch the rest of the one below.
Bona® Sand & Finish Training – Chapter 1: Preparation (17:29)
Bona Professional
A more detailed look at sand & finish. There are 4 chapters, each one automatically following the next. Watch them all!
How-to Restore Wood Floors (25:34)
About Your House with Bob Yapp
Another option from a master.
Visit Bob to see all the educational opportunities he offers here.
Should you have questions regarding wood flooring for your bungalow, visit my page of articles here. With 45 years in the trade, specializing in old houses, I have a lot to say!
Sign up for our newsletter & receive our FREE E-book, 7 VITAL Things to Do Before You Hire a Contractor.

Why would you hire a pro? It’s expensive. It’s a pain in the #@& to have strangers roaming about your house. Maybe they won’t do an good job.
Here’s why I think hiring a professional wood floor sander/finisher is a dang good idea. (From my experience as an old house lover & a wood flooring business owner for 45 years.)
 0. When you hire a pro, you acquire a friend in the biz.
I answered the phone for 45 years & guided homeowners through the process. Sometimes their call was premature- they had other issues to be addressed. I always quizzed them about their most recent termite inspection, signs of moisture intrusion, their allover restoration plan. If they lacked a plan, we put one together. The longest time I ever walked someone through the process was 2 years & 3-6 months was not uncommon.
I also took the opportunity to dissuade people from making unfortunate decisions such as refinishing perfectly lovely floors simply to change their color. I sold my business but I had a website full of great information & links & was able to educate them on how preserve their old houses. Now I write this blog!
I wanted to make sure that if they were taking the step of hiring a professional wood floor sander/finisher, that they were getting everything that they needed to get the best floor possible & to make the experience as smooth & pleasurable as it could be. It was a fun job!
 1. You get the benefits of their experience. Pro’s have made all the mistakes already & don’t have to go to school on your floor.
The first floor my husband, Dennis sanded, at my vintage clothing store, way back in the early 80’s, was maple, which is a very hard wood. He learned how to refinish by going to the library & studying books. He was a chemistry major in college, which gave him a bit of a jump on coatings-stains & finishes- but his only experience with wood was as a sophomore in high school wood shop & he wasn’t very good at.
None of the books he read at the library, mentioned anything about the different species & their requirements & characteristics. I was young & foolish & specified a medium dark stain. A pro would have encouraged me to forego the stain to allow the full beauty of this finely grained wood to be displayed, but my husband wasn’t even aware that it was maple! And he certainly wasn’t aware of how difficult it is to get an even stain on maple because of its uneven porosity.
Fortunately, he realized that he needed to know more than the books could teach him, & called a pro company at random out of the Yellow Pages. Wildly, the person who answered lived right behind us & graciously stopped by to help. The pro suggested that we rent sanding equipment from him & gave Hubby some good tips on using it, which was what saved the project. (Two years & 100 floors later, my now educated & skilled husband critiqued this first effort & gave it a C-.)
Which leads me to:
2. Pro’s have state-of-the-art equipment that they keep well- maintained & calibrated. Since the 20’s, sanders really hadn’t been improved much but they were miles above the tools you could rent at the time (early 80’s) Hubby first started. The rental machines were extremely under-powered & just chomped the heck out of floors. Slowly & arduously, you understand, because of the lack of power.
During our 45 years in the business, we went through 4 major iterations of equipment. With each new development, we would replace perfectly workable sanding machines for new, ever more expensive & sophisticated machines that could make a floor flatter while removing less of the surface.
Our equipment was maintained religiously. An uncalibrated machine can bounce over a floor making waves that are impossible to remove. Rental company employees just don’t maintain their equipment. They probably don’t know how & it’s not theirs, so they tend to be a bit casual about it. Hiring a professional wood floor sander/finisher means that the machines that they will be using belong to them- it was our $15,000 that bought each one & we wanted them to operate well & have long lives. At least until it was time for the next upgrade!
3. They use the best products & have working relationships with product manufacturers Many pro’s have attended their training programs to achieve better knowledge of their particular products & equipment. Generally, folks who hold these certifications are conscientious & professional.
Bona, a stain, finish & equipment manufacturer offers such a program. Bona was a pioneer, way back in the 80’s of low VOC water base finishes & soon after, began manufacturing low VOC oil based stains & oil based polyurethanes.
Students who are pre-qualified by a local manger, must have at least 3 years experience & it is required that the company have been in business for 5 years. They are required to carry commercial liability insurance which protects the homeowner from any damage to a home that might occur from their work. (We had a decent amount of work paid by this type of insurance from floods caused by plumbing fiascos!)
In addition to attending their school, in Aurora, Colorado, member pro’s receive technical support in the field.
 4. I seem to have wandered off product relationship & wandered into training. While everyone learns through experience, training under master craftsman takes skill to another level.
Lagler, an equipment manufacturer also offers training & certification. In the class, students learn to master their machines, including advanced sanding techniques & the use of correct sandpaper grits at each stage. One benefit of this study is that the craftsmen learn to use operate the machines more efficiently, greatly reducing time spent on the job- & in your home!
The National Wood Flooring Association is the organization that sets the standards for the trade. They have researched & developed the most effective techniques & offer training in installation & sand & finish as well as educating inspectors who help homeowners when a job goes bad. Just holding a membership in this organization shows commitment to professionalism.
5. All these things mean that your floor will be finished in much less time than if you are going the DIY route. It also means that your floor will have a longer life because rented equipment in the hands of a novice can mean that more wood is likely to be removed. An experienced, trained hand is a gentle hand, very important in preserving our old-growth wood floors.
That being said, as much as you will benefit from hiring a pro, not all of them are alike. You must perform your own due diligence, to ensure that the one you choose has the above attributes. I strongly suggest that you-
STAY IN THE BUNGALOW KNOW!!!Sign up for our newsletter & receive our FREE E-book, 7 VITAL Things to Do Before You Hire a Contractor.
 This guide of how to clean & maintain your wood floors applies only to floors with a surface coating type of finish such as oil-based polyurethane finish, water based finishes, etc. For floors with penetrating finish, refer to your manufacturer’s instructions.
There are some similarities in care between the various finish types, but for the sake of ease, this article pertains to water & oil based polyurethanes only. None of them requires scrubbing on your hands & knees nor flooding the floor with water! Flooring finishes have come a long way since Great-grandmother’s time & the methods of cleaning & maintaining them have evolved right along with them.
There are many choices in flooring finishes today, each one with different care requirements. If you should currently be trying to decide about which finish to apply to your floor, you might want to read this article on cleaning & maintenance, as well as the one on types of finishes. Appearance is not the only consideration unless you have a houseful of staff. I’m guessing that a few of you don’t!
That’s brings the point to mind, this article is a good guide for your housekeeper. I have seen too many floors ruined because a lack of education.
1. Avoid high heel traffic, especially heels that have lost the protective little tips on the end. They are deadly to wood floors.
2. Use walk-off mats at all entrances. It’s not a bad idea to remove your shoes before entering your house. It is the tradition in many cultures. In addition to dirt, it also keeps out pesticides & herbicides that might be picked up outside. It also helps you enforce #1 when you have guests & you don’t want to be singling out any one person.
3. Place protectors on the feet of all furniture. You can get them in different types. This is a link to Amazon where you can see the various kinds & even some cute little videos about how to use them.
4. Use area rugs in high traffic areas.
 Let’s start with our canine buddies.
If Doggie weighs over 30-40 lbs. or is very bouncy, their claws can not only scratch the wood but can actually dent it. Softwood floors like pine or fir, even floors of old growth wood which are harder than floors of newly harvested woods of the same species, are more susceptible to this, but I have seen many dented old-growth oak floors.
Some of my flooring customers used claw tips & found them workable. You can see them on Amazon here. I know little about them & recommend that you speak with your vet or trainer before trying them on your pet.
I also recommend placing rugs beneath the places where Doggie likes to hang out because when they jump down, they can exert quite a bit of force against your floor. If you place the rug part way under the feet of the furniture piece, it will help to anchor it.
There is no finish that will make your floor harder. Wood is soft & porous & though I’m not going to say that it’s a delicate material, it does take knowing what it likes & what it doesn’t like to get along with it.
Kitties are another matter. Firstly, I do not think that there is any way in the world to protect a wood floor from a litter box. There is nothing that you can put under it that will make any difference. Find a floor with an impervious surface. Kitties also seem to like to throw up & their vomit is very acidic. All I can say is that you need to clean it up as soon as possible. You hear the urping sound, grab a paper towel & get it up immediately.
I have never seen a cat scratch a floor, though my Pouella scratched my high gloss dining table. We had a large round metal platter that we displayed in the center, & she used to like to walk around it before settling herself atop the nice, cool dish. After a couple years of this, when you picked up the platter you could faintly see a circle of tiny claw marks. (This was nothing compared to what she did to the couch, but that’s another story.)
 Here’s where you’re going to get instructions that are unique to me. I have seen many, many floors ruined by loving hands.I have spoken to many heart-broken homeowners whose new floors were cupping (Here’s the GLOSSARY!) or cloudy. They all had one thing in common. They weren’t my customers! My customers got a cute little care basket with a cleaning kit, feet & most importantly, instructions on how to use them, at the end of the job.
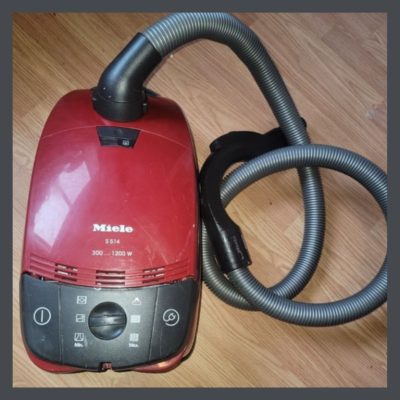
So here’s what I suggest- a long-handled Swiffer for every day dust & cat fur removal. Barefooted, it is exactly the right height for me. (With shoes on, I have to bend a little bit.) I use a robot vacuum every other day but it doesn’t get under & around everything, & the dust & cat fur do! I do not use one with a water tank. As you will see, I like to control my floor’s moisture level.
For a more thorough clean, I pull out my trusty canister Miele. It has a HEPA system, not just a HEPA filter. I use a soft brush attachment that I routinely check for any pieces of plastic that could touch the floor. I run this over the floor, using a wee bit of pressure, to ensure that the brush is loosening dirt from the grain. This is my second Miele canister. The first one was ruined by a housekeeper who ran it without a bag.
 The word mopping conjures up visions of dripping string mops & buckets of soapy water. THIS IS NOT THAT!!!!
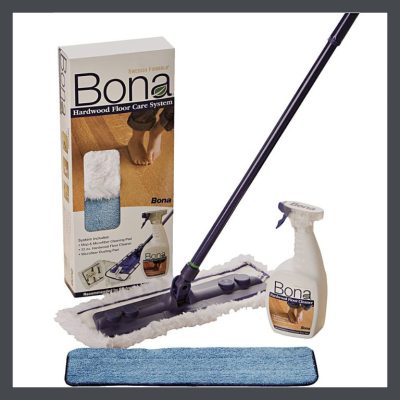
I highly recommend using Bona’s original cleaning formula with its basic mop. Here’s the whole system in a package on Amazon. There are other similar products offered by Bona but I am not a fan of scented cleaning products & their other, fancier mops that squirt, don’t allow me to clean as thoroughly as I would like, while protecting my floor. I also purchase several additional mop heads.
After I Swiffer & vacuum, I spray a section, starting at a far wall, about 6′ X 6′ with a little bit of Bona. I just mist it, really. Then I take my nice, clean dry Bona mop & going with the grain of the wood, I mop up the water. I get that floor dry. As I move from section to section, I check my mop head for dampness & dirt & change it for a fresh, clean, dry one at least every room. The purpose of the mop is to pick up the moisture & the dirt, not lay it down. I stick the mop heads in a plastic back as I go along. I don’t leave them on the floor. They then go in the washer & dryer with my other rags & are ready to go for next time.
Does all this sound too easy? Well, it is. Here are my only cautions:
1. Buy at least 6 extra mop heads.
2. Do not use a great deal of the cleaning fluid in any single area. If you have to spray it & wipe it again, so be it.
3. If you buy a gallon of the concentrated cleaner, do not make the mistake of using it without mixing it with the amount of water in the instructions. Ensure that your housekeeper understands this. I’m recalling now that I actually did get a call from one of our customers. Her floor was cloudy & sticky. Turned out her housekeeper used the fluid full strength instead of mixing it with water 7 to 1. For months! I told her to hide the bottle of concentrate & just rinse it a couple times every cleaning. This worked. She saw improvement with the first rinse.
4. Occasionally mop with just sprayed water. The Bona can leave a tiny amount of film that over time might become noticeable.
5. Keep an eye on your floor for the finish wearing in high traffic area. When you see finish wear, (loss of sheen) call your wood flooring company & ask them if it’s time for a re-coat of your high traffic areas. If you keep your floor coated, barring disaster such as deep scratches or water damage, you’ll never have to refinish it again. We are big on saving wood floors & like advise folks to keep them protected.
I recommend that you read all the articles in the WOOD FLOOR section so that you will have full understanding & appreciation from these gifts from Mother Nature.
 STAY IN THE BUNGALOW KNOW!!!
Sign up for our newsletter & receive our FREE E-book, 7 VITAL Things to Do Before You Hire a Contractor.
 The finish is the material that goes on top of a prepared wood floor- a correctly & thoroughly prepared floor- that makes it look fresh, emphasizes the grain & protects the wood, a comparatively soft & porous material.
This finish does not protect the wood from denting, from standing water or pet accidents, subfloor moisture issues, from dragging heavy furniture across it, or doggy toenails. Abrasion resistance/durability is about how long will it take to wear through it with normal traffic. Take a look at my article on cleaning & maintaining your polyurethane coated wood floors
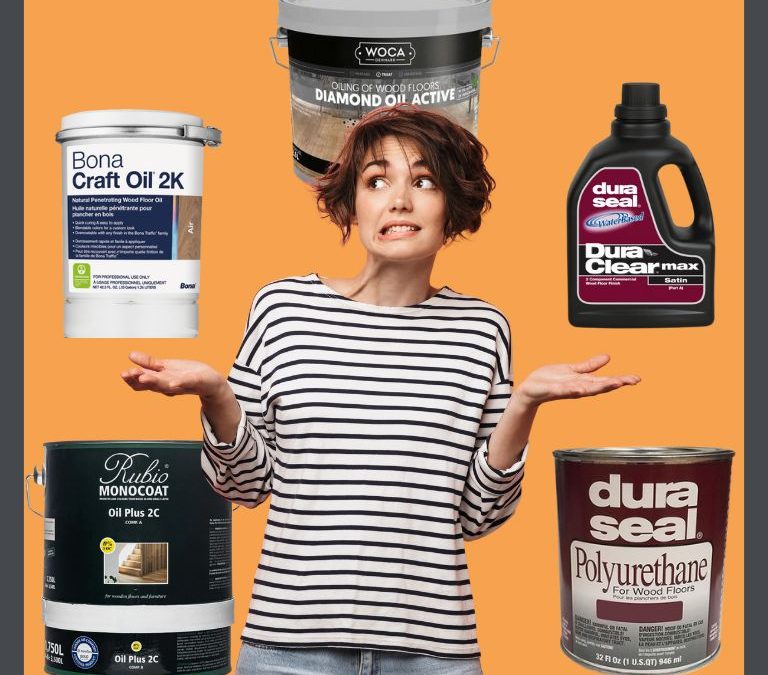
There are many products on the market, & I think the best way to choose the right wood floor finish for your bungalow, is to examine some of these products & consider their pluses & their minuses. I am not going to talk about stains (changing the color of the wood) here. Historically, wood floors were not stained. They were left natural & have aged & darkened to a beautiful patina over the decades. So that’s what I am going to recommend- floors au naturel.
As with any material that you use, or is used by a hired professional, I suggest that you read the manufacturer’s data, the Safety Date Sheet for the product & if you have any questions after reading the material, call the tech people at the manufacturer. They are the ones that most likely to have all the true & correct information about the product- not the pro, not the distributor or seller, not little ol’ me, but the manufacturer. I once had a really good painter apply paint in a method that was different from the manufacturer’s directions. The paint failed. The company’s literature said it would.
I do not like speaking ill of members of my trade, but I have seen some pretty angry homeowners complaining about the odd choices made, resulting in high-gloss floors that gleamed like beacons in the night, floors that peeled before they were even dry & floors with their beautiful grain obscured by too many coats applied by the overzealous finisher.
As a wood flooring professional, my focus, when I choose the right wood floor finish for your bungalow or decide on which technique or equipment to use, it to view their consistent workability & durability. After answering calls from tearful owners of old houses, seeing hundreds of attempts by others to do oddball stuff to save time &/or money, all the advice that I am giving you is based on my 40+ years of experience with professional products & techniques.
You have only so much wood layer left above the tongue & groove of your historic floor. Incorrect choices, over-aggressive or poor sanding can reduce your floor’s life by decades. I always recommend that any wood flooring tradespeople you hire be trained & certified by the companies that make wood floor finishes for your historic bungalow that they will actually use on your project. (Hopefully, they follow schooling that they learned!) The National Wood flooring Association has extensive training programs for installers, sander/finishers & even sales reps. Additionally, Bona, a finish company whose products we used for many years, has a topnotch training program for finishers. They train craftspeople in the use of their products, their state-of-the-art equipment & techniques, including removing the least amount of precious floor necessary to get the heavy marks out of it & create a surface with which the finish will tightly bond. I also recommend that you read my 7 VITAL Things to Know Before You Hire a Contractor.
I caution you against hiring someone to apply a particular type or even brand of finish for the very first time. The techniques & tools for applying each of these finishes varies hugely. They do not use the same skill set.
My pros & cons are based on the use of these products in an old house- either for the installation of new or reclaimed/salvaged, wood or for the refinishing of existing wood. Folks seem to have strong opinions about wood floor finishes. Please be polite in expressing these opinions. Everyone has different requirements for their floors based on budget, lifestyle, skill level & aesthetic preferences. And perhaps the phases of the moon.
 Pros: Approximates the illusion of depth that old finishes- shellac, wax, & varnishes showed & it ambers over time, again mimicking those historic materials. Costs less than many other types of finishes.
If you follow my maintenance guide & don’t have any water intrusion horrors, you have a good chance of never having to refinish your floor again by periodically recoating it. Check out the section RECOATING to learn more about this useful option.
Cons: Strong odor that can linger for months. Long cure time. More environmentally harmful. Flammable, as are applicator rags. Some people don’t like the fact that it ambers over time.
Sheens: Available in matte to high gloss. (With matte, it is almost impossible to get an even sheen.)
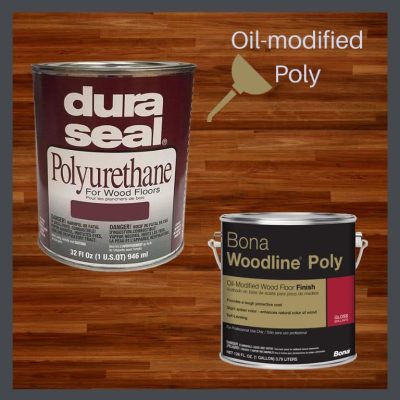
Recommended brands: Bona & Dura Seal (Not available at big box stores.
 Pros: Easy application & cleanup; low odor and low VOCs; several gloss options, including an easy-to-use matte; no yellowing over time. Good scuff, scratch and chemical resistance at full cure. Quick drying. Easy care.
The ones we liked best were two-partwater-based finishes, such as Bona Traffic HD, Dura Clear Max, & Basic Coating Street Shoe which are considerably more durable than most oil-based polyurethanes. They have much better abrasion resistance and will last longer when used on your bungalow’s wood floors. However, water-based finishes sold at the retail level are not two-part & are less durable than these better, professional grade water-based finishes.
Cons: Raises grain when applied for the first couple of coats when no stain coat has been applied. Grain raise makes the wood surface feel rough, both in appearance & to the touch. A trained wood flooring professional should be able to deal with grain raise & would probably suggest a minimum of 3 coats, lightly abrading between each one.
Lower sheen or matte water-based finishes make the wood look bare rather than creating a look of depth that old finishes impart. Semi-gloss or gloss water-based finishes do give good depth of finish.
Sheens: Available in matte to high gloss, except for Bona Traffic HD which is not made in high gloss.
Another good option when you choose the right wood floor finish for your bungalow, is to consider applying 1-2 coats of Bona Dri-Fast oil poly sealer, with 2 coats of water-based Bona Traffic HD (stands for Hard & Durable!) on top. This combination gives you depth, ambering & durability plus avoids grain raise.
One thing that you must consider when combining an oil-based undercoat with a water-based overcoat, is that that the manufacturer states that they must be compatible. The most common situation is that most oil-based finishes require a 30 day minimum cure time before they should coated with the water-based finish, otherwise the top coat of water, could not adhere & it might peal. Here’s what Bona says about it, “Bona DriFast® Sealer is a quick drying, oil-modified polyurethane sanding sealer that’s designed to penetrate and seal bare wood. It is compatible with all Bona stains, oil-modified and waterborne finishes.”
Recommended brands: Bona, Basic Coatings, & Dura Seal. These products are available in extra durable product levels. (Not available at big box stores.)
Once again, if you follow my maintenance guide & don’t have any water intrusion events of magnitude, you can avoid refinishing your floor again by periodically recoating it.
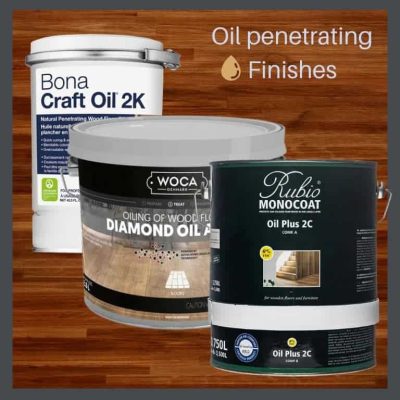 While other finish systems sit on top of the surface of the wood, oil penetrating wood finishes go down into the fibers of the wood, then harden on the surface.
Pros: Offers a natural look because you do not look through it. Many contain no VOC’s. Easy application of non-pigmented products. We have found Rubio to have a moderate odor & WOCA’s to be stronger.
The use of these products requires periodic maintenance- re-applying oil, but may not ever need a full sand and refinish. If severely worn, a light sanding may be needed first.
Cons: The look is very matte & most people are accustomed to a bit of shine. It is a durable finish, however, we once used this coating on the floor of a studio of a painter. He worked in oils & his paint drips were not repelled by the finish but soaked right into the wood. It was awful!!!!
Pigmented oils require impeccable prep/sanding & are difficult to apply.
Clean-up is similar to that of oil-base finishes. You will need paint thinner to clean your hands, your brush or non-disposable applicators. All are flammable.
Recommended brands: WOCA, Rubio & Bona
In 40+ years in the trade, we did not have good luck with these materials for various reasons- cost, durability, toxicity, flammability, sheen choices, ease of use & ability to get a consistently good finish. There are no manufacturer recommendations for use on floors for some products. Floors lead a hard life & using a product designed to be applied to furniture is only going to lead to more maintenance. We greatly preferred the products mentioned above. If you should choose to use these product formulated with these oils, please ensure that they are specified for floors.
One more bit of advice- when it’s time to choose the right wood floor finish for your bungalow, no matter what the species, stay away from high-gloss sheens. They reflect so much light that you will not be able to see the beautiful wood grain. Additionally, they show even the tiniest scratches as well as dust & dirt. And the there’s the hairballs. Kitty’s urp is very high acid & will dull that mirror shine of high-gloss very quickly.
This article also does not cover the types of finishes available for prefinished products. There are prefinished products that you can choose with finishes that are actually tougher than the types of finishes mentioned above, which are applied in your home.
These finishes are applied by machine to flooring at the factory & are exceptionally hard & durable. When these finishes are applied during the manufacturing process, the application is done in a highly controlled setting — as opposed to the conditions on a job site. The contractor can not create the same conditions found in a mill because of the equipment required & also safety concerns. Some companies offer a urethane/ceramic finish which is UV-cured to increase hardness. Others offer finishes with aluminum oxide particles added to increase the abrasion resistance of the wear layer.
Prefinished products have pluses & minuses which are explained here.
As always, whether you are hiring someone to perform the work or doing it yourself, study the manufacturer’s materials (printed & online) & contact the manufacturer with any & all questions that you might have. They have tech people who thoroughly know the product & are glad to help you. Caveat: Some of them are more knowledgeable than others. Should you speak with a representative who doesn’t sound confident or doesn’t answer your questions so that you are confident, ask for someone with more experience. Always request where each piece of information can be found in their literature or online so that you can refer back to it. Be prepared to take notes.
Yes, your flooring craftsman has information. Yes, the distributor has information, but the people who really know are the customer service rep’s at the company & when they don’t know, I get transferred to the tech people there. Do not be afraid to insist on getting the information you need to fully understand the product.
For each product, study the Safety Data Sheets & protect yourself & your family from chemicals & toxins in your home. And enjoy your beautiful wood floors!
STAY IN THE BUNGALOW KNOW!!!
Sign up for our newsletter & receive our FREE E-book, 7 VITAL Things to Do Before You Hire a Contractor.
 I consider historic bungalow wood floors to be the single most endangered historic fabric, well, maybe second to windows! As a tree-hugging, wood flooring professional, specializing in the restoration & preservation of historic floors, I’d like to pass on what I have learned in over 40 years in the trade. I’m starting here with HISTORIC BUNGALOW WOOD FLOORS 101- From the Forest to Your Floor, so that you will understand the value of your original wood flooring material that was gifted to us by the forest primeval.
“They’re not shiny enough.” “They’re the wrong color.” “I just bought my house & I want everything to be fresh & new.”
The value of this valuable material is often not understood & the poor floors often get attacked by a sanding machine at the hands of a person who doesn’t have a learner’s permit let alone a license to drive such a machine. (That’s a joke but there is training for the most conscientious craftsmen which saves floors & honors trees.) You can read about our viewpoint on when to sand here.
Let’s see what precious material, harvested over a century ago from the old-growth forests of our country, this wood actually is, that we may decide to treat it more gently.
 Your historic bungalow’s wood floor began as trees. It is a product of Mother Nature, gifted by her warmth & beauty, but also subject to her whims. Consequently, to fully understand & properly care for your floor, it helps to know a bit about your floor’s life from its conception.
The seed holds all the parts of the tree as well as the nutrients it needs to get started. Given the proper conditions, soil, water, temperature, it sprouts into a tiny seeding. After only a few weeks you will see a miniature tree, complete with leaves, needles, bark & wood.
Like everything else on earth, ancient trees sprang from the sea & like all other life, are dependent on water. The entire tree has evolved to move water to all its parts.
When we look at a historic bungalow wood floor, we see the tree’s trunk & branches. The trunk’s function is to support the tree’s limbs & to move water & nutrients from the roots to the leaves. As the tree grows taller & taller in its reach for the sun, allowing its leaves to photosynthesiz to make food for the tree, it expands in girth to increase its ability to support its increasing height. Each year the cambium (See the diagram below.) adds new layers of woody tissue which create the tree’s annual rings which you are very visible.
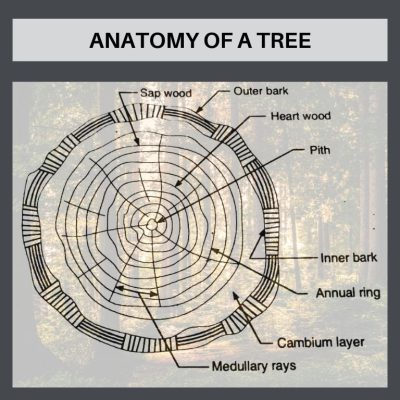 The bark covers the tree to protect it from pests & disease. Just under the bark is the layer called the cambium. It is made of growth tissue cells & these cells divide to increase the tree’s diameter.
The sap wood, on the outer edges of the tree is made up of the youngest layers of wood. Its cells carry moisture & nutrients- sugars, amino acids, vitamins, hormones, minerals & micro-nutrients from the tree’s roots to its leaves.
In an old tree which has lived many centuries, like the ones from which the lumber was cut to produce our bungalows, most of the trunk is dead. This wood, on the inside of the tree, is called heart wood. It has ceased transporting nourishment for the tree, & has become a repository for various chemical compounds. The heartwood is often much darker in color than the sapwood. The heartwood gives the tree support, but in some species, as the tree grows, it rots away leaving a hollow, living tree.
Heartwood tends to be more durable than sapwood. It is less subject to attack by certain insects & by stain & mold-producing fungi. This wood at the center of the tree, is usually more highly colored & therefore considered more ornamental. It is more highly prized for historic bungalow wood floors, than the white sapwood. Heartwood is also less permeable to liquid, containing more resin than the sapwood.
The meduliary rings are ribbons of cells running from the inside of the plant to the outside which carry nutrients & chemicals which fight invasion by insects & fungi, & block any damaged areas, out toward the surface of the tree. The pitch is found in the middle of the stems & roots of many plants which store & transports nutrients. It is the oldest part of the tree.
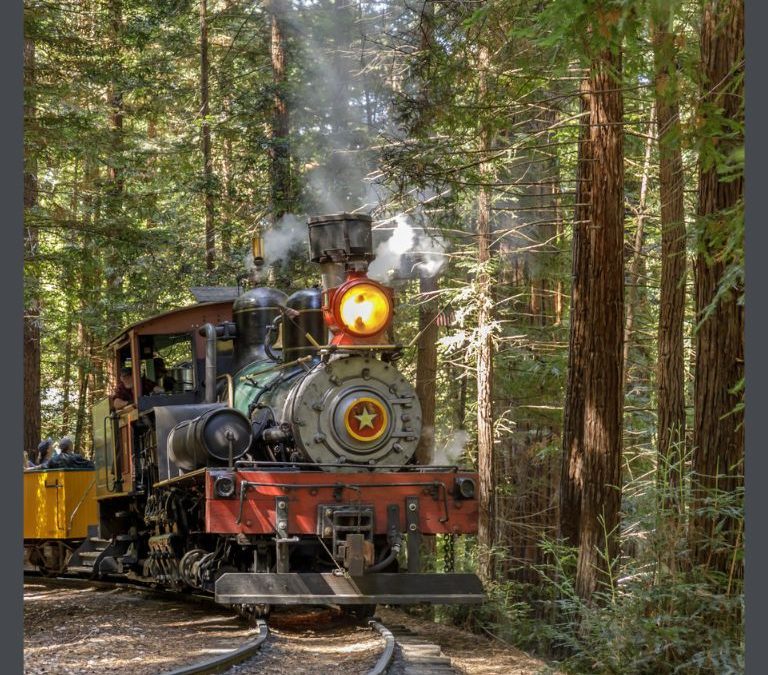
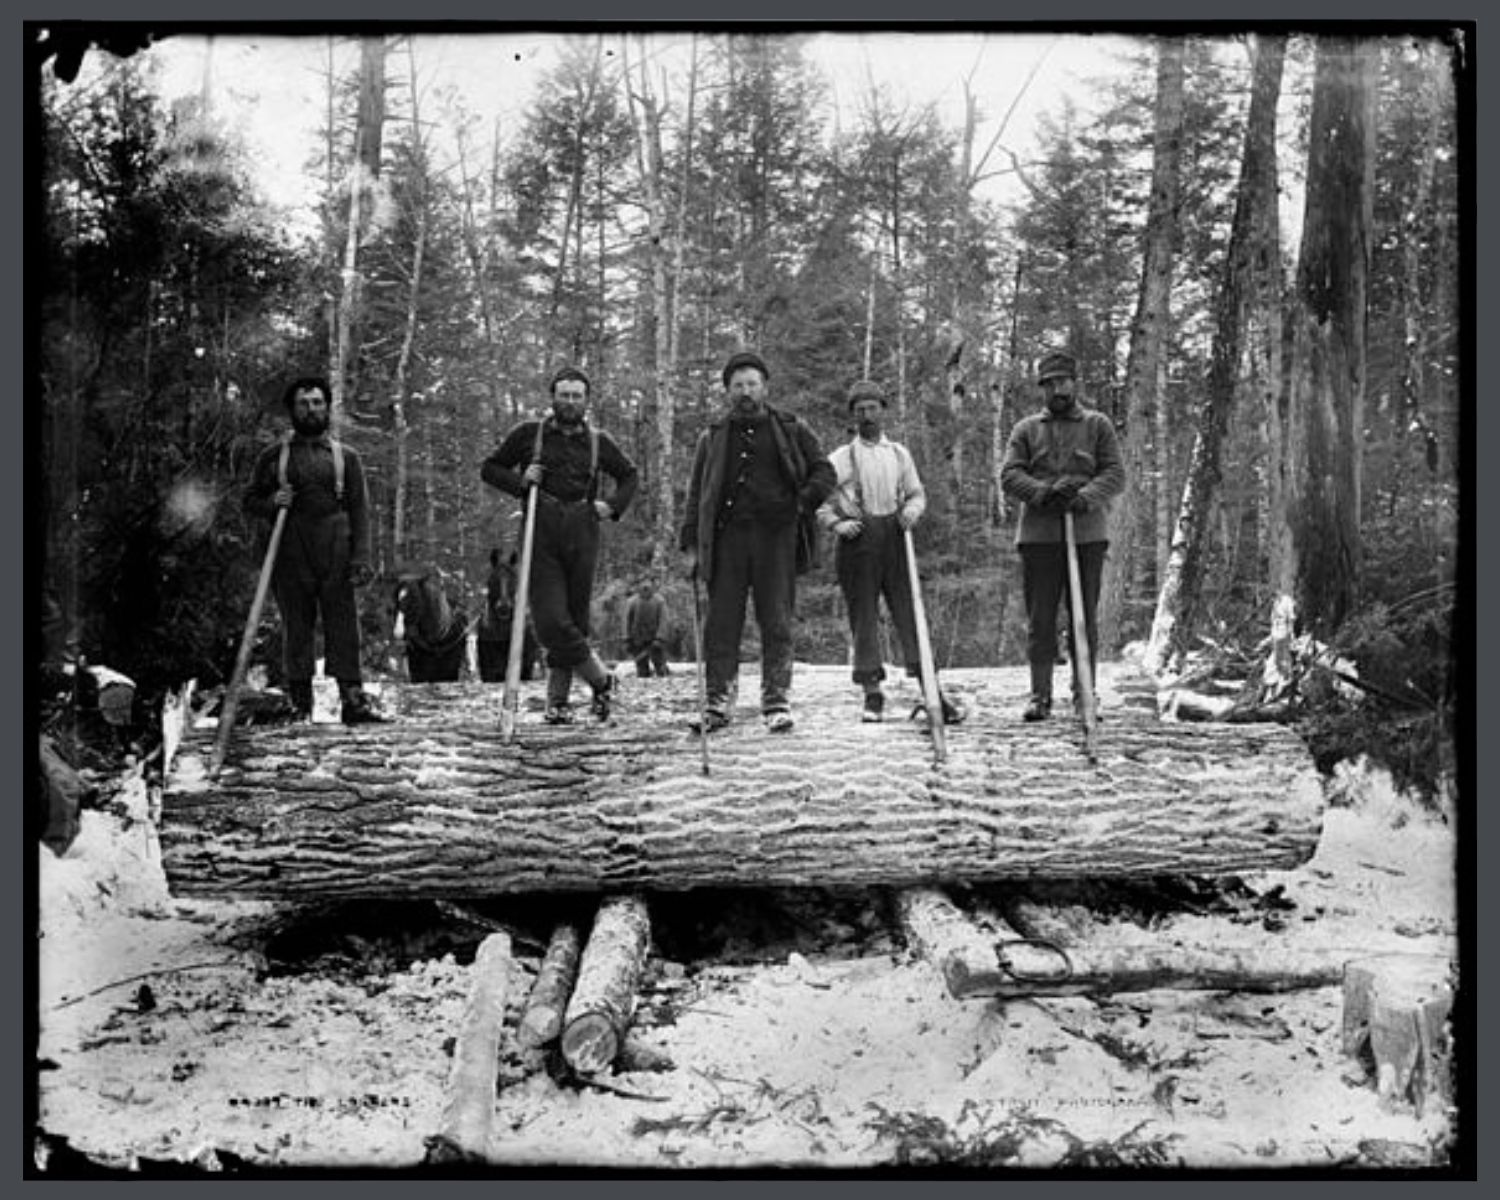
The intrepid men who logged our wood from the forest are long gone, but here’s a shout-out to their efforts in ensuring that we have our cozy little bungalows to live in for the next 100+ years. There’s a very cool group who graciously allowed me to use their photo. Click on over to read the fascinating history of logging here.
I ask you to remember the miracle of the forest. Honor those men & those trees by preserving your floors.
TIP: If you love wood floors, there’s plenty to learn about them here!
Sign up for our newsletter & receive our FREE E-book, 7 VITAL Things to Do Before You Hire a Contractor.