by Dennis Prieur, 40 year veteran of the wood flooring industry, writes about how to decide when to refinish the wood floors in your bungalow.
 Dennis was a 25 year member of the National Wood Flooring Association where he sent his craftsmen for certification & was himself an NWFA Certified Sales Consultant. Popular speaker at Historic Homes Workshop. Supporter of my preservation activities from writing the checks to drying the tears & celebrating the victories. All around wonderful person.
The first floor I ever refinished was in 1981. It was in a bungalow near downtown Phoenix. I went to the library and read books about how to refinish floors. The floor was maple, notoriously difficult to stain, but I didn’t know any of this and just sanded away with the equipment rented from Home Depot, using the stain and finishes I got from the paint store. I have a background in chemistry, which helped, but otherwise, I was just wingin’ it!
Since then, I have refinished or supervised the refinishing well over 1,000 historic floors. My aim was always to preserve and protect historic materials, beyond making pretty floors. The old growth forests are long gone and their beautiful wood will never be available again.
So here’s the important question- Do your wood floors really need refinishing?
THIS ARTICLE IS FULL OF TECHNICAL TERMS. PLEASE USE OUR GLOSSARY IF YOU RUN INTO ANY WORDS THAT ARE NEW OR UNFAMILIAR TO YOU.
The first thing I’d like to do is to help you establish if your floors should be sand and refinished, if they can be sanded, or if they should just be cleaned and left as-is. I will also discuss recoating as an option for floors in relatively good condition, or where further sanding is not possible.
MAYBE, MAYBE NOT!
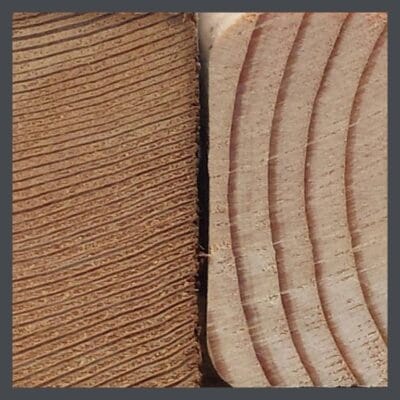 The original wood of bungalow floors is what is termed, old-growth wood. This wood is from the ancient forests that were here when our country was first settled. The forests were clear-cut to near extinction by the beginning of the 20th Century. Old-growth wood is denser, tends to be darker and is much richer in appearance than the wood that is harvested today. It is to be treasure and preserved.
Consequently, old-growth wood floors need to be sanded down to raw wood and refinished only when they are heavily worn, and the wear includes one of two factors. The first, is dents or deep gouges into the wood. If you aren’t sure, get on your knees and run a fingernail into the dent. If it catches, and seems more than 1/32”, it is a scratch into the wood and will only be removed by sanding the wood floors. Scratches that stay in the finish layer are generally 1/64” or less. A floor with this lesser type of surface scratches and abrasions, or where the sheen has worn off, can be recoated (described below) without a full sanding. The other factor, requiring a floor to be sanded, is where the finish has worn off in some or many areas and dirt is worn into the grain of the wood. Wood is a soft and porous material, so leaving it unprotected causes your bungalow wood floor to degrade with traffic.
A wood color change requires a full floor re-sanding (with one possible exception discussed in the recoating section below). However, wood floors in your bungalow (and houses built earlier) were traditionally finished to a natural wood color with no stain. Although it is possible to change the color and stain older floors, please consider that this color change will change the character of your home, and move you away from an original look. Additionally, it will shorten the life of your floor, buzzing away that beautiful, irreplaceable, old-growth wood.
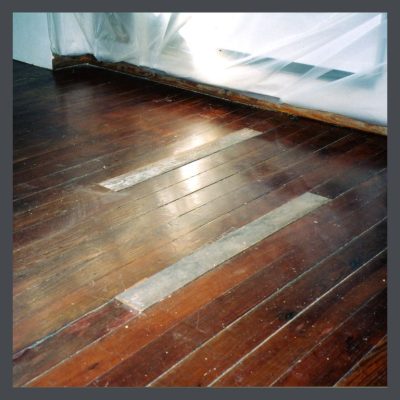
One time where a color change is often required, with older wood floors, is where there is significant wood discoloring due to water stains and pet urine stains. Water and urine stains are usually quite dark. The discolored boards need to be removed and replaced, if you want a natural color refinish. If there are just a few discolored areas, you may choose to live with these age marks. Bleaching isn’t a good solution. It lightens most stains, but doesn’t bring the wood back to the look of the rest of the floor. Also, bleach- no matter how carefully applied- will wick and spread past the discolored wood and lighten un-discolored boards. You end up with 3 shades- the look of the undamaged wood, the lightened boards that were discolored, and a thin band of bleached wood that separates these areas. Additionally, the boards’ integrity is already compromised by the damaging water and more so by pet stains which are usually quite acidic. Bleach or even hydrogen peroxide can further degrade the boards decreasing their strength. This is not such an issue when there’s a nice subfloor underneath, but you want to protect the boards of a floor that is laid directly over joists so that they remain strong & safe.
PATCHING YOUR BUNGALOW WOOD FLOOR
 Boards can be replaced so the patching is almost invisible. Ideally, this is done with salvaged, matching, old-growth wood flooring boards. This is best left to a professional who knows how to match wood color and grain. Red oak used to patch a white oak floor stands out badly. Newly harvested white oak used to patch a 100 year old floor also stands out and will be much lighter in color and usually coarser in grain. I commonly see the wrong wood species used to patch floors, and even boards of a wider or narrower width. All floor repairs should be done with tongue and groove flooring materials. When we patch an old white oak floor, and don’t have old salvaged flooring, we select and use only tight, straight grained pieces and stain them after installation for a better match to the historic wood floor.
The most important point is that on a floor with no subfloor, the new pieces need to be placed so that their ends nail to the joists. We have discovered boards or sections of boards hanging in air, waiting for the exactly placed heavy step or the new piano to cause them to fail. Old joists are usually at least 1 & ¾” wide. We end the repair halfway over a joist on both sides so it is supported well.
INSPECTING A BUNGALOW WOOD FLOOR
Here is what I do when I inspect a wood floor that a homeowner wants to refinish. I first notice whether the floors were installed directly over the floor joists, or over a subfloor that is nailed onto the joists. The easiest way to tell this from the floor surface is to look for the butt ends of boards. A floor nailed to the joists will generally have all board butt ends over the floor joists. Joists are normally 16” apart, but can be 2’ or even wider on very old floors. If you look across a floor and see that the butt joints line up in these spaced intervals, there is no subfloor. A wood floor over a wood subfloor will have randomly staggered butt ends, since all boards are laid over a layer of solid wood which creates stability.
Another way to tell whether you have a subfloor, is to go into the crawl space under your house and look up. A wood subfloor under your wood subfloor is normally laid at a 45 degree angle to the wood floor, but can occasionally be at a 180 degree angle. While under the house, see the direction of the floor boards nailed on the joists. If they are the same as the surface wood floor, and are the same width, you are seeing the bottom of the wood floor that has been installed directly on the joists. Subfloor boards were normally around 5 & ½” wide or occasionally wider. Finished wood flooring in older homes was most often 3” or less in width. Another way to tell, from the surface, is that a floor laid over the joists with no subfloor, almost always has much more movement and sag than a floor nailed to a separate subfloor. You also might notice cracks through which you can see daylight!
IS MY WOOD FLOOR TOO THIN TO SAND?
Next, I want to see how much wood remains from the surface of a board, down to the tongue and groove. Newly installed wood floors had around ¼” of wood to the tongue. A wood floor needs at least 1/8” between the surface and the top of the tongue to be sanded. (Some wood flooring professionals often can and will resand a floor that is slightly under 1/8”, but you will have to live with some defects.)
One way I determine this depth is to look for boards with gaps on the sides, wider than the thickness of a credit card. On my hands and knees, I slide a credit card down and measure with my thumbnail about how far down the card goes before it hits the tongue. I check several boards in different areas to get an average depth to the tongue. (If you get a depth over ¼” you may have a section that has no tongue and your card will go down to hit the sub floor.) Oak and other hardwood floors normally have a tongue and groove on all sides of the flooring boards, however, many older softwood floors (like pine or fir) do not have tongue and grooves on the butt joints, just on the two long sides.
It’s best to measure on the long edges of the boards. I will check butt ends if I find no other wide gaps. but know that if my card goes down almost ¾” that there is no tongue here and that there is no way to tell if the floor can be sanded from this spot.
If the thin section of wood above the tongue is thinner than 1/8”, it will often start to crack and split off when sanded, leaving a ¼” wide gap and exposing the tongue. These gaps can be filled if there is a subfloor, but this won’t look great and the filler usually won’t stay in well. If you have a floor laid over the floors with no subfloor, a floor is potentially dangerous when sanded too thin, and your foot may go through the boards.
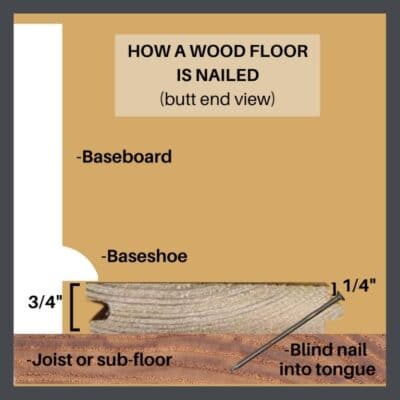 The second method to check wood thickness to determine if the floors can be re-sanded, is to look for exposed nails in the joint between two boards. All wood floors had a tongue and groove on the length of the boards and were generally “blind nailed” by positioning the nail at a slant and nailing on top of the tongue to secure it to the joist or the subfloor. (See diagram.)
When a floor has been sanded many times and there is 1/8” or less from the board surface to the top of the tongue, you will see some exposed nail heads between two boards. These nail holes must be between two boards for this to be a valid test of wood thickness. Here’s why- many older wood floors may have been top nailed to “handle” squeaks or loose boards. Also, in certain areas of the Western United States, old wood floors had no tongue and groove. They were top nailed. These nails are never at the edges of the boards, and you will see a regular, repeating pattern, if you have these floors.
If you do have some nails showing between the boards, a wood flooring professional may still determine your floor can be sanded. Sometimes, these nails can be set down and filled, which will be visible in the finished floor. If small finish nails were used to lay the floor, it looks better to leave them and just sand the floors. You will see these exposed nail heads, but the floors will still look great. I have sanded many floors where homeowners had previously been told they could not be sanded again, to great result. If I find that the floor is borderline to resand (less than 1/8” wood remaining above the tongue and groove) I discuss the options. Usually a refinish can be done that will make the floors look amazing, even if some age related blemishes exist. However, some floors cannot be resanded. I always let a homeowner know what I think can be done, and what he can expect to achieve.
RECOATING YOUR BUNGALOW WOOD FLOOR
 This is a good option for any wood floor that isn’t too badly worn. A recoat allows the finish coats to be renewed for a great improvement in appearance. It works well for a floor that is too thin to be resanded but can be aesthetically improved and be better protected by a recoat. One to two coats are all that is ever needed.
The wood floor must be properly prepared before any coats are done. This is normally done using a light duty stripper designed to remove wax, oils, and other household cleaning products that may have been applied to the floor. Follow the recommendations of your selected finish manufacturer for how to do this, and what product to use. If this step is omitted, the finish often will adhere poorly to the old finish, and either peel off or scratch easily. Once you have a peeling recoat, a full resanding is normally the only solution.
After any cleaning and prep work are done, the floors are normally lightly sanded using a floor buffer and a sanding screen, clog-resistant nylon discs in 80-120 grit. Always follow the grain and direction of the floorboards. The floor is then vacuumed and tacked down well, and is ready for your recoat.
Apply the 1-2 coats per manufacturer instructions for the finish you are using. Also, follow dry time and abrasion instructions if a second coat is planned, and to determine when you can walk on and use the floors.
A recoat doesn’t remove anything in the wood, so you will see any dents, deep scratches, and discoloration on the floor after the recoat is done. If your floor is too thin to sand, a recoat will always improve the appearance, but may not be satisfactory for a badly worn floor that could have been sanded.
CHANGING THE COLOR WITHOUT RE-SANDING
An American Company, Basic Coatings, has developed a product called HyperTone stain. These are water-based floor finishes with tint added, in 14 different colors. They are designed to be used as undercoats followed by 2 coats of their Professional Street Shoe water-based finish. Tricky to use, they can give a blotchy look, but when done correctly, change the color of a floor and look great. Their main drawback is that they will cover up some of the grain and color variation of your original bungalow floors, which is why I recommend these only for a floor that is too thin to resand. But what I most recommend is to leave your floors stain free.
OTHER OPTIONS
Bob Yapp of Belevedere School offers other options. I’m going to let him tell you about them. Bob is a giant in the world of historic preservation & if you want to learn how to restore your own floors, he will teach you!
REFINISHING YOUR BUNGALOW FLOORS: SUMMARY
 Original wood floors were milled from trees from our old-growth forests. They have a luminous and lively appearance that is not present in wood that is farmed, harvested and milled today. The old trees were often hundreds of years old when they were cut. Grown naturally, they may show as many as 10 times the number of growth rings per inch. In addition to being more beautiful, this wood is more dense and more pest and decay resistant and also shows greater stability, meaning that tt is less likely to warp.
The purpose of finish is to preserve the wood, a soft and porous material underneath. We urge you to forgo sanding if your floor has a good, protective coat on it. If it is showing little wear, we encourage recoating rather than re-finishing. Once your floor is ground down to the tongue and groove, it is effectively over, especially if you have no subfloor to support weight on the thin boards.
A floor that is properly cared for will last several hundred years. The old growth forest will never come again. The supply of wood from them is finite. Let’s protect what we have.
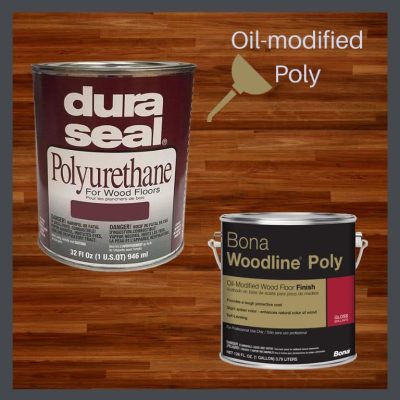
TIP: READ OUR ARTICLE ABOUT WOOD FLOORING FINISH CHOICES HERE.
 STAY IN THE BUNGALOW KNOW!!!
Sign up for our newsletter & receive our FREE E-book, 7 VITAL Things to Do Before You Hire a Contractor.

It is truly amazing to me that my bungalow that was built shortly after I was born is now almost historic. I know nothing about types of wood or anything else I just know what I LIKE. And I like my floors but they are warn and with some insect damage. Its really nice to know that there is a solution to rejuvenating my floors without having to replace them completely
Gracious, your floors are far away from needing replacement! WEll cared for, they will never need replacement.
And, we’re all historic.