by bungalow101 | May 3, 2024 | ALL AROUND, Preservation groups
 If you build it, they might come or they might not. If you market it wisely, they will.
The first thing that you’ll need to do is meet with the association board & tell them your plans. You’re going to need their backup. You can copy the activitie’s list & see which ones interest the board members. I would be very surprised if you were to be greeted by anything other than enthusiasm. Non-profit boards are always thrilled for volunteers to step up, not just with ideas, but with plans of action.
The key to marketing is understanding the needs of the neighborhood. Ask the board if you can use their communication lines to survey the neighborhood about their preservation interests & needs. You would be wise to also find out what their general needs are as far as their living environment is concerned. Many things that they find desirable are to be had in the preservation of historic buildings, which they may not have considered.
If you have no survey & don’t really know what people’s interests are, just start! Pick an activity from my public events list & promote it. Keep got track of what type of events pull & which do not. This tracking is its own survey!
After you get communication going, you are going to run into one or more people (perhaps someone on the board!) who share your passion for saving our built heritage. Set up a one-on-one meeting with them & see what their thoughts are. Send them links to these articles & get them onboard with helping you implement an activity or two. It’s a way more fun game to play with a friend! Your attendees will become your committee members.
HERE’S HOW TO PROMOTE YOUR COMMITTEE’S ACTIVITIES
 Create your promotional messages based on what you find in your surveys. Let’s imagine that people say they want community, let them know how history builds community. If they want a beautiful, well-maintained neighborhood, talk about that aspect. High real estate values, ditto. There are so many benefits in preservation, but some are wa-a-ay more important than others.
1. On your association’s email blasts. Generally these are sent to all on their mailing list, both members & non-members.
If they should have a print newsletter for members, ask if you can create an “ad” for your event.
2. Posting on the association’s Facebook page. My posts can be shared, including those about building a neighborhood group.
Whoever runs the association page can set up a notice for any meeting or presentation as an event where it will be shown many more times than just a regular post.
3. If your association will allow it, create a Facebook page for the committee. Post about committee activities & share information about preservation from other sites.
Join several FB, old house group pages as well as group history pages for your area. When you have events, or want to share some special news, share your posts to these group pages. This will greatly amplify your exposure.
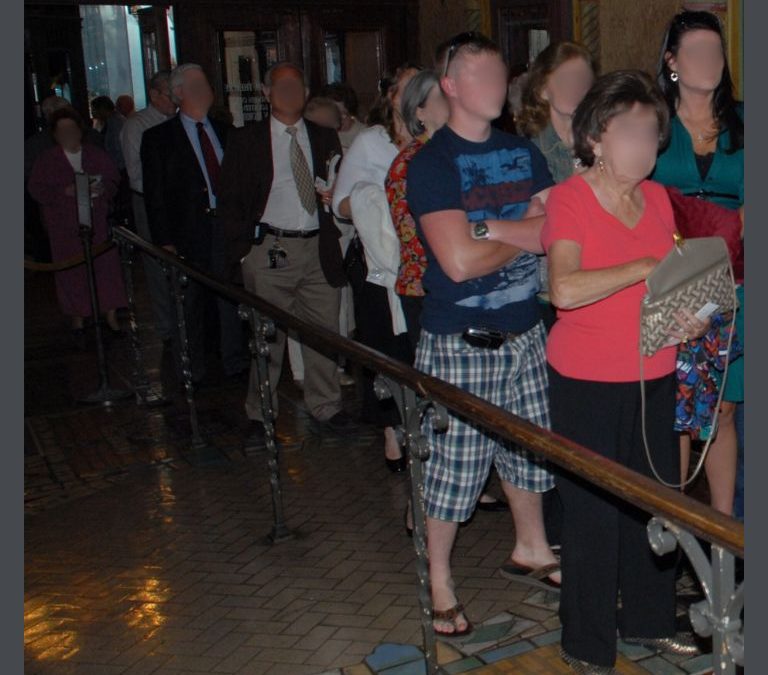
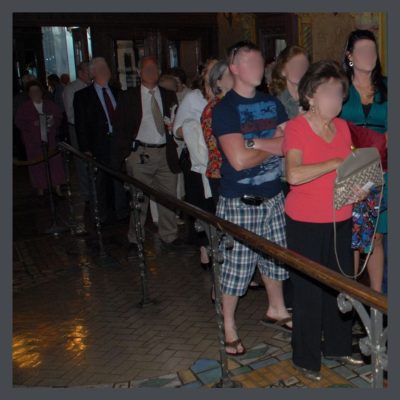
Take pictures at your events & post those afterward, along with attendees’ rave comments. Make sure you have ok from people to post their photos or blur the faces.
4. There are many sites online where you can post events. I recommend studying their individual terms of service before you sign up for them.
Print media is floundering but there are many still alive & there are also online newspapers. Submit press releases to all of these. Here’s a good write-up on how to do that. From this you can build a list of journalists who are interested in preservation. It is helpful to built good relationships with them.
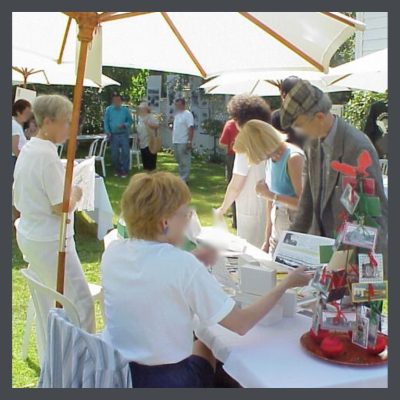
5. Discuss with the board the idea of the preservation committee having a visible presence at all association events such as general meetings, events & social gatherings. I would suggest that you use a card table with an antique table cloth that you would sit beside, with a large, pretty flower arrangement on it, with fliers for the next committee activity. You might want to create a flier for the committee which promotes some of its activities.
You are going to want to create a sign-up list for people who are interested in the committee. Speak with your association board about ownership of these names & addresses. Ideally, you can have your own list to which you can mail as a group, & you also want to be able to connect individually with the more interested people.
You also want to have a list for people who attend your events. Some of them will not be residents of the neighborhood & will have no interest in the association’s other activities. You will want to have your own list of committee members. Get these lists & what you want to send to them, sorted out with the board.
6. Trotting door-to-door with fliers ( 2 up on 81/2″ X 11″) that you stick in people’s doors. This is a really good way to generate interest because you’ll see neighbors when you’re out & about & you can chat them up about the new historic preservation committee. You’ll promote the event, but you’ll also encourage them to participate on the committee. You can do this too with the committee meeting fliers. It’s great exercise!
7. Generally there will be businesses that line the commercial boulevards of a neighborhood. Ask the businesses if you can post a mini-poster (11″ X 17″) in the window or somewhere in their store. (If you are so unfortunate as to a couple have less wholesome businesses, I’d recommend that you skip those.) I always took a roll of tape with me so that I could attach it myself, or provide tape for the proprietor to attach it. Extend a warm personal invitation for them to attend the event, & express your heartfelt thanks.
It’s also a good idea to promote in all the historic neighborhoods in your city. We cruised all over the county putting up our fliers. And we drew people from allover too!
8. If you are partnering with another organization, even going on a field trip, encourage them to promote to their public. Let them know about all the ways that you will be promoting them!
Take photos at these outings. Send the venues the photos so they can post on their FB pages. (Make sure you have ok to post anyone that you have in your shots, or blur faces.)
 One of the things that I love the most about preservation advocacy, is that it provides opportunities for personal contact & allows people to contribute to the neighborhood in a positive way that is not taxing for them. Many of the businesses are struggling & they will be very pleased to be able to help, even in a small way. It is a continuous exercise in community building in our extremely disconnected world.
You may run into some rude & grumpy folks. Keep smiling. Remember that you do not know their story. I always had 2 goals when I hit the streets- to promote the committee & to brighten people’s lives. You never know whose cat died that morning.
You represent the association, the committee & our built heritage with everything you do & say. Be the bright spot in everybody’s day, grow your group & make the world a kinder, more beautiful place.
9. Suggest to the neighborhood board that they host an event every year that validates their volunteers. It could be just a segment of a regularly occurring event, or a complete program, but please ensure that your committee volunteers get a public shout-out. A follow-up article in the newsletter is also appreciated. Volunteers work because they believe in the cause & because it’s fun. Preservation volunteers work even when it’s not fun, (Damn the cursed wrecking ball!) but we always enjoy the fellowship & a pat on the back is always appreciated.

10. Track your marketing & attendance. If a particular program doesn’t draw, take a look at the marketing. If it was well-marketed, you might not want to present that particular topic again, or, perhaps you could repackage it.
Persist. Building anything worthwhile takes a great deal of intelligent planning, hard work & willingness to admit that your most brilliant idea was a bust. They won’t all be. I promise you many wins & grand successes.
READ THESE ARTICLES TO FIND OUT HOW TO DO IT!
NEIGHBORHOOD HISTORIC PRESERVATION COMMITTEES- BUILDING COMMUNITY
BASIC HISTORIC PRESERVATION GLOSSARY OF TERMS
NEIGHBORHOOD PRESERVATION COMMITTEE MEMBERSHIP ACTIVITIES
PUBLIC EVENTS THAT CAN BE PRODUCED BY YOUR HISTORIC PRESERVATION COMMITTEE
MAKING YOUR NEIGHBORHOOD PRESERVATION COMMITTEE WELL KNOWN
AGENDA FOR YOUR FIRST NEIGHBORHOOD PRESERVATION COMMITTEE MEETING
WHAT IS A HISTORIC DESIGNATION, ANYWAY?
 STAY IN THE BUNGALOW KNOW!!!
Sign up for our newsletter & receive our FREE E-book, 7 VITAL Things to Do Before You Hire a Contractor.

by bungalow101 | May 1, 2024 | ALL AROUND, Preservation groups
 The association has sent out notices of the meeting; you have trotted about the neighborhood, sticking fliers in the doors of all the residents & posters in the windows of all the businesses; you have communicated on an individual basis with everyone you know, inviting them to come, urging them to tell others, & you have a few RSVP’s.
You have watched the video that you will show at the first meeting several times & you have worked out the important points are. You will discuss these points in your first meeting.
You have reviewed the glossary & have gotten any questions about any of the terms answered. You feel like you have some familiarity with all of them.
You have figured out where to seat everyone, put out some lemonade & snacks & have the T.V. connected to YouTube. You have created your sign-in sheet (Name, phone # & email address) & gathered a couple pens, & set them out where they are easy to see. I’m a big fan of name tags. When you are trying to learn the name of more than one person (or heck, even one!) it is handy to have a visual aid. Simple mailing labels will do fine.
HERE’S YOUR AGENDA
1. Greeting & welcome. What do you do when the people arrive? Ask each person to write his/her/their name on the tag & the style of house in which they live. Request that they sign in.
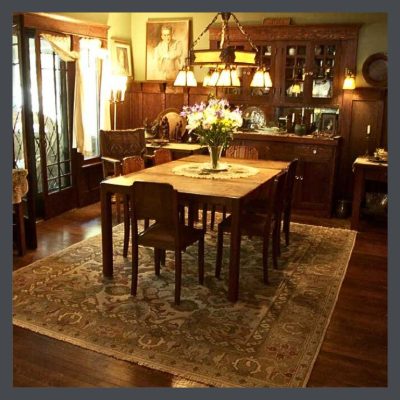
We have always started with a brief tour of the host’s house. (I’m going to assume that you are the host for the first meeting.) Take them through the architectural features important to the period, the restoration you have done, & tell them about any house history you have uncovered. Invite them into the room where the meeting will be held & point them to the snacks. We often sat at the host’s dining table. It is a cozy & intimate space & allows everyone to speak & be heard by everyone.
2. Introductions. When the last stragglers have arrived, go around the table for introductions. Start with yourself, stating your interest in preservation, & any training or experience you might have. Ask each one in turn about their interests. (Be on the lookout for people with experience & follow up personally with them. They may be your new best friend!) Ask how they wish to benefit from being part of a preservation committee. What do they want to learn? How do they wish to contribute? Take notes. This is important!
 3. The video. Introduce this video. The speaker, Rhonda Sincavage works with The National Trust for Historic Preservation, a privately funded, nonprofit organization, that has led the movement to save America’s historic places for over 70 years.
Play the video. Go through the points that you have noted as important & ask for discussion. Ask if there is anything that she mentioned that they would like to know more about.
4. Intro to The Secretary’s Standards & Guildelines. The U.S. Department of the Interior protects & manages our country’s natural resources & cultural heritage, providing scientific & other information about those resources. A body of information, researched & formulated by top preservationists, The Secretary of the Interior’s Standards for the Treatment of Historic Properties, was written to provide guidance to historic building owners & building managers, preservation consultants, architects & contractors prior to beginning work.
Tell the group that this is the basis of historic preservation in the United States. We are going to learn more about it, & how it is applied next week.
5. More Q&A time. Ask if anyone has any questions or comments. Invite them to stick around to munch & chat. This gently adjourns the meeting, while encouraging people to stick around.
Let me know if you should have any questions about what to do so far.
READ THESE ARTICLES TO LEARN MORE!
NEIGHBORHOOD HISTORIC PRESERVATION COMMITTEES- BUILDING COMMUNITY
BASIC HISTORIC PRESERVATION GLOSSARY OF TERMS
NEIGHBORHOOD PRESERVATION COMMITTEE MEMBERSHIP ACTIVITIES
PUBLIC EVENTS THAT CAN BE PRODUCED BY YOUR HISTORIC PRESERVATION COMMITTEE
MAKING YOUR NEIGHBORHOOD PRESERVATION COMMITTEE WELL KNOWN
WHAT IS A HISTORIC DESIGNATION, ANYWAY?
STAY IN THE BUNGALOW KNOW!!!
Sign up for our newsletter & receive our FREE E-book, 7 VITAL Things to Do Before You Hire a Contractor.
by bungalow101 | Apr 10, 2024 | ALL AROUND, Preservation groups, Uncategorized
NOTE: This is not an article about the benefits nor the drawbacks of historic designations. This is just information about what they are. I have included many links in case you would like to know more.
 First, let’s look at a common misconception about historical societies. Historical societies traditionally are 501 (c)(3)’s, non-profit, charitable organizations, dedicated to collecting, preserving, interpreting, & promoting the history of a city or sometimes a neighborhood, in photographs, documents, artifacts & recordings. They focus on research, education & creating awareness of the cultural & architectural history of the area. They generally host educational events, lectures, workshops, tours & exhibitions which display their archived materials & teach the community about the culture of bygone years. They offer these materials to academics & the public for research. Many societies own & run museums.
They have nothing to do with establishing historic districts, other than providing materials for research & sometimes, provide advice as to the process. They do not make rules or statutes. They do not participate in enforcing rules or statutes. This is done by governing bodies.
For example, The Eagle Rock Valley Historical Society was very helpful in my research to have the Hare House designated. They had archived material about the house, the family & the neighborhood that was very useful.
CRITERIA FOR HISTORIC DESIGNATION
- To be designated at any level, a structure or area, must be associated with events that have greatly contributed to the history of a city, state or to our nation.
- Have some association with a person who is significant in the history of a city, state or our nation.
- Display the characteristics of a particular type, period, or method of construction. A great example of this is bungalows! The structure might be the work of a master, or it might possess highly artistic values.
- If you were to study this structure or group of structures, it would show you information important in prehistory or history.
A building or group of buildings, would need to possess one or more of these attributes in order to be considered for inclusion.
 The basis of historic preservation in the United States is The Secretary of the Interior’s Standards for the Treatment of Historic Properties with Guidelines for Preserving, Rehabilitating, Restoring & Reconstructing Historic Buildings, (Each explained in the PRESERVATION GLOSSARY here.) which provides guidance to historic building owners & building managers, preservation consultants, architects, contractors, & project reviewers prior to beginning work. It explains how to repair & maintain historic materials & provides the basis for many design guidelines in many cities. The basic philosophy of The Standards is best expressed in the definition of rehabilitation – “the process of returning a property to a state of utility through repair or alteration which makes possible an efficient contemporary use while preserving those portions & features of the property which are significant to its historic, architectural & cultural values.” It encourages & provides technical data for respecting the original character of each historic structure, while allowing for updating for functionality & safety.
It is this original character, (See character-defining features in the glossary.) either from the period or sensitively repaired or reconstructed, of a single structure, site object or of an area, which forms the criteria for designation.
A SINGLE STRUCTURE DESIGNATION
A house, a church, a public building, a site or an object such as a fountain or a bridge, can be designated as historic based on its significance in history, its relationship to an important figure in history, or its architecture. The Hare House was awarded Los Angeles & California landmark statuses because the Hare’s contributed greatly to the local community & were active in other areas of the state & because the style of the house contributed to the bungalow character of the neighborhood.
HISTORIC DISTRICTS
 There are several types of historic districts. One thing that it is not is a historic neighborhood. A historic neighborhood is area in which there are many older houses. To be considered a historic district, the neighborhood must be designated as such by a governing body at some level.
A historic district is an area which has a significant concentration of sites, buildings, structures, or objects, urban or rural, that are united by period (or periods) or style (or styles) or important events. Based on these factors, it has been designated as such by a city, state or federal body (or all of them!) as historic.
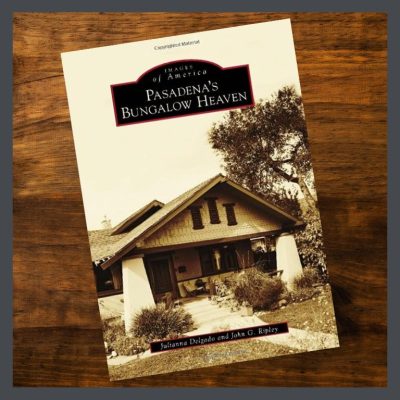
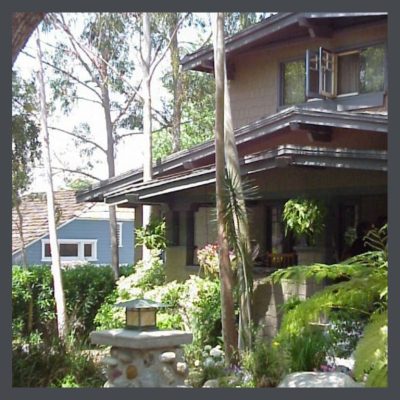
One of the most well-known areas so designated is Bungalow Heaven in Pasadena, California. It is a charming area filled with bungalows of every style, shape & size that draws visitors from all over the United States to its annual home tour.
LEVELS OF HISTORIC DESIGNATION
LOCAL (City)
This level, through the means of a preservation ordinance, provides properties with a degree of protection from unnecessary demolition or alterations (generally only exterior) that damage or destroy the character of the building. A guideline for a particular area is written specifically for the history & individual architectural styles of that area, based on the Secretary’s Standards.
Many cities have individual guidelines for each neighborhood that are tailored to the design features of that area. These guidelines are very educational, generally covering building anatomy, basic construction & clear descriptions & photos of the different styles found in the neighborhood.
Historic preservation staff or boards, made of citizens, conduct reviews of proposed changes to locally designated properties.
STATE
Though differing from state-to-state, listing here triggers limited regulatory protection from state government actions. Many states offer state funding, tax benefits, or other incentives. The owners of the Hare house, on the California register, enjoy a sizeable break on their state property taxes. Additionally, if any repairs are made, in most states, the local building inspector must grant code alternatives provided under the State Historic Building Code. I am not even going to try to explain what that is because it varies from state to state. Follow this link to see what the National Park Service says about building & safety codes.
NATIONAL DESIGNATION
 These structures, sites, objects or areas which must be a minimum of 50 years old, have a strong association with a significant event or events in the history of our country, not just a section of the country; have an association with & tell the story of a person or group of persons who strongly affected that history; are an outstanding example of a type of structure or group of structures; & hold lessons about our nation’s history that can be learned through the study of the structures or districts.
The National Park Service, in the U.S. Department of the Interior, manage 2 programs. The first is the National Historic Landmarks (NHL) Program. The second is listing on the National Register of Historic Places (NR.)
Something that heartbroken neighborhoods have realized only after they have lost properties to development, is that neither NHL nor NR designations affect what private owners can do with their property. Both do offer protections in the event that federal government work threatens a place, for example, the destruction of whole neighborhoods to make way for the building of a federal highway. They also offer preservation funds & federal historic tax credits that can help offset the costs of rehabilitation. You would need to contact them to see if you might qualify.
Please let me know if there is anything more you want to know about historic districts!
READ MORE ABOUT NEIGHBORHOOD PRESERVATION COMMITTEES!
NEIGHBORHOOD HISTORIC PRESERVATION COMMITTEES- BUILDING COMMUNITY
BASIC HISTORIC PRESERVATION GLOSSARY OF TERMS
NEIGHBORHOOD PRESERVATION COMMITTEE MEMBERSHIP ACTIVITIES
PUBLIC EVENTS THAT CAN BE PRODUCED BY YOUR HISTORIC PRESERVATION COMMITTEE
MAKING YOUR NEIGHBORHOOD PRESERVATION COMMITTEE WELL KNOWN
AGENDA FOR YOUR FIRST NEIGHBORHOOD PRESERVATION COMMITTEE MEETING
STAY IN THE BUNGALOW KNOW!!!
Sign up for our newsletter & receive our FREE E-book, 7 VITAL Things to Do Before You Hire a Contractor.
by bungalow101 | Apr 2, 2024 | ALL AROUND, Preservation groups
 Leading a preservation committee presents the same challenges as leading any activity. To be successful at it, you need to take a look at what might motivate someone to work a 40+ hours a week job, to care for a home & a family & then to go “work” in a volunteer position in their rare & precious free moments. While their friends are enjoying the festivities!
The prime motivator for anyone to perform any activity is purpose, the impact we want to have on the world. For example, my own purpose is twofold. I love local history & culture. In my free time, I visit museums, old house museums, research & write my blog. My first strong purpose is to better understand & preserve our built environment. My second, stronger now that I am approaching my 80’s, is to encourage & guide others in effectively participating in these activities.
The next most powerful reason to go traipsing off to a meeting when others are nestled comfortably in front of their TV’s, is to find fellowship with those who share our passions & purposes. I consider preservationists to be my peeps. When I moved from L.A. to Tampa, the head of my neighborhood preservation committee became my instant best friend. We did not need time to get acquainted, we just knew each other.
The key to leading a preservation committee is to fulfill these wants. Provide direction toward achieving purpose & the fellowship will follow.
MY EXPERIENCES
 I was fortunate to have served under some inspiring leaders. Here’s what I learned from them.
1. Have a clear statement of purpose or purposes that inspires action.
My first venture in neighborhood preservation was participating in a home tour committee. The purpose of this committee was to display our beautiful, historic residential areas, hidden behind our blighted commercial corridors. We wanted to eradicate the blight. We wanted the world to love our beautiful neighborhood as much as we did.
I’m going to use this home tour committee as an example because there were several well-defined tasks & positions.
BREAKING IT DOWN
We knew what we wanted the committee to accomplish & we formulated a plan of how to do this- host a lovely tour like neighboring Bungalow Heaven in Pasadena. They were famous!
We broke down the tour purpose into its parts. We wanted:
1. Beautiful houses to show who we really were.
2. The houses to look their best.
3. Attendees to have a delightful & educational experience.
4. Attendance is huge!!!!!!!!!!
5. A nice brochure that described each house & its history & an accurate map.
6. Marketing materials that presented our neighborhood in its best light.
WHO’S WHO IN THE ZOO
 We knew what we wanted to accomplish. The next was to delineate the tasks & then assign single people or subcommittees for each task, ensuring that they knew the purpose of the subcommittee & how it contributed to the allover purpose.
From knowing our purposes & copying Bungalow Heaven’s wonderful tour, we were able to see what the pieces of the home tour were that formed the whole picture & what actions were required to be done to create each piece. This guided the setting up of the structure of our committee.
Here’s are the some of positions that we had, based on what we wanted to achieve:
Chair– Oversees the committee & ensures tasks are being completed. Runs the meetings according to the agenda.
Secretary– Creates the weekly agenda. (More on that later.) Takes minutes during meetings & sends to each member.
Organizer– Creates the timeline, the training materials for each position, ensures that everyone knows what they are doing & is having a good time.
Volunteer coordinator– Builds the committee. With Chair, assigns tasks.
Treasurer– Handles income & outgoing as directed by the Chair, in coordination with the board Treasurer.
PR. & marketing– Makes to tour committee well known, attracting active members. Creates huge interest in the event through the use of compelling marketing materials.
I’m going to stop here. We had other positions, but this should give you an idea.
RUNNING THE ZOO
A well-run zoo requires each person knowing where they fit. When we first started, we were a small group & many people held many positions. What made our tour a success was that each task/position was well-defined as to purpose. The steps of how to achieve that purpose were clearly described, in sequence. Each team member knew where their tasks fit into the allover timeline.
People volunteered for things with which they were familiar & had some expertise. Our Chair had worked in the Bungalow Heaven tour for several years & had an allover idea of how a tour should go. Our Treasurer was a bookkeeper by vocation. Our P.R. was a trained, pro P.R. Our Volunteer Coordinator had headed many successful non-profits. Our Organizer, me, had run a construction business for years, creating business plans, writing training materials, etc. Our Secretary was new to the task so I created a template for her by which she could easily track the meeting.
Everyone knew what they were supposed to do & had guidelines for how to do it. If someone needed help, such as more information or more hands, they asked for it. Otherwise, we stayed in our own lanes & met every other week to co-ordinate.
PRIDE OF OWNERSHIP
This is the key to good leadership- giving someone a well-defined task & letting them run with it. In a volunteer organization, nobody is there for the paycheck. They are there because they believe strongly in the purpose of the activity. Occasionally leadership will have to step in, but I have seen this occur only once in any group I’ve been involved with, where the help was not requested. (We had a rogue member who surprised us a couple times with some wild shenanigans.)
Giving someone a task & not letting them complete it, leads to heartbreak. It is tempting to want everything done exactly, as you would do it, & decide to leap in. Be warned that it will weaken your team & loose you willing team members if you do not allow them to contribute. Delineate the task & hand it over.
If a volunteer on your team is doing a bad job, have a chat with them & see what the problem is. Otherwise, occasionally inquire if anyone might like some help or assistance, & if not, allow them to proceed.
A related subject to this is showing appreciation for work well done. I made sure that my team’s contributions were acknowledged whenever possible- in event programs, in association newsletters, on the website, at every committee meeting, at neighborhood association meetings. I was impressed by & grateful for the wisdom & assistance that I received from everyone & made sure that they & the world knew it at every opportunity.
APPLYING THIS TO A PRESERVATION COMMITTEE
Begin by deciding what the purpose of your committee is. Take a look at my lists of activities & choose which ones might help you accomplish that purpose. Work out the steps you need to take to do that activity. My almost complete manual on producing a historic homes workshop might give you guidance also. You could even just follow the bouncing ball & go ahead & produce a workshop! Contact me & I’ll send you a pdf of the manual. If you don’t want to start off such a huge endeavor, hosting a film night might be a good first event. Try it! If you need any help, let me know.
READ THESE ARTICLES TO LEARN HOW TO START & RUN A SUCCESSFUL PRESERVATION COMMITTEE
NEIGHBORHOOD PRESERVATION COMMITTEES- BUILDING COMMUNITIES
NEIGHBORHOOD PRESERVATION COMMITTEE MEMBERSHIP ACTIVITIES
PUBLIC EVENTS THAT CAN BE PRODUCED BY YOUR NEIGHBORHOOD PRESERVATION COMMITTEE
MAKING YOUR NEIGHBORHOOD HISTORIC PRESERVATION COMMITTEE WELL KNOWN
AGENDA FOR YOUR FIRST NEIGHBORHOOD PRESERVATION COMMITTEE MEETING
BASIC HISTORIC PRESERVATION GLOSSARY OF TERMS
WHAT IS A HISTORIC DESIGNATION, ANYWAY?
STAY IN THE BUNGALOW KNOW!!!
Sign up for our newsletter & receive our FREE E-book, 7 VITAL Things to Do Before You Hire a Contractor.
by bungalow101 | Mar 7, 2024 | INSIDE, Wood floors
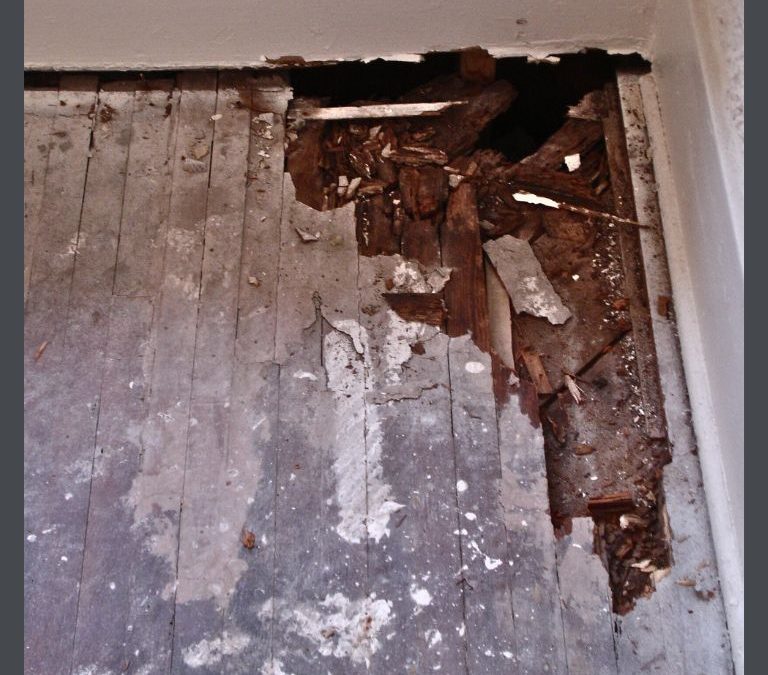
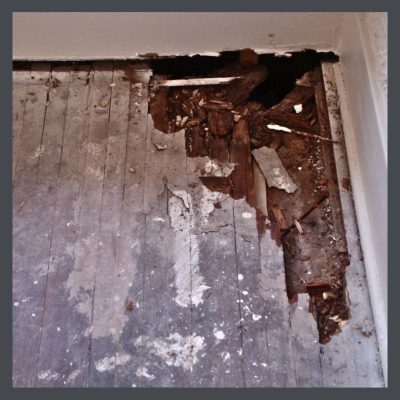 Wood flooring is a major, character-defining feature in a bungalow & I vigorously encourage their restoration. However sometimes, they are so worn or damaged that it requires installing new wood flooring in your old house to provide a surface that provides sufficient safety & functionality. Fortunately, more often, they require only patching. This article is about the types of materials available which you would choose for patching or replacement.
One of my followers is preparing to replace her floors so I have been answering many questions for her, which is what prompted this article, putting together all the pieces.
Here are the basics, in more detail than I have provided in the glossary. I will link to the wood flooring glossary when using terms that are covered there. It’s a really long article, so stay with me!
I write for you (& for my younger self, desperate to learn all these things to do right by my house) so any questions that you might have, I want them! If I have been unclear or omitted needed information, please let me know!
THE BASICS OF INSTALLING NEW WOOD FLOORING IN YOUR OLD HOUSE
Wood flooring products are referred to as tongue & groove, or T&G because protruding tongue is cut in one side of the board & a groove is cut in the other at the mill, allowing the pieces to be fit together closely when installed. This was done so nails could be hammered into the tongue & hidden from view by the groove. Before the advent of T & G flooring, boards were nailed from the top and these nails were visible.
In unfinished wood, the area above the groove, the top or wear layer, is ¼” thick. If you purchase salvaged wood, you need to ensure that the top layer is at least 3/16″ thick.
HARD & SOFT WOODS
Woods are categorized as hard or soft woods. The hardness of a wood is determined by its ability to resist indentation. Hardwood comes from broad leaved trees such as oak, ash, cherry, maple & poplar. Softwoods come from conifers, such as pine, fir, or spruce. To learn more about the hardness of woods, read this article by the National Wood Flooring Association here. You’ll see that there is great variation amongst the resistance of each category.
In many bungalows more than one species is used, either in patterns or in different rooms. Often the public areas were a more expensive hardwood & the private were a locally sourced softwood.
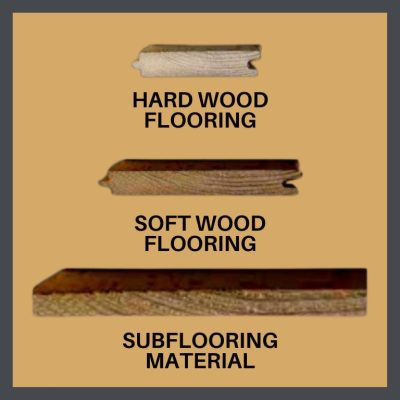 The wood found in most bungalows is called strip flooring. Hardwoods are mostly 2 ¼” wide by ¾” thick. Softwoods can be wider, usually 3 1/4″.
LENGTHS OF FLOORING
Wood can be purchased in different lengths, with each gradation being more costly. Often, the boards used in public areas were longer than those used in private areas. However, in homes which have hardwood flooring such as oak in the public areas, with pine or fir (softwoods) floors in the private areas, the softwood floors were always longer in length than those of hardwood floors.
ORIGINAL
Hardwoods: 2′-8′, with an average of 4′.
Softwoods: 6′- room length, with the max at 16.’ It was common that many pieces would be 10′-15′ long.
TODAY
Hardwood solid, unfinished- (standard) 9″-7′ with an average of 2 1/2′ to 2 3/4″ wide. You can get specially milled flooring that is longer for more $$$.
Hardwood engineered, unfinished- better brands offer 1′ to 7′. 2 1/4″ width may not be available unless you have it custom milled at a much higher price.
Hardwood prefinished, solid today- varies between 9″-7′ for better products.
Hardwood prefinished, engineered today- no data. Varies greatly by manufacturer.
HOW WOOD IS CUT FROM THE LOG DETERMINES ITS APPEARANCE & STABILITY
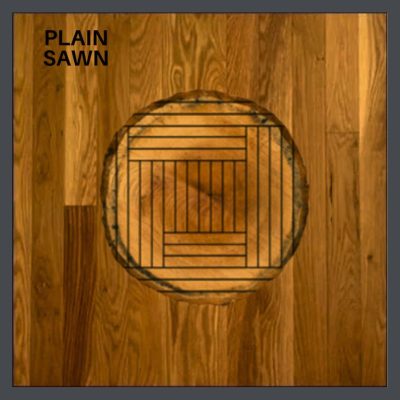 PLAIN SAWN
This cut utilizes the whole log, with the smallest amount of waste, making it the least costly of all the grain patterns. It results in a large, course, looping grain pattern. Plain sawn wood is less dimensionally stable (The degree with which wood shrinks & swells with changing moisture content) than quarter sawn or rift sawn so will tend to expand & contract more across the width of the boards than quarter sawn lumber.
Should you need to replace flooring in your house, I often recommend that oak be used because it is both reasonably hard and traditionally used. I suggest that this cut be chosen for the private areas because though it lacks the excitement of quarter sawn, it is still a workhorse.
Should you not be able to access quarter sawn or reclaimed, this is a fine type of oak to use in your public areas with all the beautiful rugs of the Arts & Crafts era. Unless you are a museum, your honoring the natural materials of the Movement counts with me.
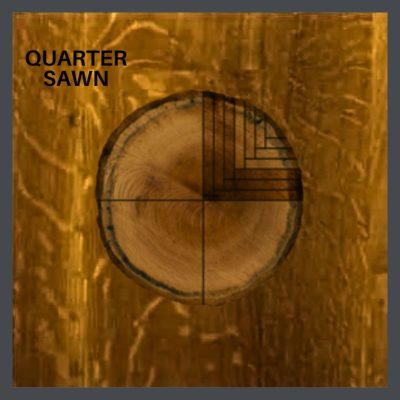 QUARTER SAWN
This is the wood of the Arts & Crafts Movement. When you gasp at the beauty of a Stickley piece, much of your awe & admiration are your reactions to the beautiful flecked graining, the Tiger Oak wood.
To produce the intense flame pattern, each log is sawed at a radial angle into four quarters. Then each quarter is cut along the center angles, near the center of the tree. (To better understand tree anatomy, read this article.) The wood from this cut twists & cups less than plainsawn, making for a more stable floor. It also wears more evenly under traffic.
Quarter sawn is more costly than plain sawn because it wastes more wood & is also more difficult to cut. I recommend its use in public areas where you want to impress your guests!
 RIFT SAWN
Rift sawing is similar to quarter sawing, with many of the same advantages. The way that it is cut accentuates the vertical grain but minimizes the tiger stripe effect found in quarter sawn oak.
Also a pricey option, it mixes beautifully with quarter sawn in a public area. I think that a floor of all quarter sawn looks whiskery! Rift sawn flooring was not used in older homes by itself, but was usually mixed with quarter sawn in a cut sold as “rift & quarter sawn” flooring. Today, standard milled oak flooring is sold as rift & quarter sawn as a mixed grade. You get more rift, usually 70% of the bundle, than quartered boards. This is much more economical than purchasing, from a specialty mill, all quartered or all rift cut oak. Place the boards strategically so that it is varied throughout the floor.
GRADES OF LUMBER USED IN WOOD FLOORING
There are more grades, but none that are appropriate for use in a bungalow. Some of the omitted grades are lacking in character (considered imperfections) & lose the look of real wood & some have too much character & appear too rustic.
Here’s straight from the big guys, the National Wood Flooring Association:
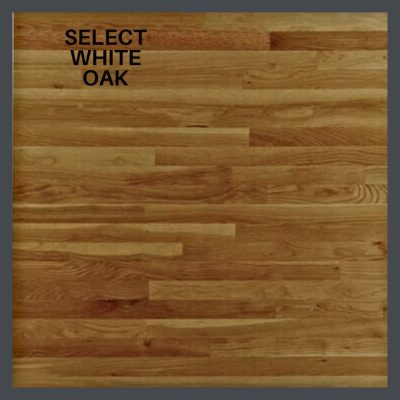 SELECT OAK
Contains all the variations in coloration produced by the contrasting differences of heartwood & sapwood. Also included are minimal character marks, such as small knots, worm holes, & mineral streaks, as well as slightly open characters.
The combination creates a floor where the light sapwood & dark heartwood are combined with small characters & other small color interruptions.
Should you be unable to access reclaimed wood or quarter sawn, in newly harvested wood, this grade, in plain sawn, is a good choice for your public areas. Arts & Crafts patterned rugs are perfect accents for bungalows & this grade of flooring will look beautiful with them in your home. Honest. View some beautiful ones I have collected for you on my Pinterest board, here.
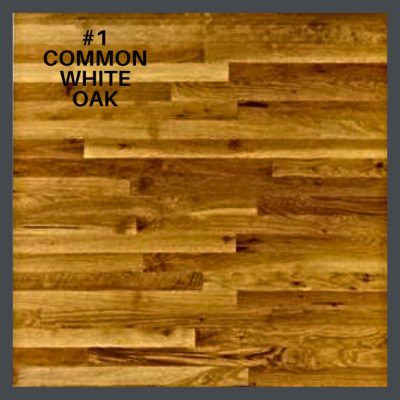
#1 COMMON OAK
A flooring product characterized by greater color variation than Select, that also contains prominent characters (with size limits) such as knots, open checks, worm holes, along with machining & drying variations.
#1 Common is a tasteful floor where prominent variation is expected. I think it looks fine in private areas, but you need to make sure that the colors are well placed, so that the floor doesn’t look like a study in color-blocking! You can use the shorter, knottier pieces, or ones with more blemishes in your closets.
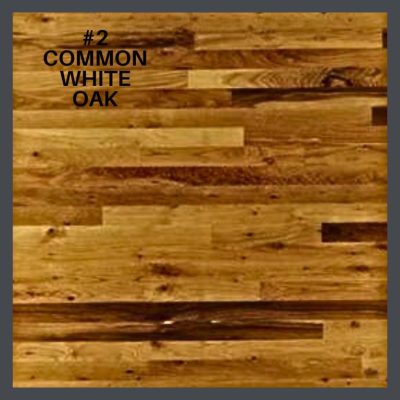 #2 COMMON OAK
#2 Common may contain sound natural variations of the forest product & is suitable for homes, general utility use, or where character marks & contrasting appearance is desired.
I like this choice in finished attics because I like them to look like what they are! In unfinished products, this is a material that you can paint without feeling bad about it. And don’t try to hide the character marks. It’s an attic!
THE BEST CHOICE IN AN OLD HOUSE- RECLAIMED OR SALVAGED WOOD
This is your first choice. Reclaimed, old-growth wood is milled from lumber harvested from ancient forests that is either rescued as logs from the bottoms of rivers & milled into lumber for various uses, or is removed from old buildings & re-milled for other purposes. Sometimes old flooring is salvaged & employed again as flooring which often does not require milling. You can see some cool videos about it here.
Recycled wood is available in solid unfinished, solid prefinished & also in engineered, unfinished or prefinished.
Should your site finished (as opposed to factory finished) floor require patching, this is the type of wood that you will need to use, especially if your floors are old heart of pine. You can read about its properties & its value here.
TYPES OF WOOD PRODUCTS
UNFINISHED WOOD FLOORING
 This is the type of wood that was installed in our old houses when they were built. It requires sanding & finishing on site after installation is completed. Today it is milled from newly harvested trees, generally grown on tree farms. It can also be milled from reclaimed material, or, salvaged as flooring from old buildings.
Unfinished wood flooring, either newly milled or reclaimed, is available in solid or engineered.
After unfinished wood is completely installed, it is sanded, sometimes stained, & then coated with a protective finish. This article explains many of the finish options available.
Unfinished flooring allows you to create a completely custom floor so that you can match or complement the other floors in your home.
PREFINISHED WOOD FLOORING
A prefinished floor is one on which the stain & finish (a clear, protective coating) are applied at the factory. There are many tough finishes available from oil penetrating finishes which provide a matte finish, natural look, to polyurethanes which coat the wood & are available in matte to high gloss. Most of the finishes you can use on a site finished floor are avail in prefinished. You can read about them here. You are going to want to choose one with a medium gloss which mimics wax or shellac. As far as choosing a sheen level, a matte floor shows dust, dirt & fur & a shiny one obscures the grain & shows scratches & dust, dirt & fur.
The factory/manufacturer applied finishes, especially products at the higher end, are very tough, & are more durable than those applied on the job to unfinished wood. Many prefinished products can be sanded at least once. If you do not have to match existing flooring, it can be a good option, with a few caveats.
Here’s where prefinished floors can have a drawback. In your old floor, after the raw, unfinished wood was laid, several passes were made over it with a sanding machine to fully level all sides of the boards where they join the next rows. This sanding is not done on a prefinished floor. The boards are sanded at the factory before the finish is applied. Consequently, there may be some differences in leveling from board to board. There are several ways in which manufacturers cut the wood at the factory (mill) to make the final floor appear flat.
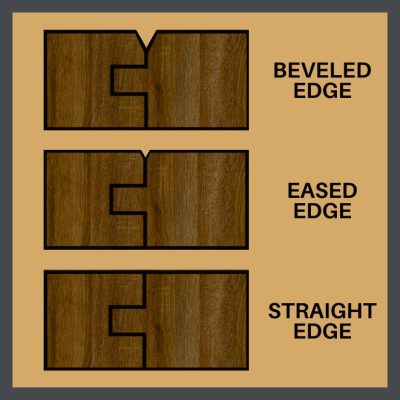 BEVELED EDGE
These products have a very distinctive groove in them.
EASED EDGE
This is the most common. Each board is just slightly beveled. Some manufacturers add an eased edge to both the length of the planks as well as the end joints. Even this small groove helps hide uneven plank heights. Eased edge is also called a micro-beveled edge.
SQUARE EDGE
The edges of all boards meet squarely creating a uniform, smooth surface that blends the floor together from board to board, giving it the same appearance as an old floor. High-end mills offer this option at a higher cost because each board must be cut with great precision. This floor will still not be as flat as a floor that has been sanded on site.
CONSTRUCTION CHOICES IN WOOD FLOORING
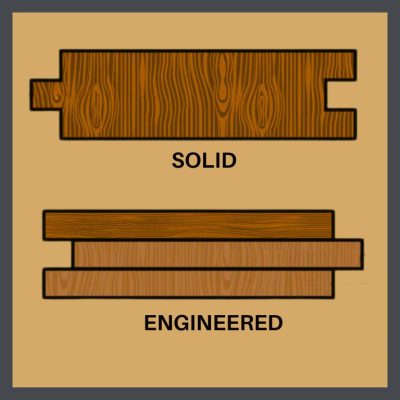 SOLID FLOORING
Your traditional floor, which you would find as the original flooring in your historic bungalow. This flooring is cut from one piece of wood. When you look at a piece of it from the side, you see no striations/layers.
ENGINEERED FLOORING
This type is created in layers that are glued together. The veneer on the top is called the wear layer & can be of varying thicknesses.
The wear layer of engineered floors can be from 1/32″ to 1/4″ (1 mm to 6 mm) thick, again, affecting the price point.
This method of construction increases the stability of the boards. Especially in high moisture areas or situations, I think it can be a good choice. The majority of the time, these products are prefinished & have the 3 above edging characteristics. Square edged prefinished engineered floors are uncommon & at a much higher price point than are beveled ones.
Engineered wood can also be sold as square edged unfinished, but is more expensive than most prefinished flooring. Usually the wear layer is at least 3 mm on these products. I like this product in humid climates.
WHAT IS VENEER?
Engineered hardwood flooring is built up using layers of plywood or a high density fiber board then on the top a layer of wood veneer, to create the look of real hardwood. Veneer is a thin layer of wood or other material for facing or inlaying wood. Veneer is made of a particular material that is applied to a different material in order to create a more desirable surface appearance than that of the basic material of the object.
SAWN FACE VENEER
The dry-sawn face method creates a thicker layer (4 mm) of veneer than the other methods. This method creates a veneer with an appearance that is identical to solid hardwood in color, grain, & character. (See cut & grain examples above.) This method produces the least amount of usable veneer so it is more costly than the other two methods below.
SLICED VENEER
Slice-cut is the second most common way to create a wood veneer. The finished wood presents a lovely face, like the sawn face above, but is in thinner layers (2mm or less) & is generally less pricey.
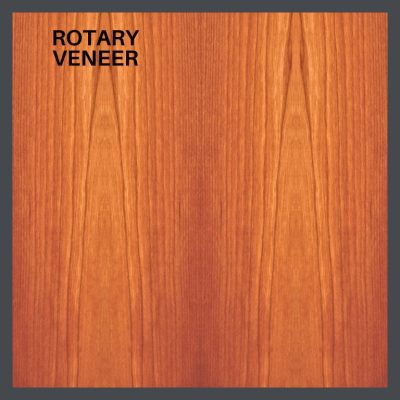 ROTARY PEELED VENEER
In this method, the log is put on a spit & peeled in a long, thin layer. The wood is then flattened which is damaging to its integrity & wearability. This cutting & flattening process produces an unnatural, repeating, unattractive grain pattern. It does create the maximum amount of product from the wood, so it is sold at the lowest price point.
That’s why there’s so much of it out there. I hate it! Be aware that, because of its low price, it is often chosen by flippers. If you see a floor that almost looks like wood, & is touted as being wood, this is likely what it is.
Engineered flooring has gotten a bit of a hit because the inferior products produced by this method. Engineered wood is a good, durable product & is quite suitable in a historic house- if- you choose the first method. I do not recommend the sliced veneer & do NOT choose rotary veneer flooring.
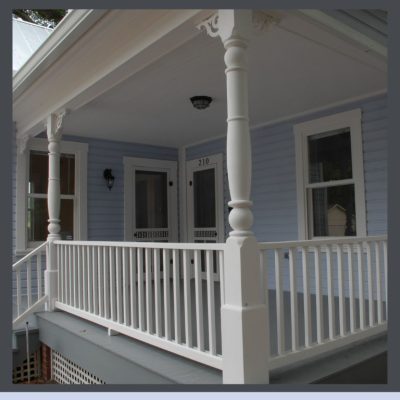 PORCH FLOORS IN BUNGALOWS
We replaced a covered porch deck on a 1907 Folk Victorian that we restored & used pressure treated, 3/4″ by 3 & 1/8″ wide, yellow, T & G pine which at least in Florida, is available in a pressure treated product.
Pressure treated wood must dry 30 days before it can be primed & painted. We painted the bottom of the boards before installation & the top after. You might be able to get pressure treated decking which has been kiln dried after it is treated, so the 30 days can be omitted. Sanding is required to give you a smooth level surface, just like with any wood floor.
Porch boards are subject to much wear & water. It is really important to make sure that they are slightly angled so that the water runs off. It’s also a good idea to have a large squeegee on a long handle so that you can dry them after a rain.
MY TOP CHOICES WHEN INSTALLING NEW WOOD FLOORING IN YOUR OLD HOUSE
In answer to the Good, Better, Best question of my follower:
BEST: 2 ¼” wide, reclaimed wood or salvaged old growth wood flooring, (with a 3/16” or thicker wear layer for 3/4″ T&G flooring, whether it be solid or engineered) of whatever species & grade was in your house originally. In any single house, there could have been more than one species, generally a pricier hardwood in the public areas & a less costly softwood (usually 3 1/4″ wide by 3/4″ thick) in the private. (This is the wood that you need for patching.)
Hire a qualified pro to sand & finish it. Reclaimed wood is $$$$$ & you don’t want to waste it.
BETTER: Select 2 ¼” wide, newly milled, farmed quarter sawn oak, either unfinished or prefinished (squared edged, please see above) solid or engineered with a thick veneer, for public areas. For private areas, 2 1/4” wide, in Select or #1 common oak. You do not want to use farmed softwoods. They are ridiculously soft.
If you want to finish it yourself, I recommend that you ensure that the equipment that you use is the latest & greatest & dust free, well maintained & calibrated. Then study these videos.
GOOD: A Select plainsawn wood floor that is either prefinished or unfinished, solid or engineered. Just no heavy bevels & no rotary veneer. (All are covered above.) Same instructions for sanding & finishing.
CAVEAT
Installing it too, or farming it out to a carpenter or handy friend, make sure that they & that they wear the correct PPE & if you are living in the house, or even visiting, please understand the materials that are being used wear it too. Read this!