by bungalow101 | Dec 26, 2022 | Doing it the right way, Features
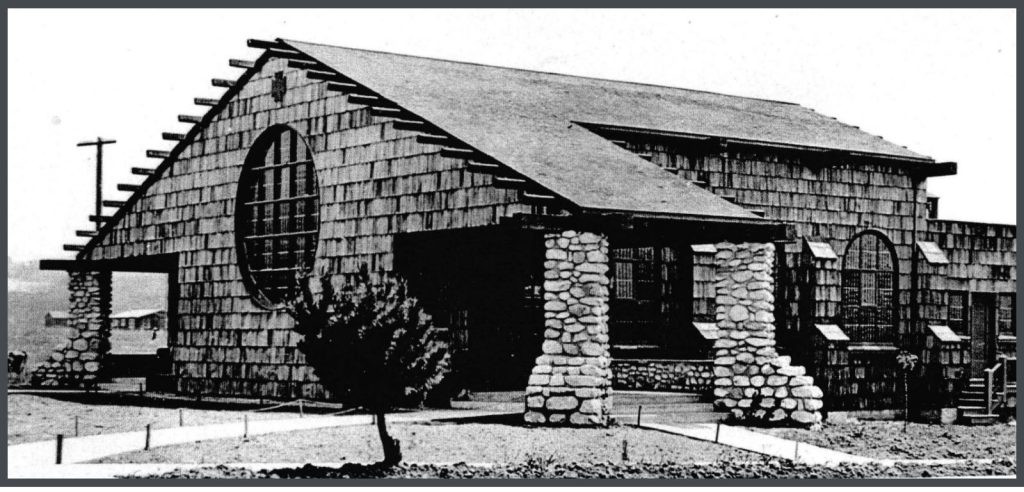
 The story begins with my love affair with the Alfred W. & Grace D. Hare House, a beautiful Craftsman, in Eagle Rock, a bungalow neighborhood in N.E. Los Angeles. Once an incorporated town in its own right, Eagle Rock is just west of Pasadena & was clearly influenced by the architecture being built there.
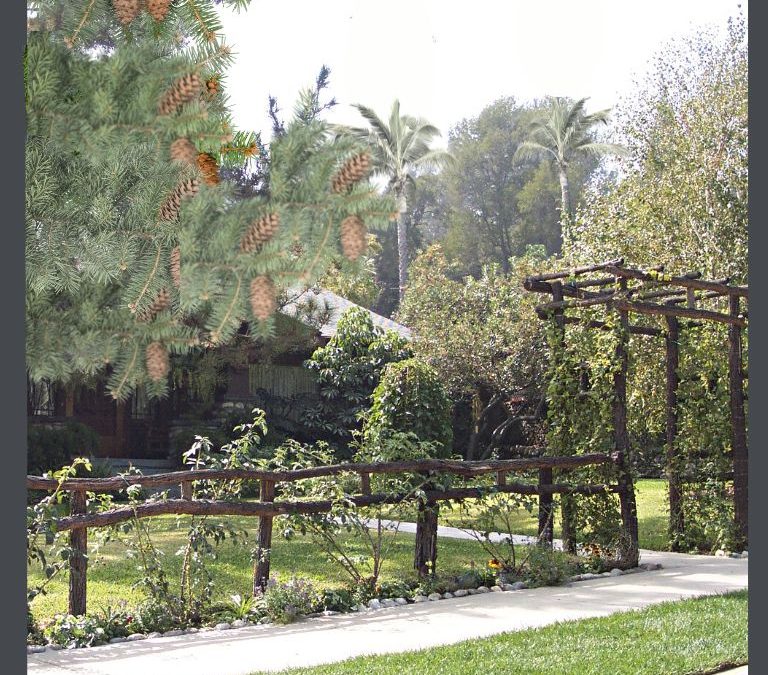
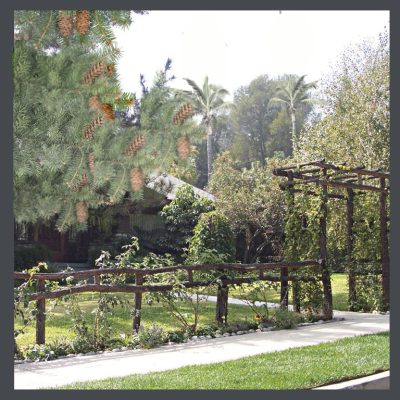
The entrance to the property is through an arbor that I had built with saplings that were so green that leaves kept growing long after the fence was constructed. An arroyo rock border lined the sidewalk & roses grew intertwined through the sapling fence. There’s a great, full page image of the arbor in BUNGALOW DETAILS: Exterior, on page 190
The rocks came from the nearby Arroyo Seco (which in Spanish means “dry gulch”) a canyon between Eagle Rock & Pasadena. This rock is a common material seen in houses in this area & clearly shows their place in the world.
My next-door-neighbor retired & got herself a chainsaw, Every time I heard the buzzing start-up, I’d grab my keys & head for the nursery to buy another tree. I ended up with a small grove of birches in the front & a shaggy, grafted tree that looked like a parasol under which fairies could dance, when it was first installed but turned into Cousin Itt as it grew. The house is on 1 1/2 lots & is set well back from the street, so the Addams family representative, the huge, aged pine & the new birches made a nice little forest.
MY ARTS & CRAFTS GARDEN
 I also used the same rocks to form a path from the driveway to the front walk. I installed baby’s tears (Soleirolia soleirolii) a mossy appearing tropical perennial with tiny, tiny leaves between the path & the border. They were very soft & sweet & I coaxed them to grow so that they would provide a natural woodland look. A week before my mother was supposed to arrive to see the house for the first time, my gardener edged them so they were level on top & flat against the border. I am a plant whisperer but I admit that during that week I was more of a plant cheerleader & probably even a plant sergeant, alternating cheering & commanding them to grow back into gentle, fluffy mounds before my mom’s arrival.
Inspired by the origins of the Arts & Crafts Movement, I planted an English garden. Arroyo rock bordered the garden beds which I enlarged & planted with shade loving plants on the shady side & plants that looked like shade loving plants on the other side. It was very difficult! Los Angeles is not England. Los Angeles is a desert & plants easily fry in the sun, so I had to stretch my wits to fill a bed that got nuked every day with plants that could have maybe been in an English cottage garden.
A great deal of my planning was centered on choosing what I would want to cut, to bring in the house. I love old flowers, so I chose calla lilies & several different types of ferns so that I would have greens. I grew roses in honor of my mother & my grandmother. My grandmother was an accomplished rosarian, & in 1930, was certified as a rose judge.
THE HOUSE
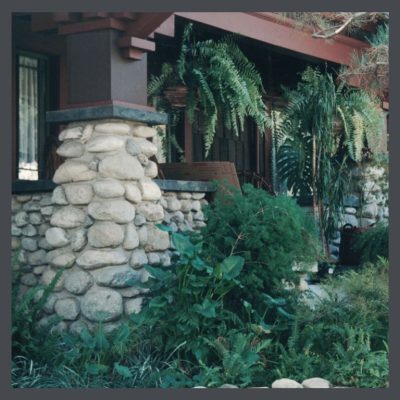
 The centered, front-gabled porch is supported by massive timber framing & arroyo stone piers. A free-form arroyo stone chimney is on the east side. Sadly, I have no pictures of my chimney, but you can see it in Jane Powell’s book BUNGALOW DETAILS: Exterior, on page 57. It’s chunky!
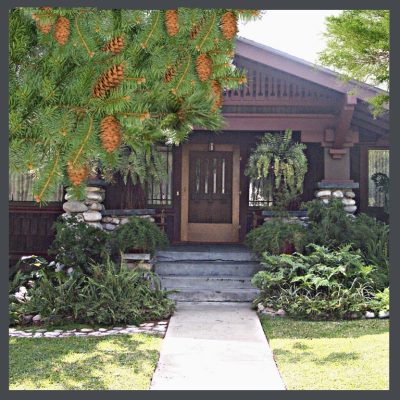
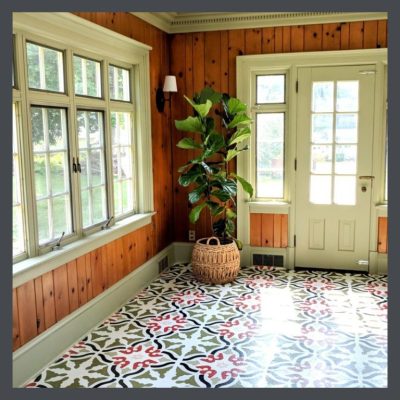
Typical of Southern California Craftsman style, as one of the earlier houses built, the Hare House helped set the style for later homes in Eagle Rock. Its solid massing & low horizontal profile, is boldly embellished with honest decorative elements, employing simple & natural building materials. As celebrated by the Arts & Crafts Movement, there are many connections from the outside to the inside, with the inviting porch & the sunroom & the many large windows, both casement & doublehung in every room of the house.
The entry features a centered Douglas fir door with 4 beveled lites. We added a screen door (not original) of quartersawn oak with brass screen. You can read about the door & the tiny faces who loved to look out of it here.
The shingle siding was stained when i purchased the house. I hire an inexperienced painter who had slapped a coat of paint on it by the time I arrived home from the office. We had chosen colors together & I thought that he noticed that I was showing him stain samples, but he did not. There is a good chance that he had never stained a house & didn’t know that you could. It broke my heart. I felt like I had betrayed the house.
THE BUILDER OF MY CRAFTSMAN IN EAGLE ROCK
The original owner (through 1923) Rev. Alfred W. Hare & his wife Grace D. Hare made significant contributions to the community of Eagle Rock & the City of Los Angeles.They were both active in the cultural, social & religious life of the town. Local papers of the time feature many stories of their travels, their house guests & their participation in events on behalf of the town’s various social organizations, such as the Women’s Club, the Elks, the Red Cross & the Near East Relief work after the war.
Ordained as a clergyman of the Congregational Church in 1896, Hare moved to Eagle Rock in 1909 as pastor of the shuttered Eagle Rock Congregational Church. Soon after, due to his inspired success of the church, Hare oversaw the construction of a new church building.
Sadly, this church, an extraordinary example of Arts & Crafts design, is no longer standing. I have been unable to track down both the architect of the house & of the church. To my eye, the house & the church were not drawn by the same hand. I would love to know your opinion of this.
After 1912, he was the pastor at other churches in Los Angeles, notably 27 total years at Park Congregational Church in Angeleno Heights.
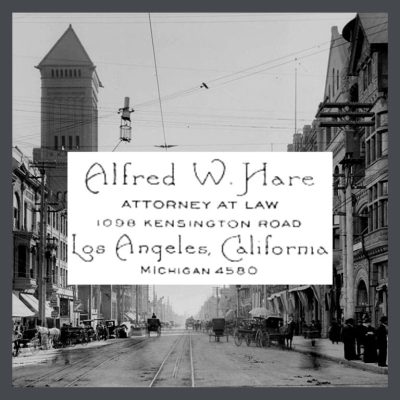 Admitted to the Los Angeles County Bar Association in 1912, Hare founded the large & successful law firm of Hare & Walden situated in downtown Los Angeles, which was connected by trolley to Eagle Rock. The little home office, with its built-in desk & fireplace was probably well-used by Hare, writing sermons, counseling parishioners & then, after he began practicing law, working on cases that he brought home from the office so that he could be with his wife, Grace.
Mrs. Grace Dunsmoor Hare had been a “successful & popular” teacher & was the daughter of Charles Dunsmoor, who was County Clerk of Los Angeles County & California State Bank Commissioner. Both Mr. & Mrs. Hare were revered leaders in the realms of social activism & philanthropy in their community of Eagle Rock.
Learning these things about them helped to explain the house. Though one of the finest homes in the neighborhood, it was situated well away from the grah-ah-ahnd street of the town, Hill Drive. Learning of Reverend Hare’s astute ability to handle money -he helped several churches whose congregations he led to tear up their mortgages- my surmise is that he thriftily chose a less pricey, but large & beautiful lot on which to build.
The house, at 1950 square feet had only 2 bedrooms. In none of my research on him have I seen any evidence of children. In later years Grace was sickly & I wonder if her maladies could have affected her fertility. By the time the house was built, they had been married for 7 years & had probably stopped hoping to grow their family.
 The public areas were clearly designed for entertaining with a large living room & dining room, as well as a sunroom. I can easily imagine gay fundraisers for the Women’s Twentieth Century Club building fund to have taken place there, with Alfred playing the guitar & the 2 of them singing, perhaps accompanied by his sisters who wrote songs & skits to contribute to the effort.
Almost 100 years later, I was a member of Club & participated in fundraising events to restore & preserve the beautiful building. Again, I wonder at the architect because all the members of the Hare family, Alfred, Grace & his 3 sisters were instrumental in the fundraising that enabled it to be built & they possibly would have had some influence in its design.
It was an honor & a privilege to hold the stewardship of this beautiful home. When I restored it, I kept the Hares in mind & strove to create make choices that would please them & create a space in which they would feel comfortable. The woman to whom I sold the house held them in the same regard & the remaining restoration that she performed, was done with the same reverence, for the family, the neighborhood & the period.
TIP: TO READ MORE ABOUT MY LOVE AFFAIR WITH THE HARE HOUSE, CLICK HERE.
 STAY IN THE BUNGALOW KNOW!!!
Sign up for our newsletter & receive our FREE E-book, 7 VITAL Things to Do Before You Hire a Contractor.
by bungalow101 | Dec 20, 2022 | Doing it the right way
 It’s not easy to stay healthy when restoring an old house. Increased demands on your time, your finances, the toxins in the materials you will demo & install, & the stress of making constant decisions, facing too many surprises mean that to stay strong, you need to maybe spruce up your lifestyle choices to compensate. And maybe you have to do this without no kitchen!
We already know that I think I’m everybody’s mother, but hear me out because I know some stuff. I learned it from my mother who learned it from her mother who, yep, learned it from her mother. I hail from a long line of totally badass women!
I also tend to be a bit of a natural health geek. As stated, I come by it honorably, but I also just tend to be a problem solver with a great deal of curiosity & a little help from my friend Dr. Google. In addition, I enjoy helping people so I have made it my business to learn things that I feel will benefit others. (Little boasting here- I got 35 lbs. off my formerly chubby hubby & got his 70 year old blood work looking like that of a 20 year old.)
PIGS & OLD HOUSES
 My grandmother, Sarah Emmeline Martz was a farmer’s wife who cooked for her family every day & tossed the slop to the pigs. During one season of household sniffles she noticed how healthy the oinksters were, compared to her own family, & considered what was in that slop. What she noticed was that she was giving the piggies the outsides of the food- the peels, the parts that grew in closest contact with the soil of her garden. Being a farmer’s wife, she knew where the nourishment for plants came from- the soil- & wondered if maybe she was throwing out the most nutritious part of her family’s food.
Decades later, my mother considered it a criminal act to use a peeling device. During my childhood I heard daily, “That’s where the nutrition is!” And tell us once again the story of Sarah Emmaline & the pigs.
Foods are the building blocks of our bodies whatever health problems we are experiencing or wanting to stave off are generally caused by inadequate nutrition & can be solved with making sure that we get sufficient nutrition. Recent scientific discoveries in labs all over the world as well as clinical trials have supported this belief and explained why it is true. It’s not just moms!
SO, HOW DOES FOOD SUPPORT LIFE?
 The answer is in the beneficial tiny living beings – microorganisms- that live in and on our bodies, especially our guts. Each one of us harbors a unique set, our own community of microorganisms- our microbiota- microscopic life. Our own, personal microbiota, our own group of microorganisms differs from that of any other person as much as our own fingerprints do. The effects of our microbiota on our bodies, are diverse & profound. I am going to concentrate on the microbiota living in our guts to address the subject of how to stay healthy when restoring an old house.
I have a YouTube playlist that has a great deal of information on this subject as well as many tips on how you can stay healthy when restoring your old house. I have attempted to include only videos that provide an introduction to the subject, but some of them may use medical term that yu have never encountered. If this is the case & you’d like to learn more about the subject, contact me & I will send you the glossary of terms that I created for myself when I was doing my own study on gut health. I am just a student myself, but I think that I have made it all the way to second grade!
HOW MICROBES HELP US STAY HEALTHY WHEN RESTORING AN OLD HOUSE
Here are some of the relationships that have been found between us & these microorganisms:
- Mental soundness- in addition to increasing of energy for working, taking care of our families & running a construction crew, microorganisms directly affect mood. The gut is described as being the “second brain” & the imbalance of microorganisms is directly correlated to such things as insomnia, anxiety, depression & our reaction to that $14,000 bid.
- Balancing hormones- These microbes control the endocrine system, and support or inhibit hormonal harmony, including estrogen, insulin & thyroid. This is especially important as we age, approaching menopause & beyond, when our endocrine system is especially taxed. The endocrine & the nervous systems work together to keep us sharp & jolly.
- Increase energy levels- By helping us absorb & utilize nutrients & to get rid of toxins, energy levels improve, allowing us successfully take on challenges such as getting that $14,000 bid to rebuild the chimney.
- Immune system- microorganisms help our bodies fight off disease by defending us from pathogenic (disease causing) organisms as well as allergens. They are the super women of the immune system.The demo process involves exposing & propelling allergens & pathogens into the air YOU BREATHE. Dust, mold, insect & animal droppings- it’s all there. (And don’t forget that PPE. You’re living on a jobsite.)
- Reduce yeast & urinary tract infections. The good bacteria once again save the day by preventing disease causing bacteria from adhering to the bladder wall. I hate to be indelicate, but for those times the only bathroom bathroom is being reno’d…And incidentally-
- Weight control- Scientists in labs have created obese mice from normal sized mice by giving them microorganisms (tiny living organisms) from obese humans, & have created lean mice by giving them microorganisms from skinny folks.
- Research has shown that a proper balance of microorganisms in the gut contributes to weight loss. What’s in your gut determines how you will process calories & how you will store them.
- The heart – Having a healthy gut allows cholesterol to be excreted by the bowel instead of accumulating at high levels in the bloodstream.You can see that these are some active critters, helping you to stay healthy when dealing with the rigors of renovation! I have a YouTube playlist that has a great deal of information on this subject as well as many tips on how you can stay healthy when restoring your old house.
STAY IN THE BUNGALOW KNOW!!!
Sign up for our newsletter & receive our FREE E-book, 7 VITAL Things to Do Before You Hire a Contractor.

by bungalow101 | Dec 18, 2022 | Kitchens
 The reason I’m even proposing the weird idea of painting a bungalow linoleum floor is because lino wears out. Through decades of footsteps in some of the highest traffic areas of the house, roller skates & doggy toenails, abrasion can annihilate the printed pattern leaving you with a rough, gray surface. Even worse, age can uncover sections of the jute or burlap base, & even one layer down, the mastic that glued it to the subsurface. Adding to the delight are the ineradicable stains of unknown origin. (A whole chicken maybe? They are dang slippery.)
Sadly, the lino patterns you see in Jane Powell’s book, LINOLEUM, are no longer manufactured. Twenty-five years ago, you could pay a ridiculous amount of money for a roll of new old stock but the supply of this too went the way of the dinosaur. I used to visit Linoleum City in Los Angeles to drool over their old lino collection. No mo’.
You may have a floor that is just suffering in a more highly trafficked area, but have some pattern left in other parts of the floor. Should this be the case, you can just touch up the rough areas with acrylic paint to match the existing pattern, & clean & wax your whole floor.
But, at a certain point, a lino floor is over. O-V-E-R. The pattern on mine was entirely gone. It was just a sea of dirty gray. While I relentlessly advocate for preserving historic materials, a kitchen floor needs to be cleanable & even with a good scrubbing followed by waxing, (I tried it, fingers crossed that I might at least get some improvement. Nah. Still gray, rough & grotty as heck.) mine was nasty. There was nothing left to coax back into utility, let alone beauty.
So what’s a lino loving bungalow girl to do?
MY BUNGALOW LINOLEUM FLOOR SOLUTION
 In 1980, I had noticed that any paint I got on the very old & worn (& hideous & impossible to clean) lino floor in my rented bungalow, was too stubborn to remove, I thought, “Gee, I could paint this puppy!”
And I did.
It was very inexpensive to do (a prime consideration, for a vintage clothing store proprietress) & a piece of cake. It was also a very fun project because it quickly changed something scary & germy to something lovely & safe.
The finished product looked great, was very easy to clean with my duster & my sponge mop, held up beautifully & looked perfect with the faux lino floor cloth I had made. I felt like if I were to drop a piece of food on it, or my cat were to cough up a big hairball, they would no longer become permanent, rotting parts of the floor! (Euwh!)
THE MANY CAVEATS ON PAINTING A BUNGALOW LINOLEUM FLOOR
 Even though I had done this process successfully, material formulas have changed radically in the past 40 years (bad) due to environmental concerns (good). Additionally, having painted no design to my 80’s floor, I had ended up with a very flat paint surface. (I used a stenciled canvas floor cloth to make a faux lino rug to fancy it up.) And, I was married to a chemistry major who had sanded & coated 1,000+ floors & was using perfectly calibrated, state-of-art equipment. I’m thinkin’ that maybe you don’t have someone living in your home with these qualifications, nor this equipment (though I’m sure he has his own fine equipment.) So, I wanted to check out these aspects with Earl, my tech guy at Ben Moore, for advice on the painting of a bungalow’s linoleum floor. Earl immediately said, “Don’t do it.”
I’m a flooring professional so I lack the dewy optimism of the inexperienced. I have seen floors peel, scratch, bubble, pretty much perform tragically in multiple ways, so I always err on the side of caution when dealing with any new material or process. I read everything the manufacturer says in their tech materials. I follow that with a question- filled call that usually gets me transferred from customer service to the tech guys. This is why I love Earl. He’s a tech guy who works the customer service phones. A jewel!
Here’s why he said this & also why the article doesn’t just end right here.
IT’S ALL ABOUT THE BOND
 You are about to become a paint expert. This will serve you well as an old house owner because this is not the only time that you will be dealing with applying paint. And if you want to know more, you can go here.
Adhesion is always an issue, especially in high-traffic areas. My husband chemically stripped the floor & then scuff sanded the very old linoleum in our bungalow kitchen to remove any materials that might have been applied to it, such as my freshly applied wax (Oops!) & also any cleaning materials that might have left a residue, in order to prep for painting. He then, using 180 grit paper, sanded off any dirt that was ground into the surface & give it some “tooth.”
Tooth is desired when you wish to create a mechanical (as opposed to chemical) interlocking/bonding of materials, i.e., the paint & lino marriage. So, you scuff the lino to create tiny cavities (tooth) on its surface to increase the contact area. The wet paint you apply then displaces any air between the paint itself & the lino & the 2 lock together. I definitely had a tooth advantage with my old lino because it was OLD, & hadn’t been smooth for decades.
A mechanical bond is not as strong as a chemical bond & herein lies the fragility of your floor.
Let’s also talk about chemical bonding when painting your bungalow linoleum floor, because you’re going to be forming those bonds too when you paint it.
THE 3 COMPONENTS OF PAINT & WHY YOU NEED TO KNOW
Most paints have 3 main components called the pigment, the binder, and the solvent.
The pigment is the color chemical in a paint. Binders are incorporated to glue the pigment particles to each another, & also to make the particles stick to the surface you’re painting. Solvents, not surprisingly, dissolve stuff. This material makes the pigment & binder into a thinner & less viscous (more easily flowing) liquid so that it will spread evenly. For the purpose of ease on your own self & ease on our fragile environment, I am going to suggest the use of water-based paints, in which the solvent is water.
A couple more concepts you need to understand are drying & curing. If your room is well-ventilated, your paint will feel dry to the touch within minutes after application. However, it is dry only on its surface. Curing, the evaporation of all the water (binder) in the paint can take days. The 2 types of bonds determine the steps that you will do as you cruise through your painting process.
 If you apply a second coat on when your first is just dry to the touch- not cured- you will get a chemical bond between the 2 coats. As the water (binder) evaporates, the like chemicals of the pigment & the binder will be attracted to each other & form what could be considered a single coat. It’s a very strong bond.
It’s why your nail polish peels down to the nail, instead of peeling in single layers.
What this means is if your weekend project goes into the next weekend, your paint will be too dry to form this chemical bond with the next coat you apply, so, you are going to need to give the original coat some “tooth” in order for your next coat to adhere with a mechanical bond. That mechanical bond is achieved with a bit of scuffing, so that you aren’t going in on top of such a smooth surface.
This is a kitchen, the most heavily trafficked room in your house, & yeah, you need to do it right so that it will take the wear. If you take all the right steps when you apply the materials the first time, you are much less likely to have problems later on.
WHY I’M CONTINUING ON DESPITE BEN MOORE’S ADVICE & A TON OF CAVEATS
A. My advice is for real linoleum only.
B. If you want to paint a new lino floor, that you will install to paint, realize that it is risky. It’s not an inexpensive material, & the labor to install it is pretty pricey too. Most importantly, new lino is made with a coating that repels, well, anything you wouldn’t want to stick to. For you, I’m am recommending that instead you choose cool patterns in cut linoleum that are fitted together like a puzzle to make your overall design. You can see an example of what can be done here.
C. If your floor is old & funky as mine was, prepping it thoroughly to create a proper bond, you can improve its look & functionality greatly. How long will it last? Who knows?
D. I’m assuming that you are performing all the testing that you need to on existing materials for asbestos & lead, & mitigating as needed. Let’s talk about asbestos. In this article by Bob Vila he talks about asbestos in linoleum. Give it a read before you start.
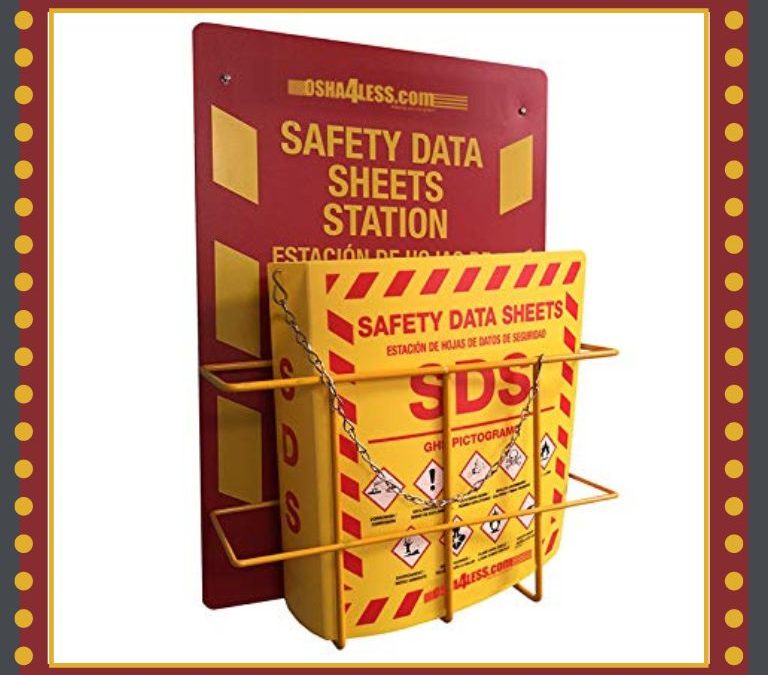
E. For every product that you are using, you’re studying your Safety Data Sheets & using correct PPE correctly.
SO HERE’S HOW TO PAINT YOUR BUNGALOW’S LINOLEUM FLOOR
 0. Mend any boo-boo’s. I am not going to try to teach you to do this because I have never mended a floor. I am going to suggest some links of pages that look like they might know what they’re talking about.
Wisconsin Historical Society
They tell you a brief history of the development of lino & give you instructions of fixing problems. This is not the only method, so here’s another one.
Porter’s Environment & Cleaning Services
This one addresses rips & tears.
ehow
This one is about how to tack down curling edges.
Week&
In this one you learn how to patch whole areas that are missing.
1. Choose your pattern & your colors. Think about coordinating your floor with your curtains. If you are going to stencil your curtains, or even if you’re not & you’re looking for pattern ideas, head on over to my article on window treatments where you will find links to vendors of lovely A & C stencils. You can use my article on choosing paint colors if you need any help. The reason I say this is because your stencil colors are more limited while a trip to Ben Moore will yield any custom color that you could possibly desire.
2. Jane Powell’s LINOLEUM has some amazing vintage patterns in it, for inspiration, or just to out-&-out copy them. You can use a simple graphics program, building it layer by layer & employing their graph feature to transfer it to real life
3. Zip on over to WELCOME TO REALITY DAYDREAM where Beth has it all figured out. I am not about to re-invent any wheels! She says that the paint on her floors is holding up well 4 years after she wrote the article, so she must know something!
TIP: Should you not be convinced of the utter coolness of lino, watch these videos.
STAY IN THE BUNGALOW KNOW!!!
Sign up for our newsletter & receive our FREE E-book, 7 VITAL Things to Do Before You Hire a Contractor.
by bungalow101 | Dec 9, 2022 | Doing it the right way
 The dangers of restoring an old house can be considerable, but with proper planning can be minimized. Let’s take a look at the actions required.
A contractor has been hired to begin the restoration of your home. You have discussed your staying in the house while the work is being performed & you have figured out how to do it despite the inconveniences. But what about the dangers to which you might be exposed?
The fact of it is that you will be living in a jobsite, in the middle of sawdust, paint, solvents & other fumes. Some of these materials may not give you any warning signs of their danger- such as a bad odor or immediate irritation, so it’s a vital to understand the hazards to yourself, your family & to your pets (whom we know are family but I just want to mention them because they live close to the floor & they lick themselves.)
Fortunately, by law, all the dangerous materials that will be used in the restoration of your old house, have detailed, written safety information about them. These materials should be named in the bids you receive from contractors, & your contractor should be happy to provide you with copies of the safety information, but if he balks, (uh, not a good sign) you can get them directly from the manufacturer online.
SAFETY DATA SHEETS & THE DANGERS OF RESTORING AN OLD HOUSE
 OSHA (Occupational Safety & Health Administration) is a U.S. federal body whose mission is to “assure safe & healthy working conditions for working men & women by setting & enforcing standards & by providing training, outreach, education, & assistance.”
Their Hazard Communication Standard requires that each manufacturer, distributor, or importer provide Safety Data Sheets (SDS’s) for each hazardous material to users & workers to explain information on these hazards, clearly & thoroughly. The Standard requires that the information be presented in a consistent, user-friendly format.
Previous regulations did not mandate this standard & manufacturers did not use safety materials that were consistent one to the next. For example, some manufacturers labeled the most dangerous materials as a 1, others did the complete opposite, labeling the most dangerous as a 5. And, the data was not organized in a consistent fashion so you had to search the contents for the information that you needed each time. Some of these sheets contain multiple pages so you can see that these inconsistencies would not be helpful in an emergency situation!
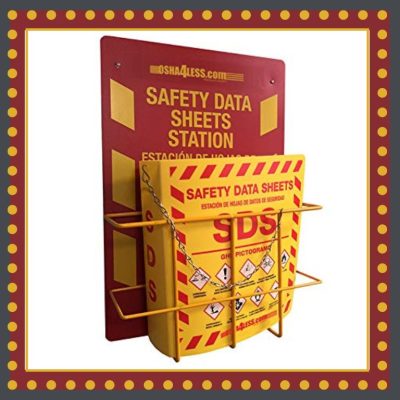 SDS’s tell users, both workers & homeowners, the properties of each chemical, what the hazards of the product are to the individual & to the environment. They let you know how to use the product safely, what will happen if the recommendations are not followed, & how to recognize symptoms of exposure. Very importantly, they lay out the steps of what to do if emergencies should occur.
Your contractor is required by law to keep these in the workplace & to train his workers on them so that they will know how to handle these hazardous materials to keep themselves & others safe. Fortunately, there are safety companies that create safety meetings that can be done in the field every week. Each one is a sheet of paper with the information on it that each person reads & signs off. Easy peasy.
This is the minimum safety training that a professional company performs in order to reduce the amount of dangers inherent in restoring old houses, for their employees & for you.
I do not recommend the hiring of any contractor or tradesperson who has a casual attitude, or who is ignorant of the importance of Safety Data Sheets.
THE SDS SECTIONS- FROM THE TOP
Lists the specific materials & names its intended use. It also provides you with the contact information for the supplier.
- Provides warning of the hazards of the material.
- Lists the all ingredients of the product.
- Describes the first aid treatment that would be given by an untrained person in case of exposure.
- Provides instructions for fighting a fire caused by the chemical.
- Gives instructions on dealing with accidental spills, leaks or releases in order to minimize harm to persons or property.
- All data about safe handling & storage.
- Lays out exposure limits with solutions for minimizing such exposure.
- Identifies physical & chemical properties associated with the product.
- Describes the various actions of the chemical constituents under various conditions.
- Explains the toxic & health damaging properties of the material.
- Describes the product’s environmental impact.
- Proper disposal & safe handling of materials & containers.
- Proper shipping.
- States the safety, health & environmental regulations that apply to the products.
- Dates of when the sheet was created or edited.
These sheets may be short & sweet but they also may be many pages long. Studying them is not an entertaining or amusing task, but it’s one to not overlook when you wish to mitigate or avoid the dangers in restoring your old house.
GLOBALLY HARMONIZED SYSTEM
The Globally Harmonized System (GHS) is an international system of hazard communication which provides a standard system to format safety data sheets & to label hazardous elements in pictograms.
Caveat: Updates are constantly being issued. All I’m trying to do is let you know that there are are things on which you need to be informed. Use Google to stay updated & fully informed. This page is only to wake you up, not fully educate you.
PICTOGRAMS: a pictorial symbol for a word or phrase.

Hazard pictograms are used to warn us about the presence of a hazardous (to people &/or the environment) chemical. These pictograms appear in the shape of a diamond with a bright red border & a white background. Any single chemical could have one or more than one of these warning images.
If you should like to read more about SDS’s, Google OSHA Safety Data Sheets. They change the links quite often & I can’t keep up!
SORRY, THERE’S MORE
 The SDS’s are about only the new materials that are being used. There’s also the issue of the old materials coming out. Amongst these is our old buddy, lead. I’m not a fan as I have expressed loudly in this article.
There’s an abundance of other materials & pathogens to pay attention to during demo. This is a good article to prepare you for what you are very likely to encounter. I’d also like to send you to my YouTube playlist, SAFETY FIRST, which is an introduction to personal protective equipment.
The first one by the little animated woman with the cute English accent makes a good point. The equipment that is need is not task oriented. It must keep you safe in the environment.
Disclaimer: There is a great deal more information on construction safety than what you see in this article & in these videos. This is merely an introduction to the topic. I am not a safety professional. I’m just a woman who has suffered the ill effects of being around toxic materials & I don’t want you to experience the same.
THE REWARDS OF RESTORING AN OLD HOUSE (DESPITE THE DANGERS!)
The rewards are huge. You will be saving a piece of history that is beautiful & tells a story & you will contribute to that story. You will learn & teach your children problem solving skills, design skills, communication & cooperation skills, prevailing over horrible surprises skills, budgeting skills & give them the opportunity to apply the things that they are learning in school. Studying the SDS’s themselves & watching the videos is a great way to orient them to their physical environment & stretch those science chops. It’s also a good opportunity to teach them that there are dangers in the environment that can be overcome with knowledge & planning. A great lesson to learn early!
STAY IN THE BUNGALOW KNOW!!!
Sign up for our newsletter & receive our FREE E-book, 7 VITAL Things to Do Before You Hire a Contractor.
by bungalow101 | Nov 8, 2022 | Kitchens
PUTTING IT ALL TOGETHER
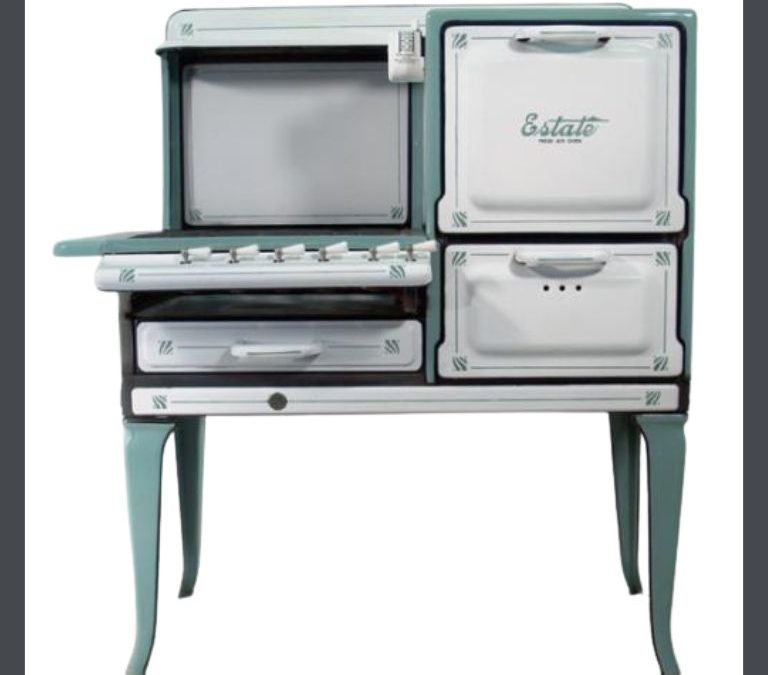
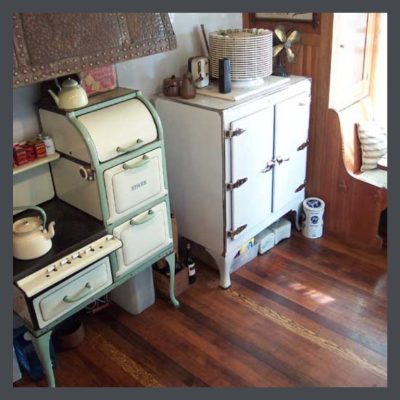
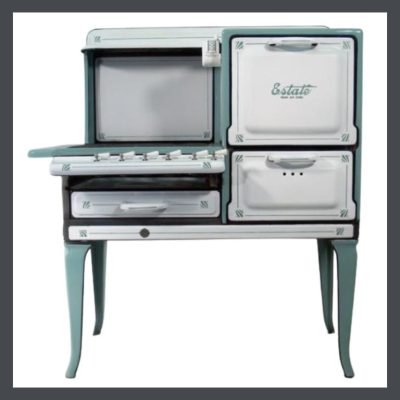 Clutching my well worn BUNGALOW KITCHENS book, I began collecting the pieces for my dream bungalow kitchen in Tampa. The first was the stove because I knew that it would take 2 ½ years to be restored, all the way in Georgia. When I had lived in L.A., there were several antique appliance sources, one within walking distance, where you could just walk in & buy an old stove.
Not so in Tampa. I found the exact stove I wanted on eBay in New England, & they shipped it to Georgia. I was at high anxiety about her little Queen Anne legs, having seen plenty of stoves with damaged ones & begged the shippers to be gentle with these delicate appendages. When it arrived in Georgia, I called the owner of the restoration shop for a status report & all was well with the lady’s gams. I set the timer for 2 ½ years. Tick. Tick. Tick.
The next step was the sink. I really wanted a green sink. I searched eBay, Etsy, Craigslist, local salvage yards for over a year. Every week I diligently scrolled, called & searched for my sink. I saw some very cool sinks, many of which would have worked well in my kitchen but I was intent on using jadeite green. For many years I have been stuck on yellow or red & white in bungalow kitchens but for some reason, those colors just no longer appealed.
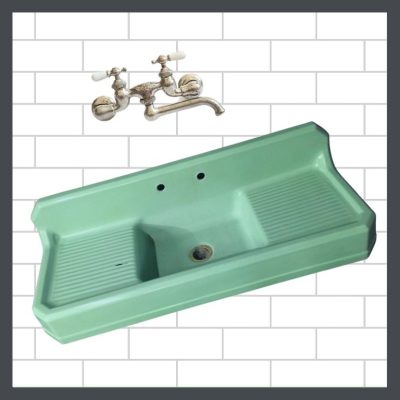 Finally, there it was on eBay. Not only was it green, but it had clipped corners, like the gable of my house! I outbid the competition & had the huge, heavy, expensive sink shipped to me where I put it in storage, awaiting the 2 ½ years until my stove would be ready, to pass. Only 1 ½ years left to go!
On to flooring. I had, long before, admired a green checkerboard floor in Jane Powell’s LINOLEM . I am a big fan of lino but, I also really like the resilience of cork, which is available in limited colors. It was not easy to get samples of either of these materials. What was common in L.A. was down-right weird in Tampa. Fortunately, we carried 2 lines of cork in my flooring company which allowed me to get my samples directly from the manufacturers.
The linoleum experience was pretty funny. I called a flooring store that mentioned lino on their website. I was very explicit- linoleum, not vinyl. Do you know the difference? “Absolutely! We have samples in many colors.’
I grabbed my keys & trotted out the door. When I arrived at the showroom, I was directed to a large display of, you guessed it- vinyl. The salesman thought that they were the same material. He was very confused. Fortunately, the next store had real lino & I got my samples.
THE DREAM BUNGALOW KITCHEN COLLECTABLES FRENZY
 Meanwhile, I accumulated mountains of kitchenalia- old mixers, toasters, coffee pots, cooking implements. All in my beautiful jadeite green. My biggest addiction was potholders- kitty potholders. It got to the point that I was wondering if I would need to build a kitchen annex to display them!
I also had quite a kitty teapot problem. The thing with the internet is that one can amass a lifetime collection of about anything in a matter of hours. And I did! Over the course of 2 ½ years I gathered several lifetimes of kitty teapots. I paused only long enough to add to my kitty pillow collection. At least I had a bed on which I could display them!
Poor Hubby, every day boxes of this stuff arriving, none of which made any sense to him.
Then there was the cabinet jewelry. When I outfitted my 1910 Craftsman in Eagle rock, I formed a friendship with my hardware specialist at House of Antique Hardware, Jennifer. She assisted me in choosing lighting & in finding replacements for some of my other hardware. If they didn’t have exactly what I needed there, she would search it out for me through the many connections she had developed in her decades in the industry. She truly lived up to her title of hardware specialist again & again.
 Turned out that her sister had a winter place in St. Pete so when Jennifer came to visit her, we would get together & she & I would talk old houses & her sister & my husband would talk food. (Sister introduced Hubby to his favorite restaurant in Tampa Bay.)
Because I never got it together to restore my Craftsman kitchen, I decided to use knobs & pulls in my 1925 Mid-Century Modest that were wholly inappropriate. I had planned to use these in clear in the Craftsman & wanted the green for the 1925’er.
My dear friend Jane Powell was a preservation bulldog, however, she left the door open by saying that anything was fine if it had a really good backstory. I consider this to qualify as a really good backstory. Heck, when she restored her own kitchen in the Sunset House, she used an antique candy store display case as a kitchen island & she was delighted with it!
On this page you will see many pictures of Jane’s beloved bunga-mansion, an altogether imposing house. One of the things that I admired about Jane was that she was so at home in this house & so not overwhelmed by its size, & frankly, the discomforts of living in an very old, partially restored mansion. As beautiful as it is, the stairs are steep, you can get lost in all the rooms, & it’s really cold. The last time we were there was just before Christmas & I shivered all night long under 3 folded double blankets.
THE BUNGALOW KITCHEN DREAM CRUSHER
Mid the 2 ½ year wait for the stove, surrounded by my lino samples, my sink, my potholders & my green glass hardware, the Recession hit. Construction shrank by 86% in Florida. That left all of us scrambling for the remaining 14%. We lost $50,000 on a Victorian we had restored. I was on the sidewalk every weekend, yard saleing my childhood dolls, Grandma’s pressed glass & my Christmas decorations to make my payroll.
When the stove restoration was finally complete, we carted it home & parked it in a corner in the ugly kitchen. After the financial hit of the Recession, I couldn’t justify the expense. Additionally, working 80 hours a week, I never had a spare minute to put it all together. When we sold the house, I finally admitted defeat, donated the sink to Habitat & sold the stove, the potholders & the kitchen implements.
BUNGALOW KITCHEN DREAM REDEMPTION
 I blog about bungalows because I have been talking, writing, advocating & educating for & about them incessantly over the past 20 years & living in them for over 40. I should have been blogging about them since the dawning of the Age of the Internet. It took searching my heart, house bound in a world-wide pandemic, for what brought me joy to get me started blogging, but better late than never!
After experiencing too many hurricanes in a frame house, I now live in a 1955 block, Modest Ranch. (The pink 50’s sink- remember?) This house when I purchased it, was almost completely original. The kitchen had been messed with so I put it right again & I used my 1910 glass hardware (in black) because, by golly, I have a good backstory!
This article is all about my long hoped for bungalow kitchen. Thanks to my blog, I got to put it together & show it off to hundreds of people.
Thank you, gentle readers. You have mended my broken heart.
STAY IN THE BUNGALOW KNOW!!!
Sign up for our newsletter & receive our FREE E-book, 7 VITAL Things to Do Before You Hire a Contractor.
by bungalow101 | Nov 2, 2022 | Kitchens
 Time to grab your Kleenex box. Creating a bungalow kitchen never got any further than the dreams stage for me. I’d had my nose buried in Jane Powell’s BUNGALOW KITCHENS for a number of years & wanted nothing more (maybe world peace, but that’s about it) than an authentic kitchen.
All of my friends had restored or original kitchens & I was feeling like the red-headed stepchild of the historic preservation communinity. Make that 2 historic preservation communities!
The one to the left is in a landmarked house in Eagle Rock, California, created by 2 plein air artists who were as dedicated as I to authentic restoration. With my ability to pick up the phone & talk to anybody, I gotten their house featured in American Bungalow Magazine.
My first friend in my new neighborhood in Tampa, Florida, Steve, who was head of the Historic Preservation Committee for the neighbor association had an original kitchen in his beautiful Craftsman. He lived down the street from me & I often tortured myself by visiting his beautiful house & peeking in his California cooler.
MY HOUSE & ITS HIDEOUS, VERY UN-BUNGALOWY KITCHEN
 Before buying my Tampa bungalow, I was house-shopping & had seen a nice looking 1925 bungalow listed for a couple months, but I was truly repelled by the kitchen, (& I didn’t even know about the roaches yet! Get ready for the icky part.) knowing that it was part of the inflated price I would have to pay only to come in & tear out that black marble & chunky tile, not to mention the (mismatched) stainless appliances, to create the bungalow kitchen of my dreams.
Not having central air, yes, in Flor-ee-da, the house had languished on the market for several months & one day when I’d been out house-hunting, it was open. What the heck. I went in & fell in like with the house. It now had A/C & though there were a few things to deal with, it had a nice, big living room for committee meetings, a good layout & was only 1 block away from my new friend, Steve. By this time, I was desperate enough & the price was low enough, I went for it. And it was in a historic district, so I knew that it would increase in value.
The house had a large, hideous kitchen, a perfect blend of 70’s jalousie windows, solid wood cabinets from maybe the 50’s, tile flooring, counter & backsplash from the 90’s, & fancy-schmancy Home Depot pendant lights from probably 2 days before the house was put on the market. The black marble countertops were especially awful. Before we got the house sealed it featured nightly invasions of palmetto bugs. This is a local species of the cockroach- huge & flying- & they felt right at home, camouflaged by the black countertops.
The kitchen did have its original door to the back porch & the original door to what had been the butler’s pantry & was now the grodiest ever pantry/laundry room/HVAC unit.
The kitchen layout was very awkward & I was clueless as to how it had ever been configured. There was now a cooktop & a wall oven so all hints of its original incarnation were annihilated long before.
JANE POWELL- THE QUEEN OF CREATING A BUNGALOW KITCHEN ARRIVES
 After seeing all the destroyed & neglected properties during my house hunting, I decided that the people of Tampa needed to get a little education about restoring bungalows-‘specially kitchens. So, I proposed to the neighborhood association that Jane should be invited to come & speak at an educational event, topic: Creating a Bungalow Kitchen! One of the board members was thrilled. He knew of Jane’s books & even had a Jane kitchen. The proposal was accepted. (They didn’t know me yet & had no idea how this would open the door to my wild my future proposals!) & a couple weeks after I moved in, Jane arrived.
My kitchen conundrum was no match for Jane. In 3 seconds she had the space planned so beautifully that I wondered why I had never figured it out. Suddenly, it seemed so obvious how I could create my dream bungalow kitchen.
Her packed-to-the-rafters event at our beautiful, historic garden center went off without a hitch & we spent the 3 days after driving around doing kitchen consultations, 2 other events & teaching a class in interior design. Well, I drove & she consulted, spoke & taught. It was rather awful to take her to the airport for her return flight home, but I connected with the head of our county library system & they bought 50 books- 10 in each title. With that, I felt like I had put a little bit of Jane in Tampa & looked forward to having my own Jane Powell kitchen.
I still missed her.
STAY IN THE BUNGALOW KNOW!!!
Sign up for our newsletter & receive our FREE E-book, 7 VITAL Things to Do Before You Hire a Contractor.