Chimneys in old houses can be problematic. When you are buying a house, generally, your home inspector will frequently suggest that you have a chimney inspection performed by a specialist.
Why would you want to fork out more money on a house that you don’t own, to do this?
Fireplaces & chimneys are complex systems with many elements to consider. Like most specialists, veteran chimney inspectors can easily spot problems which might be overlooked by a less experienced person. Often, they have done hands-on repairs themselves so they have a greater reality on the anatomy of a fireplace, what problems they can develop, & how to remedy those problems.
Could there be a conflict of interest? Absolutely! So, you want to get referrals, maybe a second opinion. It is very important to have a bit of knowledge of fireplaces & chimneys yourself so that when they’re there inspecting, you can follow the bouncing ball. That’s why I have gathered these videos for you!
I also suggest that you read my article on choosing contractors because they can be very good but some, not so much!
WATCH CHIMNEYS IN OLD HOUSES
Chimneys Explained #01 – Masonry Chimneys (508)
A Step in Time Chimney Sweeps
A great video explaining the parts of a chimney & their functions in keeping your house warm & safe.
Chimney Inspection Michigan | Doctor Flue inspects the inside of a chimney (4:36)
The Flue Doctor
The expert explains some of the problems that can be discovered during a chimney inspection & gives suggestions as to their remedies.
Performing a Fireplace Inspection According to the InterNACHI® SOP (5:22)
International Association of Certified Home Inspectors (InterNACHI®)
This video delineates what your general home inspection will cover in the fireplace & chimney section.
Home Inspection – Chimneys
Homeowner Series
Another tour of the parts of a chimney & more examples of problems that a chimney can have.
STAY IN THE BUNGALOW KNOW!!!
Sign up for our newsletter & receive our FREE E-book, 7 VITAL Things to Do Before You Hire a Contractor.
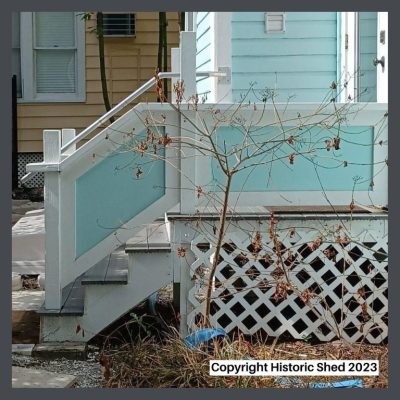
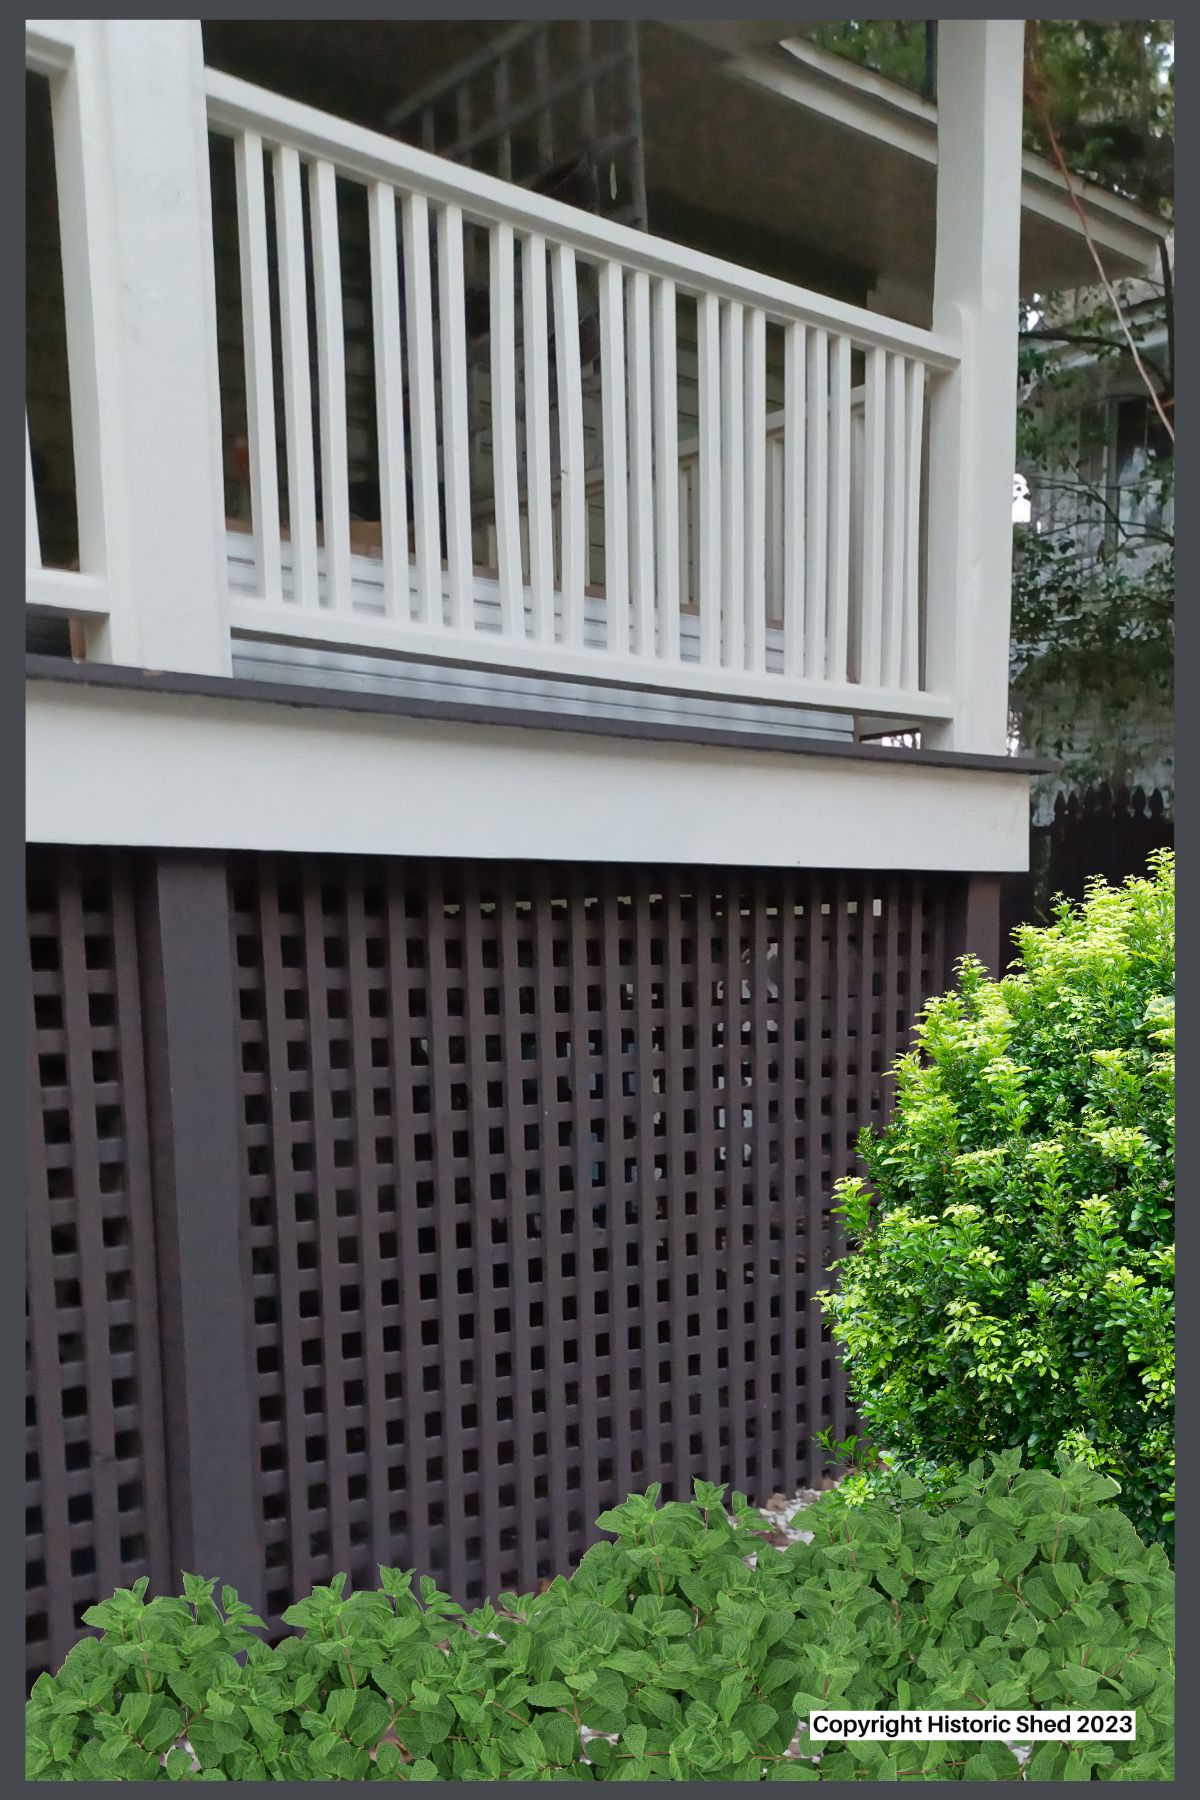
This bungalow has more exposed wood foundation lattice than the average house.
“It’s all in the details.”
These are words to live by, or at least to restore and renovate old homes by. It’s the little things that can make an otherwise well-executed renovation miss the mark. You may not know what part bugs you, but you sense they didn’t get it quite right when you look at a historic house. One of those items that often isn’t quite right is the bungalow foundation lattice.
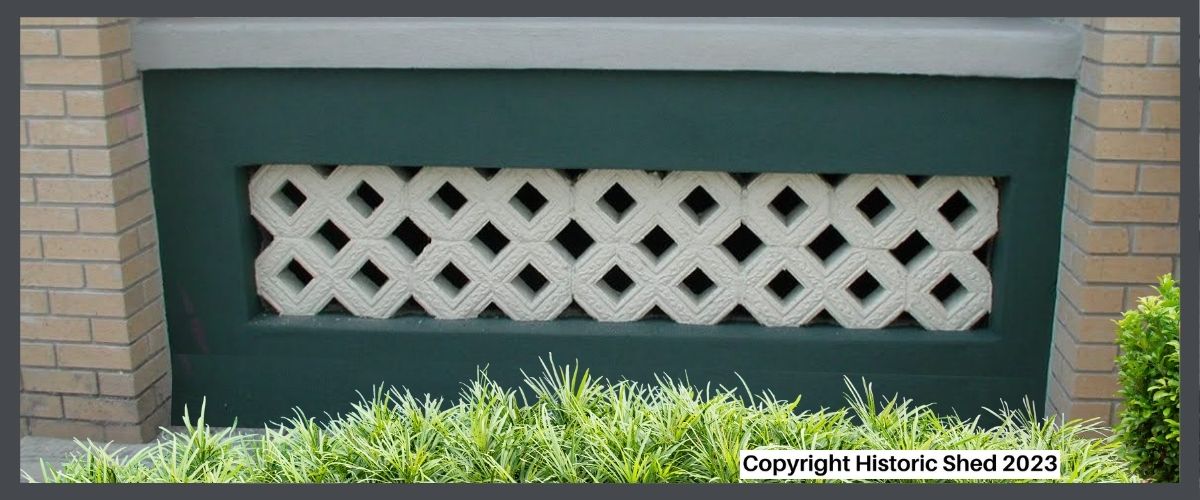
Pier foundations are a common element in historic homes, often used for porches, or, in warmer climates, as the entire house foundation. The piers are an economical way to support the house or porch, but homeowners have always had to infill between the piers in order to keep critters from making their home under there as well. At the same time, the infill works best when it allows adequate airflow under the house or porch, so it is often a material installed interspersed with openings. Sometimes the foundation is infilled with the same material as the piers, such as brick or stone. Other times a different material is used for for bungalow foundation lattice, such as wood or concrete block.
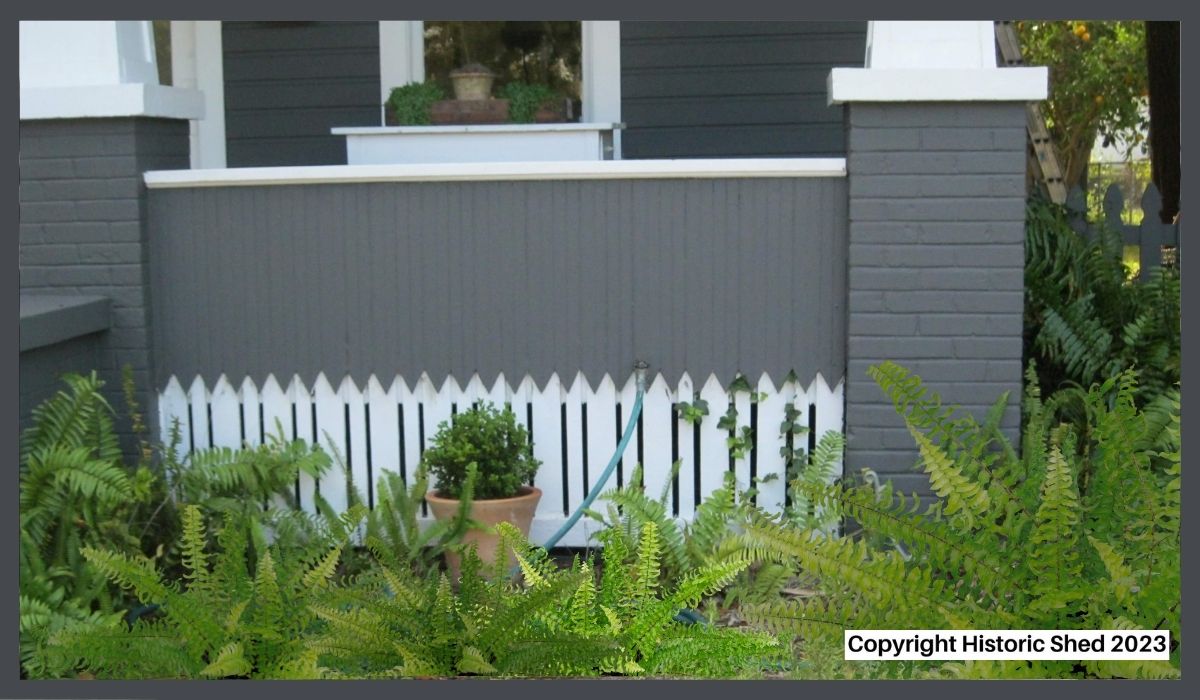
A mixture of stucco over block and open masonry block used to infill between large brick piers for this porch.
If the original lattice is missing, it most likely was originally made of wood. Making wood replacement panels isn’t a highly skilled job carpentry-wise compared to many restoration jobs, but it is time consuming and with today’s wood prices, can cost more than you expect.
Like most old house elements, there are numerous creative and varied ways that infill lattice has been installed over the years, but there are some commonalities that need to be followed for it to look right, regardless of the type of infill used. Here’s my best tips for lattice that is appears appropriate on your historic house.
CHOOSE AUTHENTIC MATERIALS FOR YOUR BUNGALOW FOUNDATION LATTICE
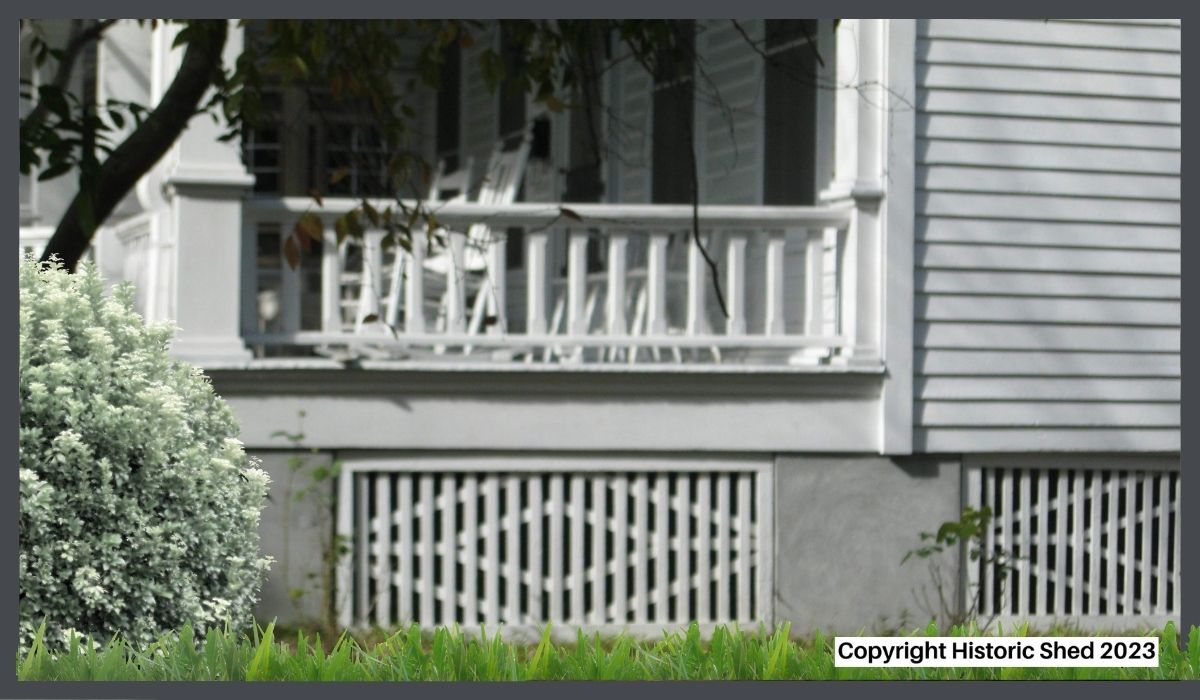
Pretty much everything is wrong with this lattice from material to installation to effectiveness.
It seems obvious to say you should avoid plastic anything on a bungalow, but how many times have you seen bright white plastic lattice used on historic homes? It jumps out in its bright white plastic-ness from across the street, so it is hard to miss. Yes, it’s ready made and inexpensive and easy to work with, but aside from the aesthetics, it gets brittle and breaks with every rock the lawn mower throws at it. And the lattice is spaced with gaps that really don’t keep much out. It’s basically the cartoon version of foundation lattice.
Clearly, the plastic lattice panels are supposed to mimic wood, which is what most missing lattice was made from (masonry infill usually survives the test of time better). Often, there are premade wood options if you don’t want to build lattice from scratch, which are less flat and flexible than the plastic option. And they are pressure treated, as any wood lattice should be for longevity. However, the premade lattice is thinner and spaced further apart than historic precedents, so the ideal replacement panels should be custom made of real 1x pressure treated wood. And either custom or premade lattice panels need to be installed correctly.
PUT YOUR BUNGALOW FOUNDATION LATTICE IN A FRAME
Too often, people install the premade lattice panels directly to the piers, making it ugly and wobbly. Ideally, lattice panels should be set in a wood frame both for stability and to make it easier to attach to the piers. Built correctly, the frame will be in front of the lattice itself, adding some depth to the panel as well.
Having the frame on all four sides also allows you to attach screening to the back of the lattice panels easily. Most building codes require a maximum size gap in the foundation openings which is quite small. Attaching screen or welded wire mesh to the back of the lattice allows you to invisibly meet the requirements without impacting the design of the lattice itself.
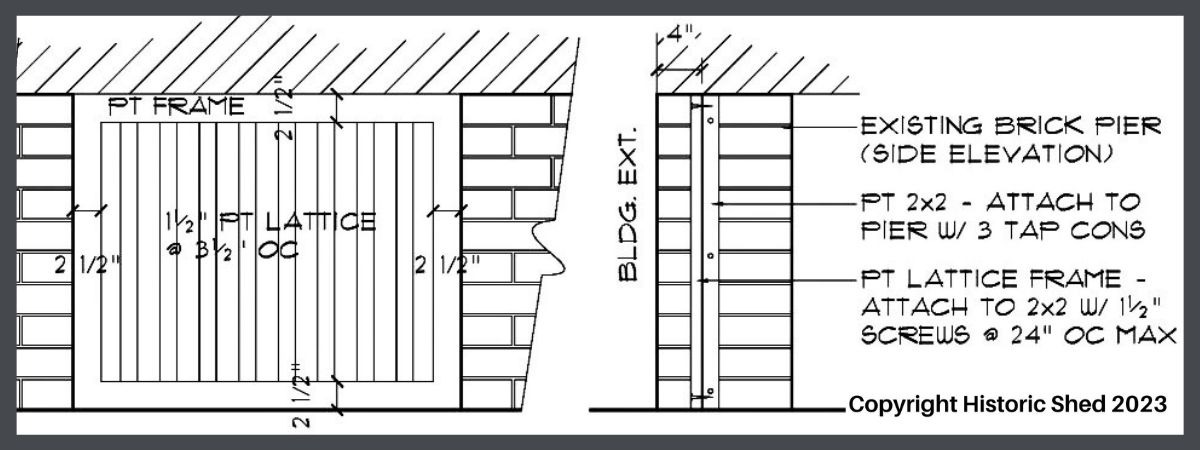
RECESS THE LATTICE FROM THE PIERS
Bungalow lattice installation detail.
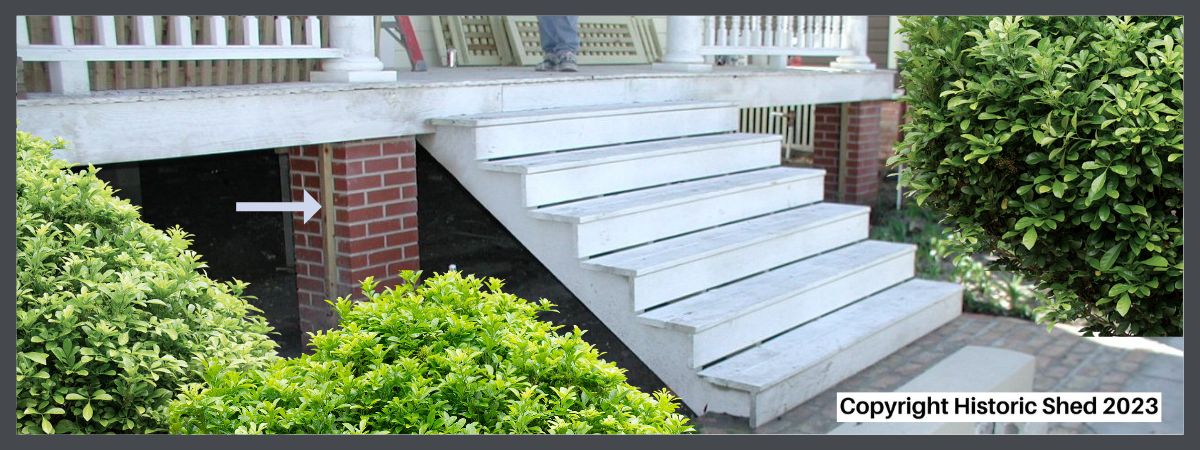
When installing wood lattice panels between piers, people are often tempted to attach it to the front of the piers, or even across them completely. Yes, it seems easier, but that is not how it should be done. Rather than trying to attach the panels directly to the piers, instead install 2×2 pressure treated nailers on each pier, set about 4″ from the front face of the pier, then screw the lattice to the nailers. This way, it is easy to remove panels for access under the building at all points without repeatedly drilling into the brick. Here’s a detail below:
Pressure treated 2″x2″ nailers attached to the piers, ready for lattice installation
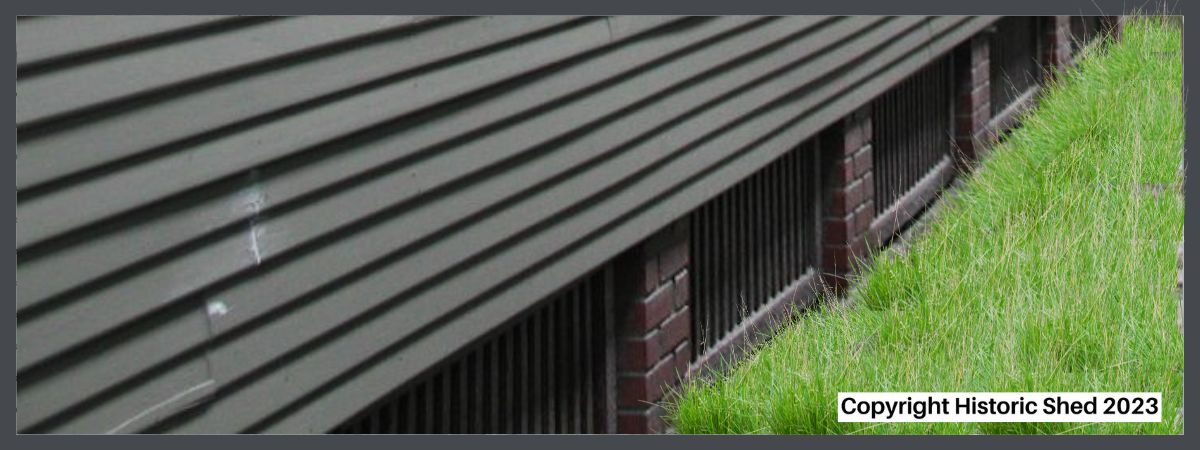
Recessing the lattice panels allows the strength of the piers to show through.
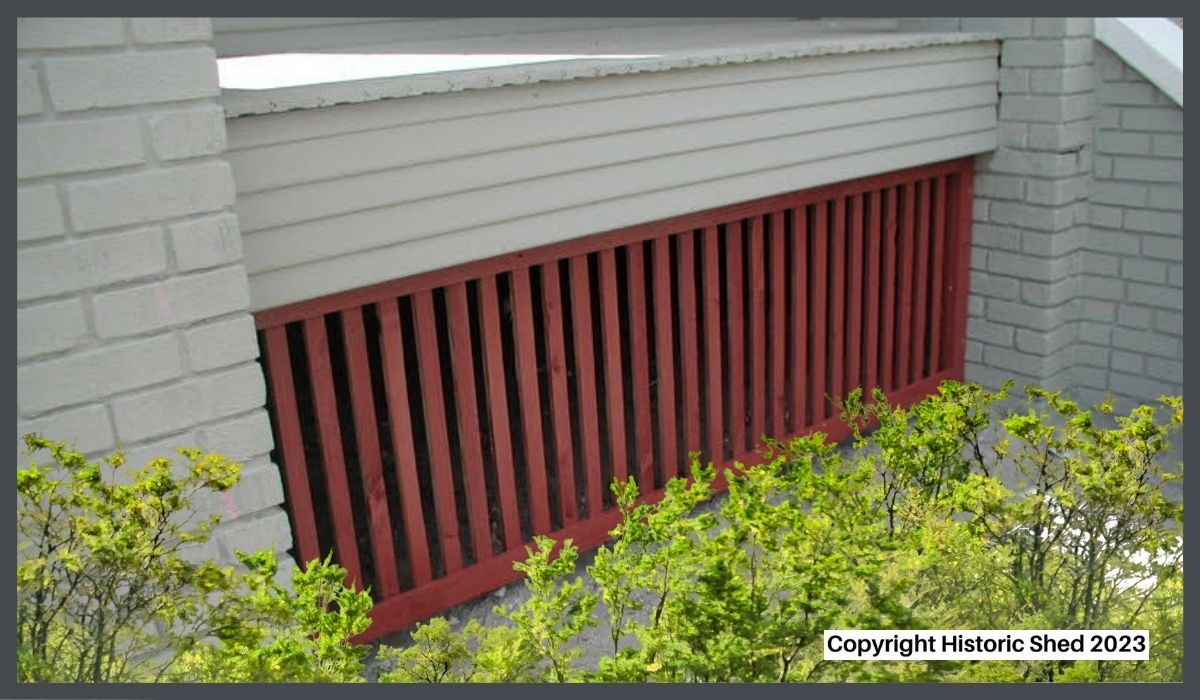
CHOOSE THE RIGHT STYLE OF LATTICE FOR YOUR BUNGALOW
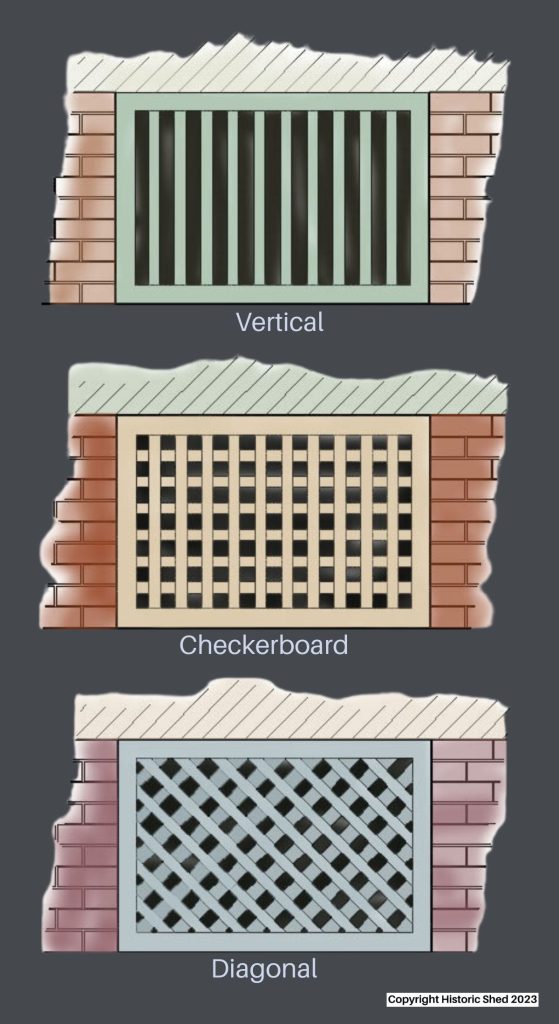
If you either have remnants of the original lattice at your house or historic photos, then it’s easy to know what style replacement lattice panels to build. However, if you are in the same situation we are with our current 1911 house, there is no original lattice left and not a single photo to be found so far. In that case, there are three common lattice configurations that will likely work. In the illustration below, I consider the simple vertical lattice to be easy to build and uses the least wood, so I specify it quite often. The checkerboard design uses twice as much material, but is also simple to build. And it is much stronger for tall openings. I find both styles appropriate for most bungalows in the 1910s and 20s. Similarly, the diagonal panels are strong for tall openings and use more material than the vertical design but are generally more appropriate for homes pre-1910.
The most common styles of foundation lattice.
Very tall porch openings are best served with checkerboard lattice panels rather than vertical for strength.
CHOOSE A COLOR FOR YOUR BUNGALOW LATTICE
When choosing bungalow paint colors, I usually recommend as dark color for the porch deck, window screens, and foundation lattice. The dark color on the lattice makes the foundation feel more grounded and (hopefully) shows less dirt. Of course, your house color scheme may work best with a light color.
GET INSPIRED & HAVE SOME FUN!
So hopefully this gives you some ideas beyond white plastic lattice for infilling between your bungalow piers. And if the simple styles shown above aren’t enough for you, there is plenty of precedent for some much more interesting options. Perhaps there are some fun examples of lattice creativity in your historic neighborhood. Here’s a couple I’ve found worthy of photographing to inspire me over the years.
This lattice is recessed behind the porch beadboard which is cut to make it look like a picket fence. I find it a very darling detail!
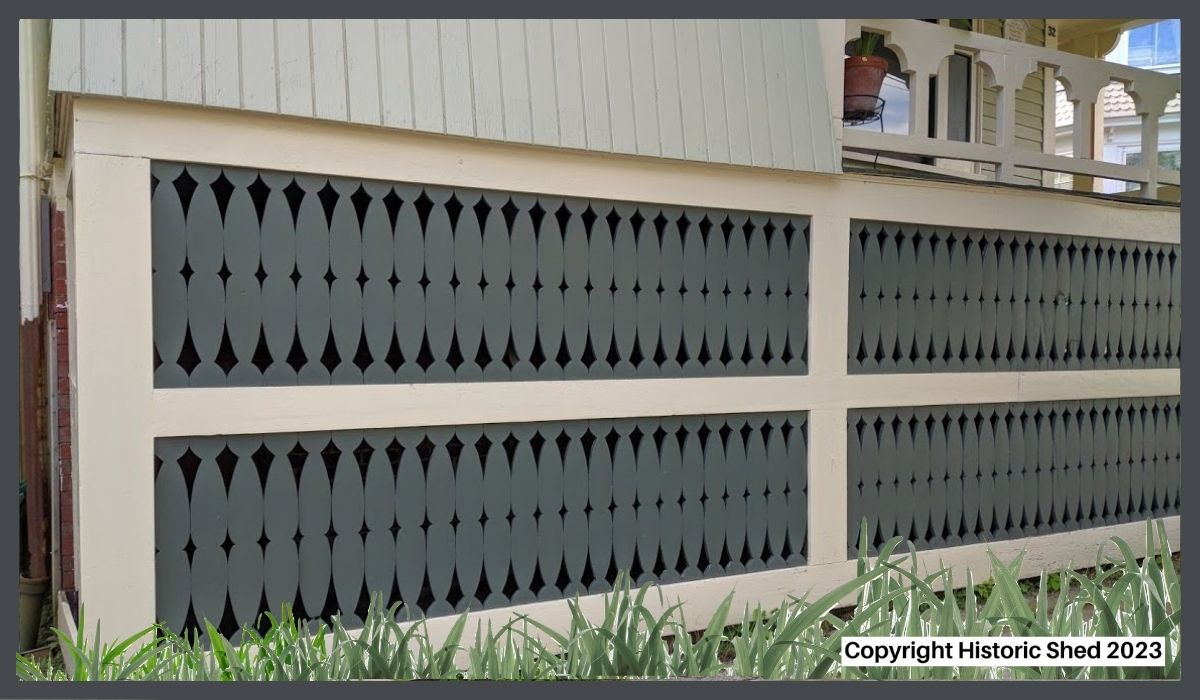
The image isn’t that great but the lattice is so lovely I decided to include it. Just squint a little.
Lattice designed by a true craftsman. And I adore that porch railing, too!
TIP: Read Jo-Anne’s article WHAT’S A BUNGALOW ANYWAY to learn more HERE!
This article was written by Jo-Anne Peck of Preservation Resource, Inc. & Historic Shed. Jo-Anne is a historic preservation professional with a degree in Building Science, a Master’s of Fine Arts in Historic Preservation & a licensed Florida Building Contractor with over 25 years experience in preservation. She has kindly provided these photos & this information based on her vast knowledge of bungalows.
STAY IN THE BUNGALOW KNOW!!!
Sign up for our newsletter & receive our FREE E-book, 7 VITAL Things to Do Before You Hire a Contractor.
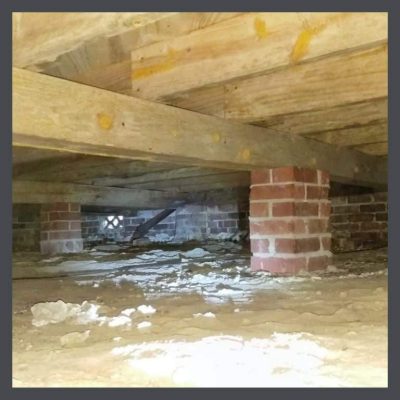
A major headache in old house restorations can be the foundation. Most of us have never crawled under our houses, & seen our foundation. For good reason! It’s cramped, it’s dark & dirty. Plus, it could be home to any number of disgusting things.
My Tampa house was littered with broken glass underneath. It was also home to some of the strangest plumbing & electrical ever seen, in fact, some plumbing parts had been used in the electrical system & some electrical parts were used for the plumbing. Hey, it’s Flor-ee-dah! You just use what you got!
The foundation is the first part of the house that is built & most of the old ones were built pretty sturdily. But, over the decades they have been compromised by earthquakes, soil compaction, water intrusion, termites & by tradespeople crawling underneath with saws & hack away at various support pieces to accommodate their work & then just walk away, as if there are no consequences in removing huge pieces of load bearing materials.
Well, there are! And you will see some of it in these videos. Meanwhile, take a look at my article on protecting your foundation. There are actions that you can take to prolong its health.
This is my longest page of videos because your foundation is so-o-o-o-o important in the preservation of your house.
THE OLD HOUSE FOUNDATION VIDEOS
ASSESSMENT
House Bolting Experts – Los Angeles Foundation Repair (2:52)
Z Ian
Assessing Floor Sag In A 100 Year Old House (14:18)
Michael Zicopoulos
REPAIR
Raising Floor in 155 yr. Old House – Part 1, Split Joists (6:17)
Rama Karl
Raising Floor in 155 yr. Old House – Part 2, Fixed!
Rama Karl
GRADING
How to Determine Land Slope (2:13)
UNL Raingarden
How to Properly Grade Around Your House (1:07)
Milwaukee Metropolitan Sewerage District – MMSD
How to Grade Around a Foundation (3:51)
This Old House
Tip of the week – Grading around your home. (2:14)
Groundup Builders
GUTTERS
Understanding Gutter Downspouts (3:43)
This Old House
How to Drain Downspout Water Flow Away from a House |
This Old House (4:22)
WAIT, THERE’S MORE!
So, maybe after crawling under all these houses you’re ready to take a shower. Now you see why I’m such a fan of PPE!
I have a slew of videos about old houses, some practical like this one, some inspirational & some just downright entertaining. So if you want to pick up a hammer, pick up the phone to get an estimate or just pick up a few hands full of popcorn & crank the old recliner, watch my curated video collection here!
STAY IN THE BUNGALOW KNOW!!!
Sign up for our newsletter & receive our FREE E-book, 7 VITAL Things to Do Before You Hire a Contractor.
Your bungalow’s foundation was the first thing to be built give or take, 100 years ago. It is still of primary importance. It bears the weight of your house & all its contents- your cast iron bathtub, your refrigerator, your bookshelf. If you live in a cold climate, it also bears the weight of winter snow, which weighs in at about 15 pounds per cubic foot.
In this article I am going to address what can adversely affect your foundation. I’m not enthusiastic about warning people about dangers without giving them solutions so I’m including what you can do to ensure that yours stays strong & level.
The ground beneath us moves often, shrinking during dryer times & expanding during wet ones, & does not move uniformly, causing damage to the supporting piers of your bungalow’s foundation.
STEPS TO TAKE TO PROTECT YOUR BUNGALOW’S FOUNDATION
1. Plant trees well away from your exterior walls. The Arbor Day Foundation recommends that you plant a medium (30’- 40’) tree at least 15’ away from a wall. A taller tree. Such as an oak, needs to be at least 20’. Most tree roots spread 2-3 times the radius of the canopy, & often reach out 5 times the radius of the tree canopy & in dry conditions, they can spread even further. As they grow, they disrupt the soil.
Some trees have more invasive roots, some that are water-seeking. Replacing a root-infested main drain pipe (which carries all the water from your house to the city connection or to your septic tank) typically requires excavation, which makes a mess in your yard & can be hideously expensive. Trees with invasive roots may need a minimum distance of 25 to 50’. Slow-growing trees generally have less destructive roots than those that grow quickly. Before you plant a tree, find out about how its root system will behave.
2. Take a deep breath!
Your foundation needs to breath. If water gets underneath your house, it must be able to dry out. A non-vented crawl-space is dangerous to your foundation & your floors. Read this article on how you can help it get some much needed air.
3. Remove dead trees, stumps & root systems from areas near the house. They attract termites & your bungalow, depending on wood beams to support it doesn’t need to be weakened by the gnawing of termites.
4. Install gutters. They channel rainwater from your roof to downspouts & keep your beds from getting washed out. But here’s the trick, you need to install gutter extenders or your gutter will pour all that water right onto your foundation. You need at least 8’ extenders to take that water away. This is most important if you live in a wet area, like I do in Florida, or during the rainy season even in a dryer climate. You can move the ends of the extenders around so that no one area is getting too much water, or, you can choose plants far from your house that would appreciate the extra soaking. I attached several together & put them on my bananas. My neighbors stopped answering their doors when I’d show up with yet more banana bread! You can get extenders at any big box hardware store, or even on Amazon. They are cheap, very easy to install & remove & take up little space in storage. Honest, you need them.
5. Be alert for leaks. If you suddenly find yourself with an unusually high water bill one month, get suspicious. Leakage can occur in any pipes, your water heater, your ice maker in your refrigerator- a biggy. In my 45 years in the wood flooring business, this was our most common repair.
6. Drainage lines can leak & create problems with you bungalow’s foundation too. We owned a house in which it was discovered that the shower was not hooked up to the sewage system. All the water drained under the house! We’d had the house “inspected” but this was not noticed & had been going on for decades.
Do not overlook the draining of your HVAC’s condensate lines. Under the indoor unit of your HVAC system, there sits a large metal pan. When you run your air conditioner, water collected from the air in the form of condensation will drip out of the unit & flow into the drain pan. From the collection pan, it flows into the drain line & then through a pipe & out your bungalow. You need to make sure that the drain line is not clogged or the pan will overflow, & you need to have that pipe long enough so that the water is not running out close to your house.
7. How is the grading around your house? Does water run away from or toward the foundation? Hopefully this was included in your inspection, but it can be overlooked. Notice where the water runs in a heavy rain.
8. If you find that you are having problems with water sitting under your bungalow, & you determine that your grading is tipped the wrong way, you can have French drains installed to move the water away from your bungalow’s foundation.
9. When you are doing your hardscaping or landscaping keep in mind the idea that you don’t want to build up your beds so that they are higher than the ground around your house, especially if you have raised borders that will trap rain or irrigation. You don’t want to be building little ponds around your 100 year old masonry piers! If you have raised borders, monitor your irrigation & use gutter extenders to keep heavy rain out of them.
10. Let’s talk about your irrigation system. My husband has been called to inspect homes which have developed cupped (wood) floors & found that the irrigation system was hitting the house. Even if it’s not directly hitting it, your sprinkler heads need to be pointed away from your bungalow’s foundation. It’s a good idea to inspect the system routinely to see if it has sprung any leaks that might be hitting your house or causing water to flow under the house.
11. Keep your plants away from your house. You need to be able to inspect your piers & peer underneath your house to see what’s going on every once in a while. (I never said home ownership is for sissies.)
12. Protect your bungalow’s foundation from termite damage. I’m going to toss you over to a Bora-Care video to tell you about the product. Then I’d like for you to watch a video on a more toxic product Sentricon.
I use both. I had the attic & crawlspace of my bungalow sprayed with Bora-Care & then I installed Sentricon at the perimeter. I don’t know why the Sentricon video presents it as an either/or situation. They each have their place your termite arsenal.
I was lucky to have discovered a wonderful home inspector whom I could call when I had things going on with my house that looked scary. He figured out why my bedroom wall was cracking (water under the house which is how I learned about gutter extenders) & he successfully tracked a leak missed by a bunch of leak detection guys at my friend’s house.
When you own a house & especially when you own a 100 year old bungalow, you need someone who knows more than you do that you can trust. A good inspector is worth her weight in gold before you purchase & as your home changes through the years.
TIP: LEARN MORE ABOUT FOUNDATIONS FROM THE GREAT VIDEOS HERE.
STAY IN THE BUNGALOW KNOW!!!
Sign up for our newsletter & receive our FREE E-book, 7 VITAL Things to Do Before You Hire a Contractor.
 Chimneys in old houses can be problematic. When you are buying a house, generally, your home inspector will frequently suggest that you have a chimney inspection performed by a specialist.


 A major headache in old house restorations can be the foundation. Most of us have never crawled under our houses, & seen our foundation. For good reason! It’s cramped, it’s dark & dirty. Plus, it could be home to any number of disgusting things.
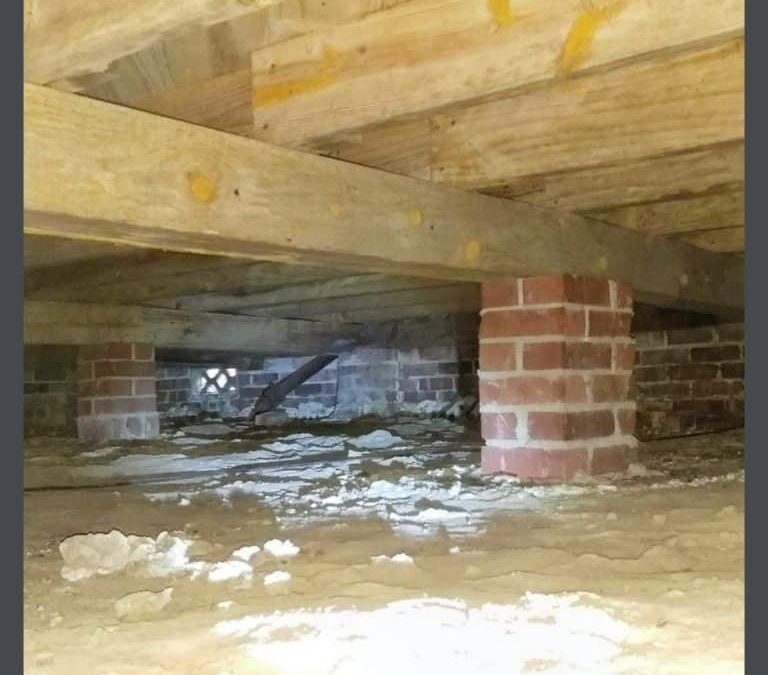
 Your bungalow’s foundation was the first thing to be built give or take, 100 years ago. It is still of primary importance. It bears the weight of your house & all its contents- your cast iron bathtub, your refrigerator, your bookshelf. If you live in a cold climate, it also bears the weight of winter snow, which weighs in at about 15 pounds per cubic foot.
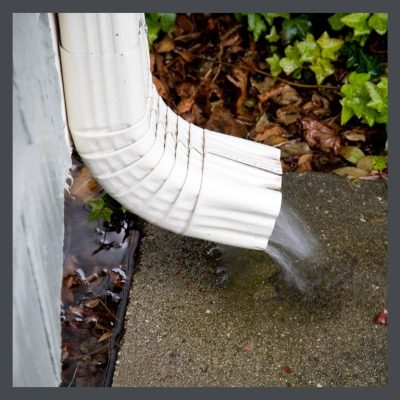 4. Install gutters. They channel rainwater from your roof to downspouts & keep your beds from getting washed out. But here’s the trick, you need to install gutter extenders or your gutter will pour all that water right onto your foundation. You need at least 8’ extenders to take that water away. This is most important if you live in a wet area, like I do in Florida, or during the rainy season even in a dryer climate. You can move the ends of the extenders around so that no one area is getting too much water, or, you can choose plants far from your house that would appreciate the extra soaking. I attached several together & put them on my bananas. My neighbors stopped answering their doors when I’d show up with yet more banana bread! You can get extenders at any big box hardware store, or even on Amazon. They are cheap, very easy to install & remove & take up little space in storage. Honest, you need them.
 9. When you are doing your hardscaping or landscaping keep in mind the idea that you don’t want to build up your beds so that they are higher than the ground around your house, especially if you have raised borders that will trap rain or irrigation. You don’t want to be building little ponds around your 100 year old masonry piers! If you have raised borders, monitor your irrigation & use gutter extenders to keep heavy rain out of them.
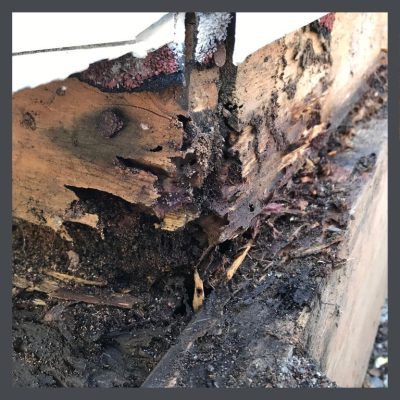 12. Protect your bungalow’s foundation from termite damage. I’m going to toss you over to a