by bungalow101 | Jan 12, 2023 | Bathrooms, Doors & windows, Kitchens
 I put a call out to my Facebook followers for their favorite bungalow architectural salvage resources. I have long been a fan of the idea of salvage, as well the the practicalities of the practice. In my previous article, I write about the cultural, economic & ecological benefits of salvage & in this article, I write about the ones that they recommend & ones at which I have shopped over the years.
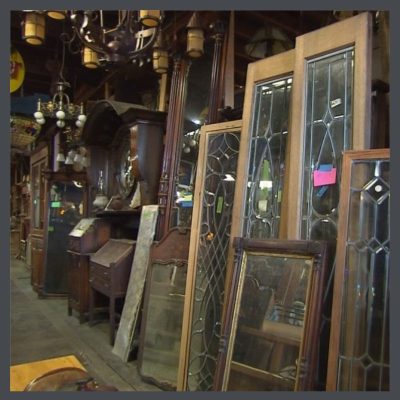
I tend to get a bit mesmerized in a salvage shop. While you see a plethora of objects, of all ages & types, the story is incomplete. Riveted by these bits of story. I get unpopular pretty fast because I ask so many questions but I’m a woman who loves a story, mine or someone else’s, & I feel untethered when I don’t know the details.
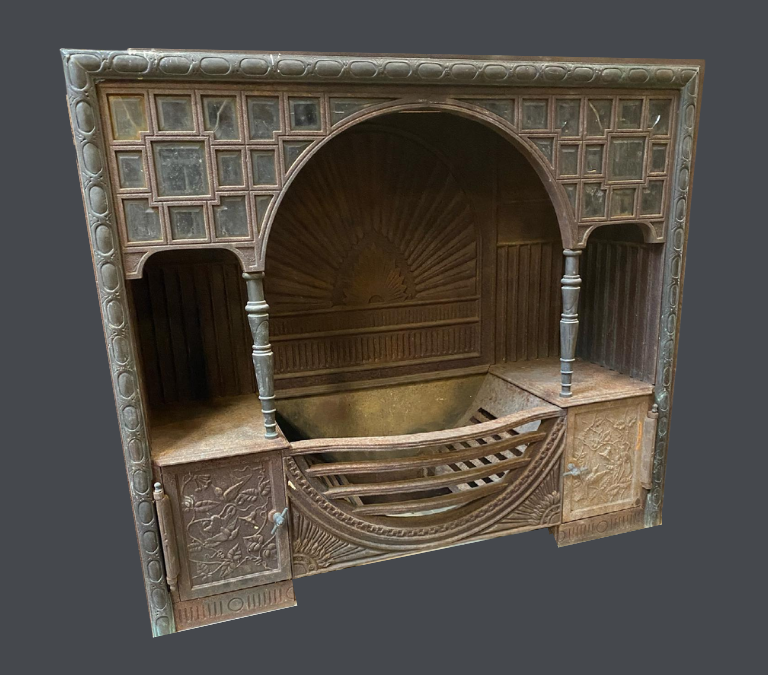
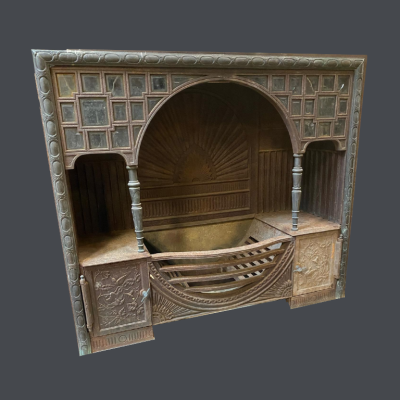
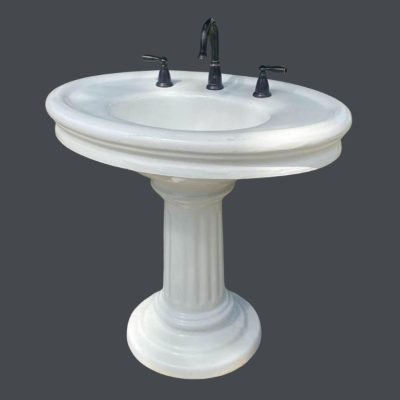
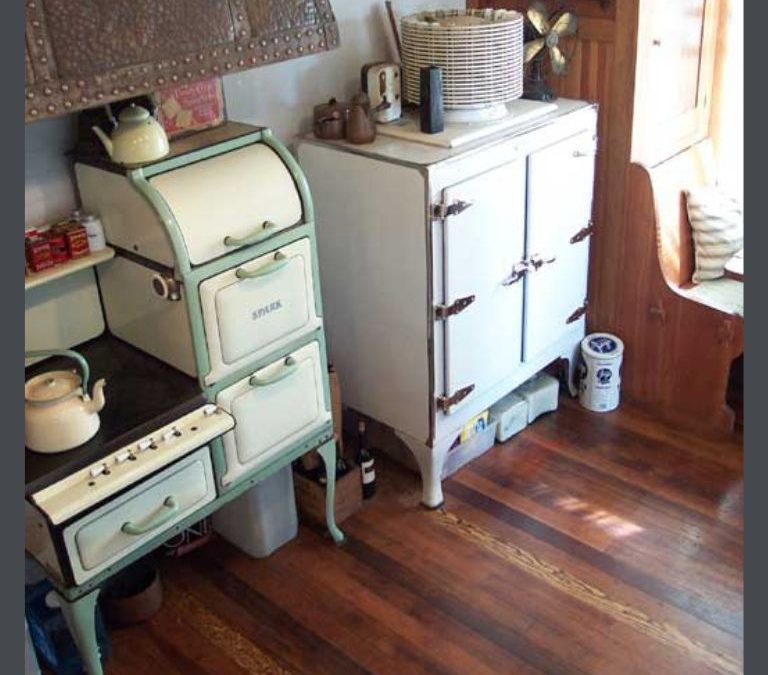
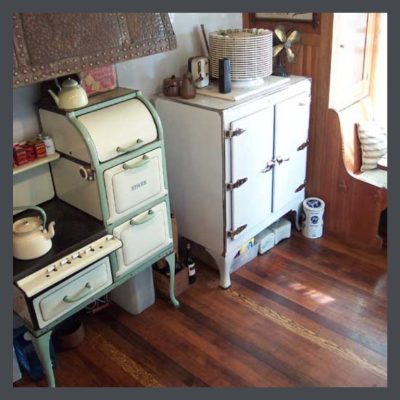
Occasionally, it is difficult is even understand an object’s purpose! The object to the left, provided by Doc’s Architectural Salvation, is clearly a product of The Aesthetic Movement, an art movement in the late 1800’s which valued the beauty of the the applied & fine arts over any social ramifications. You have heard the expression, “art for art’s sake?” This philosophy was manifested in the work of the Aesthetic Movement.
(I’m rather partial to this design style myself, & my dishware at my home in Eagle Rock, the Hare House, was of an Aesthetic pattern. I displayed it on my plate rail in my dining room & heck if it didn’t look wonderful with my Craftsman built-ins & my Restoration Hardware, Stickley knock-off dining table.) But more importantly, what is this thing?
Now you know how I feel in a salvage store!
BUNGALOW ARCHITECTURAL SALVAGE RESOURCES ALL OVER THE COUNTRY
I’m going to split up the country into sections. As I hear from you (hint, hint-see the comment form below?) I will break it up by state. So let’s get salvage shopping!
ARCHITECTURAL SALVAGE SOURCES IN THE NORTHWEST
 Aurora Mills
Aurora, Oregon
Established in 1999, Aurora Mills is a multi-facted store offering antique & vintage architectural items, lighting, reclaimed lumber, iron gates, doors, fireplace mantles- pretty the much the full array. They have an extensive website with a large online inventory as well as a tour of the warehouse which I opened on my big screen. Wow!!!
For the bungalow crowd, they carry Arts & Crafts tiles & other Craftsman pieces.
ARCHITECTURAL SALVAGE SOURCES IN THE MIDWEST
 Architectural Antiques of Indianapolis
Indianapolis
My Instagram pal, hosshouse1879 tells me, “They do an excellent job of organizing the materials that they have salvaged. If you go in looking for a house part, they know what area to go to & make the search pretty easy.”
Norm, the proprietor has a great affinity for Arts & Crafts & is always on the look-out for items appropriate to the bungalow. He has a good stock of lighting, doors & hardware for us & often has some furniture & even colonade sets that would we would love.
 Rebuilders Xchange
“We partner with communities to transform the home building and design industry into a circular economy.”
Cleveland, Ohio
Referrer Amy K. says, ”It’s a fantastic place to just wander & look at all the treasures they’ve saved.”
So, I wandered through their website & found many items in their 50,000 sq. ft. jam-packed warehouse, in various categories that would be appropriate for bungalows, such as doors, windows, flooring, hardware, cabinets & cabinet doors, lighting, mantels, even kitchen sinks with drainboards (they come & go.)
In speaking with them I discovered that all items are on consignment, which encourages homeowners to recycle instead of contributing to the landfill. They even have several elderly pickers who bring things in to them to supplement their incomes.
ARCHITECTURAL SALVAGE SOURCES IN THE NORTHEAST
 Construction Junction
“Salvaging the past to save the future.”
Pittsburgh, PA
Construction Junction is a non-profit organization which sells its donations of used & surplus materials in its 30,000 square foot store.
Sue D., a FB follower posted, “Construction Junction is wonderful! We needed a new door for our 1920 bungalow & found a perfect match for $5.00. And they wanted to give us a second one for free!’
They are always accepting donations & look forward to your visit.
ARCHITECTURAL SALVAGE SOURCES IN THE SOUTH
 Doc’s Architectural Salvation
Springfield, TN.
Doc & his crew travel all over the U.S. carefully taking apart old structures. As terrible as it is that these buildings are demolished, they are there to make sure that much is saved.
In their 30,00 sq. ft. ware house they have an abundant supply of lighting, bathroom fixtures & hardware, mantels, doors & windows & more.
All the images from this page & the one about the wonders of salvage are from Doc’s.
 Schiller’s Architectural & Design Salvage
Tampa, Florida
Taking pleasure in wacky finds. Antique cabinets. Vintage bins. Salvaged hardware. Outdoor urns. Antique doors.
They always have a huge amount of reclaimed wood in many species.
 Southern Accents Architectural Antiques
Cullman, Alabama
First of all, when you are on their site, you have to hit the OUR STORY link. The tale of this family business will both touch & amuse you. Dad started it out of love for salvage & over the decades, the business & the family just grew!
Martha L., my follower on Facebook says, “They have a huge selection & it is very organized. Their inventory is updated continually. Prices are reasonable.”
Speaking of huge selection, when you click the INVENTORY link, a full page menu drops down & each category displays another page plus.
ARCHITECTURAL SALVAGE SOURCES IN THE WEST
 Pasadena Architectural Salvage
Pasadena, California
Over 20 years ago, when I was restoring my 1910 Craftsman, the Hare House, I frequently visited Architectural Details in Pasadena, home of the Gamble House, the Blacker House, Bungalow Heaven & an glorious abundance of historic homes & commercial buildings. I was astounded that the huge space could not only be so full of old salvage, but so tidy & organized. The inventory was meticulously kept in an index of 3’X5″ note cards & there was nothing that was untracked or out of place.We drooled over the Batchelder tiles kept behind the counter wishing our fireplace was in need of mending.
A quarter of a century later, after the owner’s retirement, Architectural Details has morphed into Pasadena Architectural Salvage with just as many wonderful, orderly items (tracked electronically, I’m sure!). The folks here are very friendly & I’m sorry I’m so far away! However, looking at their website is quite the treat & even includes a couple Batchelder fireplace surrounds.
MORE! I WANT MORE!
I know that there are other great salvage outlets scattered about the U.S. & I want to know about them & why they are special. So plunk your magic twanger, Froggies & zip on down to the COMMENT section. Become visible. (For those of you who have no idea what I’m talking about, click here to see a link for a very strange children’s show in the 50’s. I shudder to think what the exposure of this to my 5 year old self had on my development.)
 STAY IN THE BUNGALOW KNOW!!!
Sign up for our newsletter & receive our FREE E-book, 7 VITAL Things to Do Before You Hire a Contractor.
by bungalow101 | Jan 11, 2023 | Bathrooms, Doors & windows, Kitchens
 If you should be fortunate enough to have a bungalow, architectural salvage can be your BFF. Merriam Webster defines salvage as “property saved from destruction in a calamity (such as a wreck or fire).”
Cambridge adds, “to try to make a bad situation better.”
Not surprisingly, the derivation is from the French, “to save.”
Personally, I consider the destruction of a historic building, by Mother Nature, Father Time, or the hand of Man to be a crushing calamity & I have spent my adult life trying to get people to understand their value. Read my story here.
There are so many arguments against annihilating our built heritage financially, culturally & aesthetically that it both puzzles & pains me that our it is destroyed so casually. Whether by neglect, natural disaster or ignorance & short-sighted greed, the stories of our communities are lost forever, turned to rubble & to dust.
Making lemonade, making “a bad situation better,” out of this sour mess, are those who are involved in architectural salvation. Architectural salvage involves carefully removing materials from a historic (or even a newer) structure that is going to be remuddled or completely destroyed. Instead of ruining these materials, & sending them to the landfill, salvagers give them a new life. Here’s a page of them, recommended by my Facebook followers outlets all over the U.S.
ARCHITECTURAL SALVAGE IS GREEN
 The footprint of architectural salvage materials is generally only that of transportation, from the original site, to the warehouse, to its final resting place, your bungalow. Keeping tons of stuff out of the landfills is almost beneficial.
My buddy, Doc, of Doc’s Architectural Salvage and Reclamation Service, outside of Nashville, who provided me with all these gorgeous images, is a master of the art. His well-ordered, abundantly stocked shop, Architectural Salvation is 38,000 sq. ft. of fine salvaged materials from homes, churches & commercial buildings & even ships. He & his crew have meticulously extracted these items from doomed structures, hauled them to his shop, cleaned & repaired them & offer them for sale to those who understand & appreciate their value.
I’m not going to try to ‘splain about Doc or Doc’s Architectural Salvation to you here when his website & social media do a good job of it. However, in the interest of full disclosure, Doc allows me to use his images for my blog & social media & buys me tacos when I visit him for the mention. I love tacos.
ANOTHER BONUS OF SHOPPING FOR ARCHITECTURAL SALVAGE
 The people who run these places have huge amounts of knowledge that they are willing and eager to impart to you for free. They are experts & aficionados of historic architecture & design. They have seen these old items in their original settings. They can date them. Often, they have repaired them so they know a great deal about the materials & construction of each one. Just visit for a lesson. You will be warmly welcomed. (Yes, there are a few curmudgeons in the mix, but the worst one is now retired!)
Please visit the BUNGALOW ARCHITECTURAL SALVAGE RESOURCES page to see outlets from all over the U.S. that were recommended by my Facebook followers. I encourage you to add the ones that you like the best too. Just scroll on down to the comments section.
STAY IN THE BUNGALOW KNOW!!!
Sign up for our newsletter & receive our FREE E-book, 7 VITAL Things to Do Before You Hire a Contractor.

by bungalow101 | Dec 18, 2022 | Kitchens
 The reason I’m even proposing the weird idea of painting a bungalow linoleum floor is because lino wears out. Through decades of footsteps in some of the highest traffic areas of the house, roller skates & doggy toenails, abrasion can annihilate the printed pattern leaving you with a rough, gray surface. Even worse, age can uncover sections of the jute or burlap base, & even one layer down, the mastic that glued it to the subsurface. Adding to the delight are the ineradicable stains of unknown origin. (A whole chicken maybe? They are dang slippery.)
Sadly, the lino patterns you see in Jane Powell’s book, LINOLEUM, are no longer manufactured. Twenty-five years ago, you could pay a ridiculous amount of money for a roll of new old stock but the supply of this too went the way of the dinosaur. I used to visit Linoleum City in Los Angeles to drool over their old lino collection. No mo’.
You may have a floor that is just suffering in a more highly trafficked area, but have some pattern left in other parts of the floor. Should this be the case, you can just touch up the rough areas with acrylic paint to match the existing pattern, & clean & wax your whole floor.
But, at a certain point, a lino floor is over. O-V-E-R. The pattern on mine was entirely gone. It was just a sea of dirty gray. While I relentlessly advocate for preserving historic materials, a kitchen floor needs to be cleanable & even with a good scrubbing followed by waxing, (I tried it, fingers crossed that I might at least get some improvement. Nah. Still gray, rough & grotty as heck.) mine was nasty. There was nothing left to coax back into utility, let alone beauty.
So what’s a lino loving bungalow girl to do?
MY BUNGALOW LINOLEUM FLOOR SOLUTION
 In 1980, I had noticed that any paint I got on the very old & worn (& hideous & impossible to clean) lino floor in my rented bungalow, was too stubborn to remove, I thought, “Gee, I could paint this puppy!”
And I did.
It was very inexpensive to do (a prime consideration, for a vintage clothing store proprietress) & a piece of cake. It was also a very fun project because it quickly changed something scary & germy to something lovely & safe.
The finished product looked great, was very easy to clean with my duster & my sponge mop, held up beautifully & looked perfect with the faux lino floor cloth I had made. I felt like if I were to drop a piece of food on it, or my cat were to cough up a big hairball, they would no longer become permanent, rotting parts of the floor! (Euwh!)
THE MANY CAVEATS ON PAINTING A BUNGALOW LINOLEUM FLOOR
 Even though I had done this process successfully, material formulas have changed radically in the past 40 years (bad) due to environmental concerns (good). Additionally, having painted no design to my 80’s floor, I had ended up with a very flat paint surface. (I used a stenciled canvas floor cloth to make a faux lino rug to fancy it up.) And, I was married to a chemistry major who had sanded & coated 1,000+ floors & was using perfectly calibrated, state-of-art equipment. I’m thinkin’ that maybe you don’t have someone living in your home with these qualifications, nor this equipment (though I’m sure he has his own fine equipment.) So, I wanted to check out these aspects with Earl, my tech guy at Ben Moore, for advice on the painting of a bungalow’s linoleum floor. Earl immediately said, “Don’t do it.”
I’m a flooring professional so I lack the dewy optimism of the inexperienced. I have seen floors peel, scratch, bubble, pretty much perform tragically in multiple ways, so I always err on the side of caution when dealing with any new material or process. I read everything the manufacturer says in their tech materials. I follow that with a question- filled call that usually gets me transferred from customer service to the tech guys. This is why I love Earl. He’s a tech guy who works the customer service phones. A jewel!
Here’s why he said this & also why the article doesn’t just end right here.
IT’S ALL ABOUT THE BOND
 You are about to become a paint expert. This will serve you well as an old house owner because this is not the only time that you will be dealing with applying paint. And if you want to know more, you can go here.
Adhesion is always an issue, especially in high-traffic areas. My husband chemically stripped the floor & then scuff sanded the very old linoleum in our bungalow kitchen to remove any materials that might have been applied to it, such as my freshly applied wax (Oops!) & also any cleaning materials that might have left a residue, in order to prep for painting. He then, using 180 grit paper, sanded off any dirt that was ground into the surface & give it some “tooth.”
Tooth is desired when you wish to create a mechanical (as opposed to chemical) interlocking/bonding of materials, i.e., the paint & lino marriage. So, you scuff the lino to create tiny cavities (tooth) on its surface to increase the contact area. The wet paint you apply then displaces any air between the paint itself & the lino & the 2 lock together. I definitely had a tooth advantage with my old lino because it was OLD, & hadn’t been smooth for decades.
A mechanical bond is not as strong as a chemical bond & herein lies the fragility of your floor.
Let’s also talk about chemical bonding when painting your bungalow linoleum floor, because you’re going to be forming those bonds too when you paint it.
THE 3 COMPONENTS OF PAINT & WHY YOU NEED TO KNOW
Most paints have 3 main components called the pigment, the binder, and the solvent.
The pigment is the color chemical in a paint. Binders are incorporated to glue the pigment particles to each another, & also to make the particles stick to the surface you’re painting. Solvents, not surprisingly, dissolve stuff. This material makes the pigment & binder into a thinner & less viscous (more easily flowing) liquid so that it will spread evenly. For the purpose of ease on your own self & ease on our fragile environment, I am going to suggest the use of water-based paints, in which the solvent is water.
A couple more concepts you need to understand are drying & curing. If your room is well-ventilated, your paint will feel dry to the touch within minutes after application. However, it is dry only on its surface. Curing, the evaporation of all the water (binder) in the paint can take days. The 2 types of bonds determine the steps that you will do as you cruise through your painting process.
 If you apply a second coat on when your first is just dry to the touch- not cured- you will get a chemical bond between the 2 coats. As the water (binder) evaporates, the like chemicals of the pigment & the binder will be attracted to each other & form what could be considered a single coat. It’s a very strong bond.
It’s why your nail polish peels down to the nail, instead of peeling in single layers.
What this means is if your weekend project goes into the next weekend, your paint will be too dry to form this chemical bond with the next coat you apply, so, you are going to need to give the original coat some “tooth” in order for your next coat to adhere with a mechanical bond. That mechanical bond is achieved with a bit of scuffing, so that you aren’t going in on top of such a smooth surface.
This is a kitchen, the most heavily trafficked room in your house, & yeah, you need to do it right so that it will take the wear. If you take all the right steps when you apply the materials the first time, you are much less likely to have problems later on.
WHY I’M CONTINUING ON DESPITE BEN MOORE’S ADVICE & A TON OF CAVEATS
A. My advice is for real linoleum only.
B. If you want to paint a new lino floor, that you will install to paint, realize that it is risky. It’s not an inexpensive material, & the labor to install it is pretty pricey too. Most importantly, new lino is made with a coating that repels, well, anything you wouldn’t want to stick to. For you, I’m am recommending that instead you choose cool patterns in cut linoleum that are fitted together like a puzzle to make your overall design. You can see an example of what can be done here.
C. If your floor is old & funky as mine was, prepping it thoroughly to create a proper bond, you can improve its look & functionality greatly. How long will it last? Who knows?
D. I’m assuming that you are performing all the testing that you need to on existing materials for asbestos & lead, & mitigating as needed. Let’s talk about asbestos. In this article by Bob Vila he talks about asbestos in linoleum. Give it a read before you start.
E. For every product that you are using, you’re studying your Safety Data Sheets & using correct PPE correctly.
SO HERE’S HOW TO PAINT YOUR BUNGALOW’S LINOLEUM FLOOR
 0. Mend any boo-boo’s. I am not going to try to teach you to do this because I have never mended a floor. I am going to suggest some links of pages that look like they might know what they’re talking about.
Wisconsin Historical Society
They tell you a brief history of the development of lino & give you instructions of fixing problems. This is not the only method, so here’s another one.
Porter’s Environment & Cleaning Services
This one addresses rips & tears.
ehow
This one is about how to tack down curling edges.
Week&
In this one you learn how to patch whole areas that are missing.
1. Choose your pattern & your colors. Think about coordinating your floor with your curtains. If you are going to stencil your curtains, or even if you’re not & you’re looking for pattern ideas, head on over to my article on window treatments where you will find links to vendors of lovely A & C stencils. You can use my article on choosing paint colors if you need any help. The reason I say this is because your stencil colors are more limited while a trip to Ben Moore will yield any custom color that you could possibly desire.
2. Jane Powell’s LINOLEUM has some amazing vintage patterns in it, for inspiration, or just to out-&-out copy them. You can use a simple graphics program, building it layer by layer & employing their graph feature to transfer it to real life
3. Zip on over to WELCOME TO REALITY DAYDREAM where Beth has it all figured out. I am not about to re-invent any wheels! She says that the paint on her floors is holding up well 4 years after she wrote the article, so she must know something!
TIP: Should you not be convinced of the utter coolness of lino, watch these videos.
STAY IN THE BUNGALOW KNOW!!!
Sign up for our newsletter & receive our FREE E-book, 7 VITAL Things to Do Before You Hire a Contractor.
by bungalow101 | Nov 8, 2022 | Kitchens
PUTTING IT ALL TOGETHER
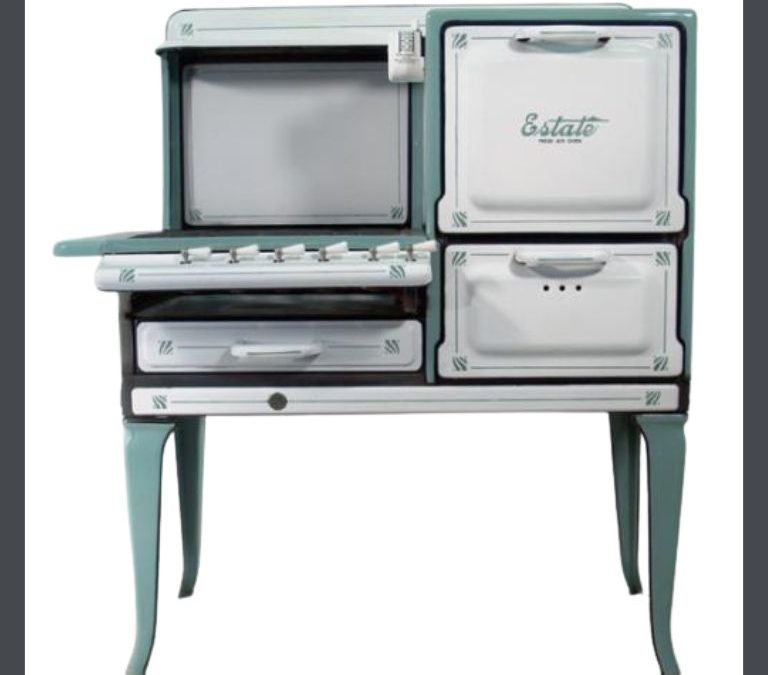
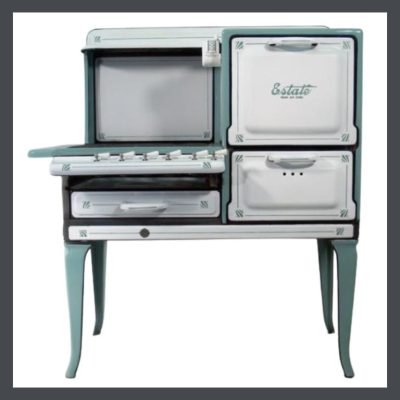 Clutching my well worn BUNGALOW KITCHENS book, I began collecting the pieces for my dream bungalow kitchen in Tampa. The first was the stove because I knew that it would take 2 ½ years to be restored, all the way in Georgia. When I had lived in L.A., there were several antique appliance sources, one within walking distance, where you could just walk in & buy an old stove.
Not so in Tampa. I found the exact stove I wanted on eBay in New England, & they shipped it to Georgia. I was at high anxiety about her little Queen Anne legs, having seen plenty of stoves with damaged ones & begged the shippers to be gentle with these delicate appendages. When it arrived in Georgia, I called the owner of the restoration shop for a status report & all was well with the lady’s gams. I set the timer for 2 ½ years. Tick. Tick. Tick.
The next step was the sink. I really wanted a green sink. I searched eBay, Etsy, Craigslist, local salvage yards for over a year. Every week I diligently scrolled, called & searched for my sink. I saw some very cool sinks, many of which would have worked well in my kitchen but I was intent on using jadeite green. For many years I have been stuck on yellow or red & white in bungalow kitchens but for some reason, those colors just no longer appealed.
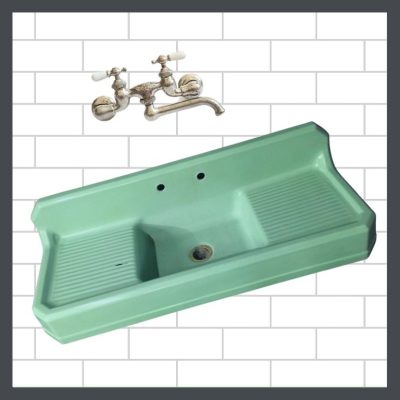 Finally, there it was on eBay. Not only was it green, but it had clipped corners, like the gable of my house! I outbid the competition & had the huge, heavy, expensive sink shipped to me where I put it in storage, awaiting the 2 ½ years until my stove would be ready, to pass. Only 1 ½ years left to go!
On to flooring. I had, long before, admired a green checkerboard floor in Jane Powell’s LINOLEM . I am a big fan of lino but, I also really like the resilience of cork, which is available in limited colors. It was not easy to get samples of either of these materials. What was common in L.A. was down-right weird in Tampa. Fortunately, we carried 2 lines of cork in my flooring company which allowed me to get my samples directly from the manufacturers.
The linoleum experience was pretty funny. I called a flooring store that mentioned lino on their website. I was very explicit- linoleum, not vinyl. Do you know the difference? “Absolutely! We have samples in many colors.’
I grabbed my keys & trotted out the door. When I arrived at the showroom, I was directed to a large display of, you guessed it- vinyl. The salesman thought that they were the same material. He was very confused. Fortunately, the next store had real lino & I got my samples.
THE DREAM BUNGALOW KITCHEN COLLECTABLES FRENZY
 Meanwhile, I accumulated mountains of kitchenalia- old mixers, toasters, coffee pots, cooking implements. All in my beautiful jadeite green. My biggest addiction was potholders- kitty potholders. It got to the point that I was wondering if I would need to build a kitchen annex to display them!
I also had quite a kitty teapot problem. The thing with the internet is that one can amass a lifetime collection of about anything in a matter of hours. And I did! Over the course of 2 ½ years I gathered several lifetimes of kitty teapots. I paused only long enough to add to my kitty pillow collection. At least I had a bed on which I could display them!
Poor Hubby, every day boxes of this stuff arriving, none of which made any sense to him.
Then there was the cabinet jewelry. When I outfitted my 1910 Craftsman in Eagle rock, I formed a friendship with my hardware specialist at House of Antique Hardware, Jennifer. She assisted me in choosing lighting & in finding replacements for some of my other hardware. If they didn’t have exactly what I needed there, she would search it out for me through the many connections she had developed in her decades in the industry. She truly lived up to her title of hardware specialist again & again.
 Turned out that her sister had a winter place in St. Pete so when Jennifer came to visit her, we would get together & she & I would talk old houses & her sister & my husband would talk food. (Sister introduced Hubby to his favorite restaurant in Tampa Bay.)
Because I never got it together to restore my Craftsman kitchen, I decided to use knobs & pulls in my 1925 Mid-Century Modest that were wholly inappropriate. I had planned to use these in clear in the Craftsman & wanted the green for the 1925’er.
My dear friend Jane Powell was a preservation bulldog, however, she left the door open by saying that anything was fine if it had a really good backstory. I consider this to qualify as a really good backstory. Heck, when she restored her own kitchen in the Sunset House, she used an antique candy store display case as a kitchen island & she was delighted with it!
On this page you will see many pictures of Jane’s beloved bunga-mansion, an altogether imposing house. One of the things that I admired about Jane was that she was so at home in this house & so not overwhelmed by its size, & frankly, the discomforts of living in an very old, partially restored mansion. As beautiful as it is, the stairs are steep, you can get lost in all the rooms, & it’s really cold. The last time we were there was just before Christmas & I shivered all night long under 3 folded double blankets.
THE BUNGALOW KITCHEN DREAM CRUSHER
Mid the 2 ½ year wait for the stove, surrounded by my lino samples, my sink, my potholders & my green glass hardware, the Recession hit. Construction shrank by 86% in Florida. That left all of us scrambling for the remaining 14%. We lost $50,000 on a Victorian we had restored. I was on the sidewalk every weekend, yard saleing my childhood dolls, Grandma’s pressed glass & my Christmas decorations to make my payroll.
When the stove restoration was finally complete, we carted it home & parked it in a corner in the ugly kitchen. After the financial hit of the Recession, I couldn’t justify the expense. Additionally, working 80 hours a week, I never had a spare minute to put it all together. When we sold the house, I finally admitted defeat, donated the sink to Habitat & sold the stove, the potholders & the kitchen implements.
BUNGALOW KITCHEN DREAM REDEMPTION
 I blog about bungalows because I have been talking, writing, advocating & educating for & about them incessantly over the past 20 years & living in them for over 40. I should have been blogging about them since the dawning of the Age of the Internet. It took searching my heart, house bound in a world-wide pandemic, for what brought me joy to get me started blogging, but better late than never!
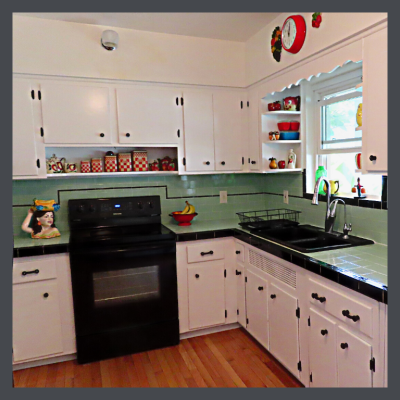
After experiencing too many hurricanes in a frame house, I now live in a 1955 block, Modest Ranch. (The pink 50’s sink- remember?) This house when I purchased it, was almost completely original. The kitchen had been messed with so I put it right again & I used my 1910 glass hardware (in black) because, by golly, I have a good backstory!
This article is all about my long hoped for bungalow kitchen. Thanks to my blog, I got to put it together & show it off to hundreds of people.
Thank you, gentle readers. You have mended my broken heart.
STAY IN THE BUNGALOW KNOW!!!
Sign up for our newsletter & receive our FREE E-book, 7 VITAL Things to Do Before You Hire a Contractor.
by bungalow101 | Nov 2, 2022 | Kitchens
 Time to grab your Kleenex box. Creating a bungalow kitchen never got any further than the dreams stage for me. I’d had my nose buried in Jane Powell’s BUNGALOW KITCHENS for a number of years & wanted nothing more (maybe world peace, but that’s about it) than an authentic kitchen.
All of my friends had restored or original kitchens & I was feeling like the red-headed stepchild of the historic preservation communinity. Make that 2 historic preservation communities!
The one to the left is in a landmarked house in Eagle Rock, California, created by 2 plein air artists who were as dedicated as I to authentic restoration. With my ability to pick up the phone & talk to anybody, I gotten their house featured in American Bungalow Magazine.
My first friend in my new neighborhood in Tampa, Florida, Steve, who was head of the Historic Preservation Committee for the neighbor association had an original kitchen in his beautiful Craftsman. He lived down the street from me & I often tortured myself by visiting his beautiful house & peeking in his California cooler.
MY HOUSE & ITS HIDEOUS, VERY UN-BUNGALOWY KITCHEN
 Before buying my Tampa bungalow, I was house-shopping & had seen a nice looking 1925 bungalow listed for a couple months, but I was truly repelled by the kitchen, (& I didn’t even know about the roaches yet! Get ready for the icky part.) knowing that it was part of the inflated price I would have to pay only to come in & tear out that black marble & chunky tile, not to mention the (mismatched) stainless appliances, to create the bungalow kitchen of my dreams.
Not having central air, yes, in Flor-ee-da, the house had languished on the market for several months & one day when I’d been out house-hunting, it was open. What the heck. I went in & fell in like with the house. It now had A/C & though there were a few things to deal with, it had a nice, big living room for committee meetings, a good layout & was only 1 block away from my new friend, Steve. By this time, I was desperate enough & the price was low enough, I went for it. And it was in a historic district, so I knew that it would increase in value.
The house had a large, hideous kitchen, a perfect blend of 70’s jalousie windows, solid wood cabinets from maybe the 50’s, tile flooring, counter & backsplash from the 90’s, & fancy-schmancy Home Depot pendant lights from probably 2 days before the house was put on the market. The black marble countertops were especially awful. Before we got the house sealed it featured nightly invasions of palmetto bugs. This is a local species of the cockroach- huge & flying- & they felt right at home, camouflaged by the black countertops.
The kitchen did have its original door to the back porch & the original door to what had been the butler’s pantry & was now the grodiest ever pantry/laundry room/HVAC unit.
The kitchen layout was very awkward & I was clueless as to how it had ever been configured. There was now a cooktop & a wall oven so all hints of its original incarnation were annihilated long before.
JANE POWELL- THE QUEEN OF CREATING A BUNGALOW KITCHEN ARRIVES
 After seeing all the destroyed & neglected properties during my house hunting, I decided that the people of Tampa needed to get a little education about restoring bungalows-‘specially kitchens. So, I proposed to the neighborhood association that Jane should be invited to come & speak at an educational event, topic: Creating a Bungalow Kitchen! One of the board members was thrilled. He knew of Jane’s books & even had a Jane kitchen. The proposal was accepted. (They didn’t know me yet & had no idea how this would open the door to my wild my future proposals!) & a couple weeks after I moved in, Jane arrived.
My kitchen conundrum was no match for Jane. In 3 seconds she had the space planned so beautifully that I wondered why I had never figured it out. Suddenly, it seemed so obvious how I could create my dream bungalow kitchen.
Her packed-to-the-rafters event at our beautiful, historic garden center went off without a hitch & we spent the 3 days after driving around doing kitchen consultations, 2 other events & teaching a class in interior design. Well, I drove & she consulted, spoke & taught. It was rather awful to take her to the airport for her return flight home, but I connected with the head of our county library system & they bought 50 books- 10 in each title. With that, I felt like I had put a little bit of Jane in Tampa & looked forward to having my own Jane Powell kitchen.
I still missed her.
STAY IN THE BUNGALOW KNOW!!!
Sign up for our newsletter & receive our FREE E-book, 7 VITAL Things to Do Before You Hire a Contractor.
by bungalow101 | Sep 16, 2022 | Kitchens
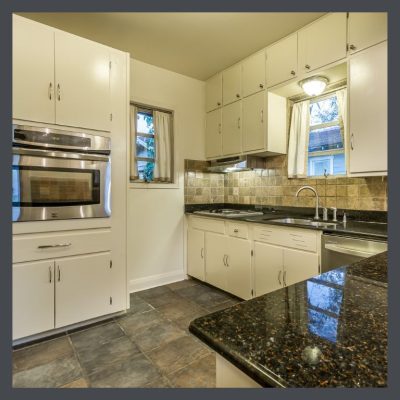
 You are so ready for your bungalow kitchen makeover. Your current kitchen is a confusing mash-up of several decades of “updating,” a chronicle of the latest trends & a vivid tale of too many decades spoiling the broth. Yeah, that was my kitchen & the broth was more like toxic sludge.
Your lighting is a row of colorful art glass pendants from Home Depot, marching over your countertop, surely installed by the seller because the house had been on the market for some time & her Realtor told her to zhuzh up the kitchen. Your countertop is 80’s shiny black granite with a backsplash of some sort of fake stone with tiny holes in it- kind of a bumpy lava rock that is really hard to keep clean. Your flooring is grey stone tile from the early 2000’s, again bumpy & a challenge to wash. The cabinets are solid wood, probably from the 50’s, but are configured very oddly. And the windows are metal jalousies from the 70’s, that don’t even work. And then there are the stainless steel appliances- the built-in stove, the cooktop & the huge stainless refrigerator lurking in the corner. Yeah, me again.
So how would you even begin to create a beautiful kitchen?
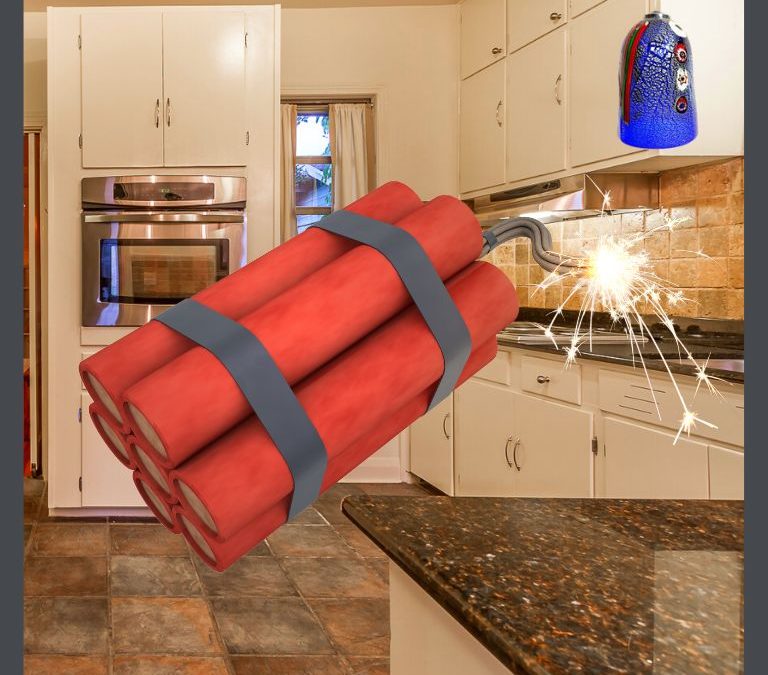
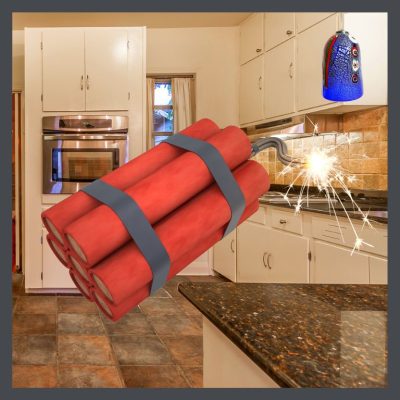
Dynamite is not an option. This is just a picture.
HARMONY-THE KEY TO A BUNGALOW KITCHEN MAKEOVER
 So let’s examine this concept, shall we? Harmony is a principle of art which refers to how well all the visual elements share some similarity- color, shape, mood, texture, theme, time period- & work together. Elements which are in harmony will have some kind of logical progression or relationship. They will integrate- go together to form a pleasing whole.
During my teen years, we used to use the word “clash” to express disharmony. One of the definitions of the word is, “a violent confrontation.” We used it to simply mean, “look ugly together.” I have to say that I have seen styles together that are worse than ugly. They are clearly at war!
Here’s an example. You go in a baby’s room & it’s painted a soft color, there’s the crib with the baby blanket it, the soft mobile, the floral stencils on the wall. It all makes sense. There’s no life size stand up of a heavy metal rock star positioned so baby can see it when she awakens from her nap. And why not? If there is an element which is not in harmony with the rest of the artwork, it will be jarring- a flat note in a song, a pig’s head on a horse’s body, plastic handles on a Ming vase- heavy metal in the baby’s room. Clang!
OLD HOUSE HARMONY
In historic structures, the harmony is created by the use of the different elements which denote the time period- shapes, materials, proportion, layout. These were determined by the builders of the era based on the factors present in the culture & the technology of the time period. Get it? A logical progression or relationship based on a time period. Individually, these are called, “character-defining features,” those visual & tangible aspects of the historic building which tell its unique tale- time period, place, demographic, etc. They all work in harmony to create a visually appealing aesthetic. It’s basic design theory. Cultures, fashions & technologies change, creating trends. That’s why when you walk into a bungalow with an avocado 70’s kitchen, you have a strong reaction to it. And not a good one! It’s a flat note. Your first instinct when you start your bungalow kitchen makeover is to tear it out & donate it to landfill. Here’s a great article on bungalow vibe, written in 1901, that will provide a solid understanding of how to achieve bungalow harmony.
DECIDING ON THE NEW BUNGALOW KITCHEN MAKEOVER ELEMENTS
 Twenty years from now, that new, shiny, 2023 grey kitchen will strike the eye with the same jarring note & it too, will land in the dump as the current kitchen incarnation is installed. You are far better off aesthetically, historically & financially to look back at the art of the period kitchen & take inspiration. Me, I want a museum kitchen, but not everyone does. It’s actually pretty easy with Jane Powell’s Bungalow Kitchens as a guide. Knowing the elements of an old kitchen will assist you in creating a period inspired one.
This is why I have spent the last several decades of my life not just advocating, but also educating on how to plan a harmonious bungalow kitchen makeover. HGTV, with its rip it out philosophy, hits way more living rooms than I do so I talk fast and loud, but I will never forget when a woman walked up to me after Jane Powell’s talk on kitchens that I had produced and said, “I get it now. A sleek Euro-kitchen is totally out of place in a bungalow.”
Hallelujah!
STAY IN THE BUNGALOW KNOW!!!
Sign up for our newsletter & receive our FREE E-book, 7 VITAL Things to Do Before You Hire a Contractor.