“Organic buildings are the strength and lightness of the spiders’ spinning, buildings qualified by light, bred by native character to environment, married to the ground.”
Frank Lloyd Wright, architect
Rather than trying to compose an educational post, I have curated this group of videos on Wright for 3 reasons, the main one being that no one explains Wright’s philosophy & work with more clarity than the man himself.
#2, nothing expresses his genius better than the buildings themselves. (How could you use words to describe Fallingwater? I stammer in my head just considering it!)
#3.These students & scholars of Wright possess 1,000 times more information & insight that I do & they have produced fascinating footage, including tours of his most iconic buildings, that will both inform & intrigue you. I spent a couple afternoons watching these videos & feel that I now understand this complex genius. My appreciation of his work has soared!
HEARING THE WORDS OF WRIGHT & SEEING HIS GENIUS BROUGHT TO LIFE
Frank Lloyd Wright: America’s Greatest Architect? | The Man Who Built America (59:33)
Timeline – World History Documentaries
This video is narrated by a Welsh architect who explores the influence of Wright’s Welsh background as he travels across the United States, visiting homes FLW designed & built. His commentary allows us to deeply understand the influences & philosophy that guided Wright’s eye & hand.
A Conversation with Frank Lloyd Wright (30:59)
Manufacturing Intellect
An interview in 1953 with Hugh Downs about Wright’s thoughts on American life & architecture. As always, Wright’s words are powerful & illuminating.
Frank Lloyd Wright and the Prairie School (53:15)
Manufacturing Intellect
This charming video features a soliloquy critiquing the architecture of the time, seguing into his design philosophy. Delivered in Wright’s own words, it is a charming peek into his brilliance & arrogance.
TIP: I have many beautifully done videos on my playlist from how to repair windows to the history of the Arts & Crafts Movement. Watch themHERE!
STAY IN THE BUNGALOW KNOW!!!
Sign up for our newsletter & receive our FREE E-book, 7 VITAL Things to Do Before You Hire a Contractor.
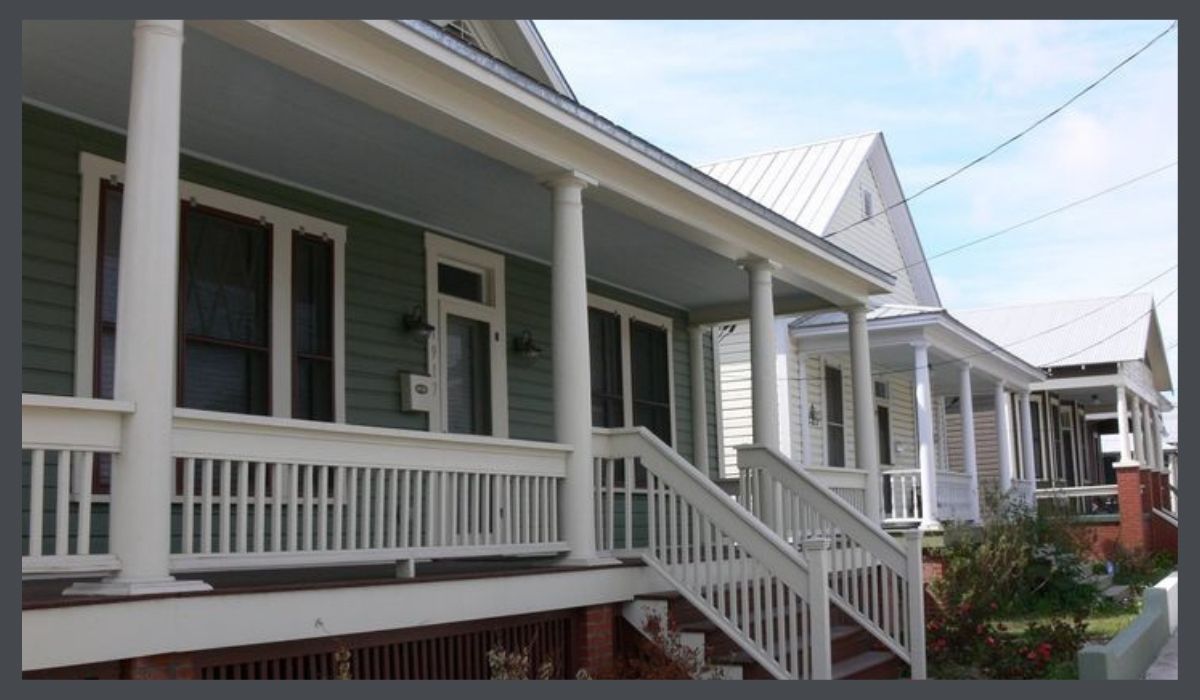
Bungalow Heaven, a neighborhood of 800+ historic homes in Pasadena, CA, truly is a paradise. Listed in the National Register of Historic Places, the area was built between 1900 & 1930 & designated in 1989, as a local landmark district. Thankfully, this status has been instrumental in protecting it from the pop design of HGTV.
I discovered Bungalow Heaven when I lived in Pasadena. Though occupying only 6 blocks by 6 blocks, entering its streets, you are completely immersed in the period. Even the historic vibe of the whole, beautiful city doesn’t smoothly ease you into this perfectly preserved jewel box of a neighborhood. Holy DeLorean, it’s a time machine!
Thanks for much of this wonder can be given to The Bungalow Heaven Neighborhood Association. BHNA is a crackerjack, non-profit organization of volunteers dedicated to the preservation of the homes & enhancing the lifestyle of its district. When we shakily formed our first home tour committee in nearby Eagle Rock, the historic community where I lived to the west, it was suggested that we volunteer as docents for the BH tour so we could learn what to do. I had been on their tour several times & had admired it from my event producer’s eye, but due to being dazzled by the charming bungalows, I hadn’t really paid much attention to the workings of the tour machine.
Like the rest of the organization, it was finely-tuned & well-oiled. The tour, only one of the group’s many activities, is a massive undertaking due to the amount of volunteer coordination & the directing of the hoards of attendees. They also have to ensure the protection & comfort of the homeowners, so each task is clearly delineated & drilled in the weeks before the tour. It was great to receive this training & experience & provided us with the template that we used to form our own fledgling committee.
My wood flooring company was privileged to restore many of floors in Bungalow Heaven. Please understand that we had moved from a bungalow neighborhood in Phoenix, but we had never experienced such wonders as we saw here. I was introduced to clinker brick, to Arroyo rock & I was treated to my first inglenook in BH, in the home of a flooring customer. My husband requested that I be given a tour of the home & they graciously agreed. I was enchanted. When I learned about their yearly home tour, I was thrilled to be able to enter these homes that were so carefully restored & preserved, beautifully furnished, with most decorated in the A&C style.
WHAT MAKES BUNGALOW HEAVEN SO SPECIAL?
Bungalow Heaven is the poster child for the Arts & Crafts Movement. Though the Movement’s origins are in England, both its aesthetic & its philosophy were brought to the United States in the early 1900’s & California heartily embraced them.
The natural materials revered by the Movement are abundant in the state. In the forests grew acres of fir, oak, redwood & Ponderosa pine providing lumber for building. California’s mild climate lent itself to the idea of living with nature, allowing houses to have many windows & sleeping porches in which to spend hot summer nights.
The nearby Arroyo Seco, Spanish for “dry gulch” runs 8 miles through Pasadena & provided beautiful stone for building & adorning houses. Pasadena’s beautiful topography, rich soil & mild weather provided the perfect setting in which lush vegetation flourished.
Pasadena spawned & inspired the applied artistry of people such as The Greene Brothers, who designed the Gamble House to enhance the setting & honored the natural environment in every detail. The extraordinary work of Pasadena resident, Ernest Batchelder, tile-maker, is seen in many homes in the neighborhood.
Additionally, the modest homes of Bungalow Heaven were within the reach of the working class. People of moderate means could afford to live in a beautiful city with views of the San Gabriel Mountains, enjoy well-built homes with a variety of attractive details & friendly front porches, & had the added benefit of being near transportation, commerce & job opportunities.
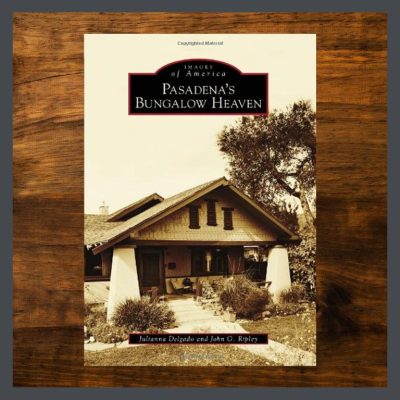
This wonder, a piece of Pasadena that is Bungalow Heaven, is an amalgamation of the history, the homes & the neighborhood spirit. Read about it in this informative book, view it on a driving tour or, catch their spring home tour!
TIP: Read about other preservation groups holding wonderful events in Southern California, click, HERE!
STAY IN THE BUNGALOW KNOW!!!
Sign up for our newsletter & receive our FREE E-book, 7 VITAL Things to Do Before You Hire a Contractor.
Brothers Charles & Henry Greene can be understood as men through the study of their Arts & Crafts architecture. As with all artists, their creations were born of their unique viewpoints of life, tempered by their educations, their personal relationships & professional experiences, & the cultures & technologies of their times.
At the same time, each creative expression contributes to the personal evolution of the individual. You can see this clearly in studying the works of any artist over their lifetime. The viewpoint does not remain stagnant, as evidenced by the often radical changes in style over the course of the artist’s career.
For an architect the quantity of these in-flowed influences is magnified by their medium- clients, contractors, topography, tradespeople, materials, climate & cost overruns, oh my! Each of these leave their mark on the soul.
These videos are about the most well-known works of the Greene’s. I believe this medium with their virtual, docented tours to be the next best way of experiencing & understanding any piece of architecture. They tell the story of the Brothers Greene through the magnificent Arts & Crafts architecture that they designed.
THE VIDEOS- Charles & Henry Green Arts & Crafts architecture
Though I am an admirer of the Brothers Greene, I am not an expert, nor a scholar, nor do I have sophisticated video capabilities so I prefer to let them do the teaching & they do it exceedingly well.
Arts & Crafts architecture of Greene & Greene including The Gamble House, CALIFORNIA episode (3:03)
Craft in America
A short video with some beautiful shots expressing how the California lifestyle influenced the design of the house.
A Portal – the Gamble House front door (9:50)
The Gamble House x
Jennifer Trotoux, Director of Collections & Interpretation, gives an overview of the artistry and construction of the front door of the Gamble House. Wherever you are, you will be transported to the entry of the house & learn so much about the design & the crafting of this beautiful portal.
The Thorson House Tour- A Greene & Greene Ultimate Bungalow (19:16)
The Wood Whisperer
A close look at the many refined & delicate details through which the Brothers Greene, took items of utility & made them things of beauty, including their version of recessed lighting!
Greene & Greene’s Bungalow for Robert Blacker (10:44)
Hoosierwoodcraft
A short history of the Greene Brothers & some images of the Blacker House.
Two Sides of the Pacific: Japan and the Architecture of Greene & Greene (1:18:15)
The Huntington
Looking at Japan through the lens of the Brothers Greene, a fascinating talk by Edward R. Bosley, Executive Director of The Gamble House on the influence of Japanese design on Charles & Henry & the reception of their work in Japan.
I invite you all to visit the Gamble House at your earliest opportunity. Sign up for their mailing list so you can stay informed of their wonderful array of activities.
STAY IN THE BUNGALOW KNOW!!!
Sign up for our newsletter & receive our FREE E-book, 7 VITAL Things to Do Before You Hire a Contractor.
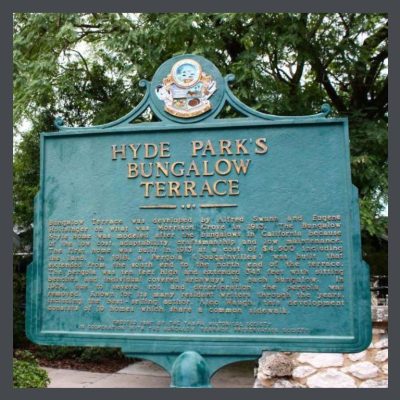
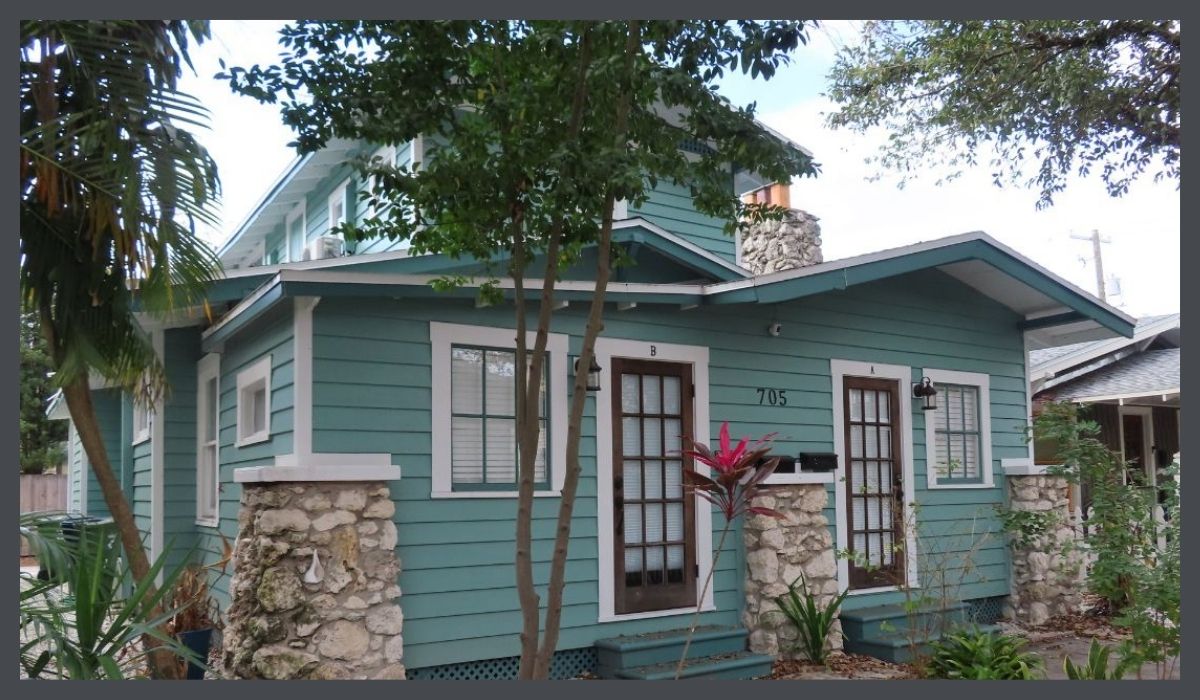
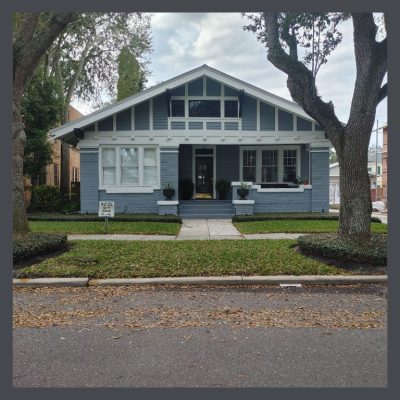
INSCRIPTION:
“Bungalow Terrace [in Hyde Park, Tampa, Florida] was developed by Alfred Swann and Eugene Holtsinger [major developers in South Tampa] on what was Morrison Grove in 1913. The Bungalow Style home was modeled after the bungalows in California because of the low cost, adaptability, craftsmanship and low maintenance.
The first home was built in 1913 at a cost of $4,500 including the land. In 1916, a Pergola (bougainvillea) was built that extended from the south end to the north end of the terrace. The pergola was ten feet high and extended 345 feet with sitting benches and individual covered archways to each bungalow. In 1924, due to severe rot and deterioration the pergola was removed. Known for its many resident writers through the year including the best-selling author, Alec Waugh, this development consists of 19 homes which share a common sidewalk.”
ENTERING THE COURT
So, here I am on a balmy winter day, getting ready to enter Hyde Park’s Bungalow Terrace.
My first adventure into a bungalow court was visiting an interior designer, specializing in Arts & Crafts, in L.A. Her little house was a mini-me of my bungalow, inside & out. It was fascinating. I was never able to learn who the architect of my house, was, nor for the court. I’m still kinda upset by it.
Bungalow courts originated in Pasadena California, & their intelligent, aesthetic & practical design motivated Pasadena’s City Council to require that all multi-family units be built around a landscaped courtyard. Great idea! And an idea easy to import to Florida, another state enjoying massive growth & needing housing. A brilliant model, developers today would be wise to mimic it to solve today’s housing shortage & to satisfy people’s need for green space & for community.
This court is in South Tampa, Florida in the neighborhood of Hyde Park. It covers a whole suburban block. Platted in 1916, the first residents began moving in in 1920. The variety of architecture featured is totally charming.
DESCRIPTION OF CHARACTERISTICS
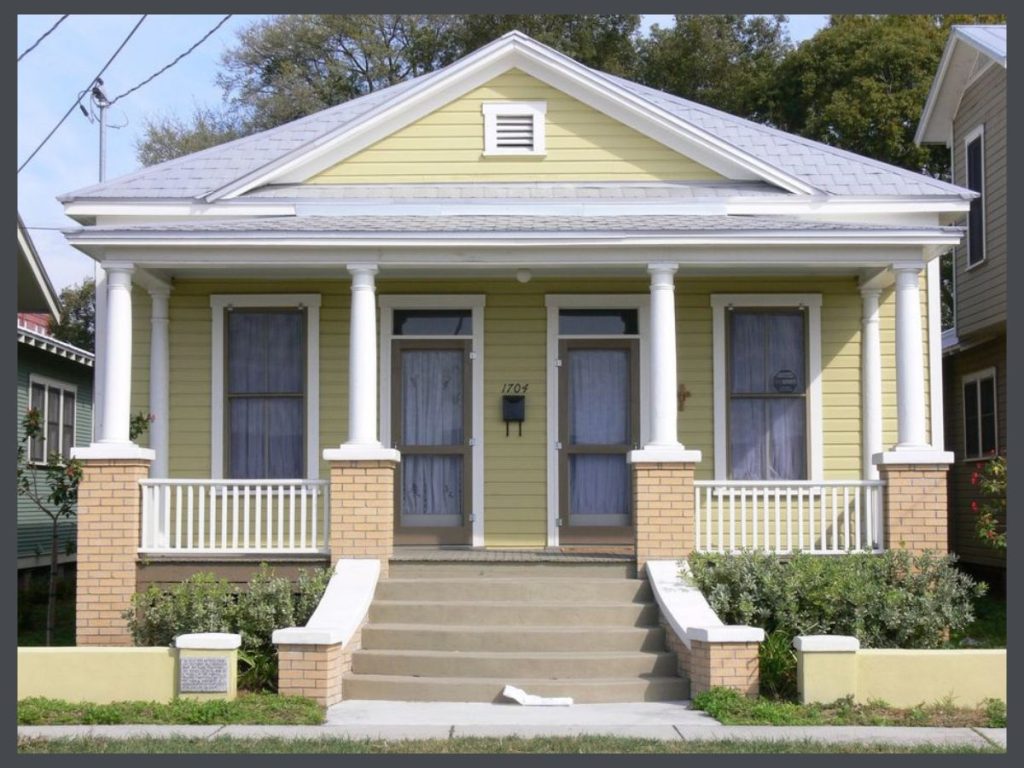
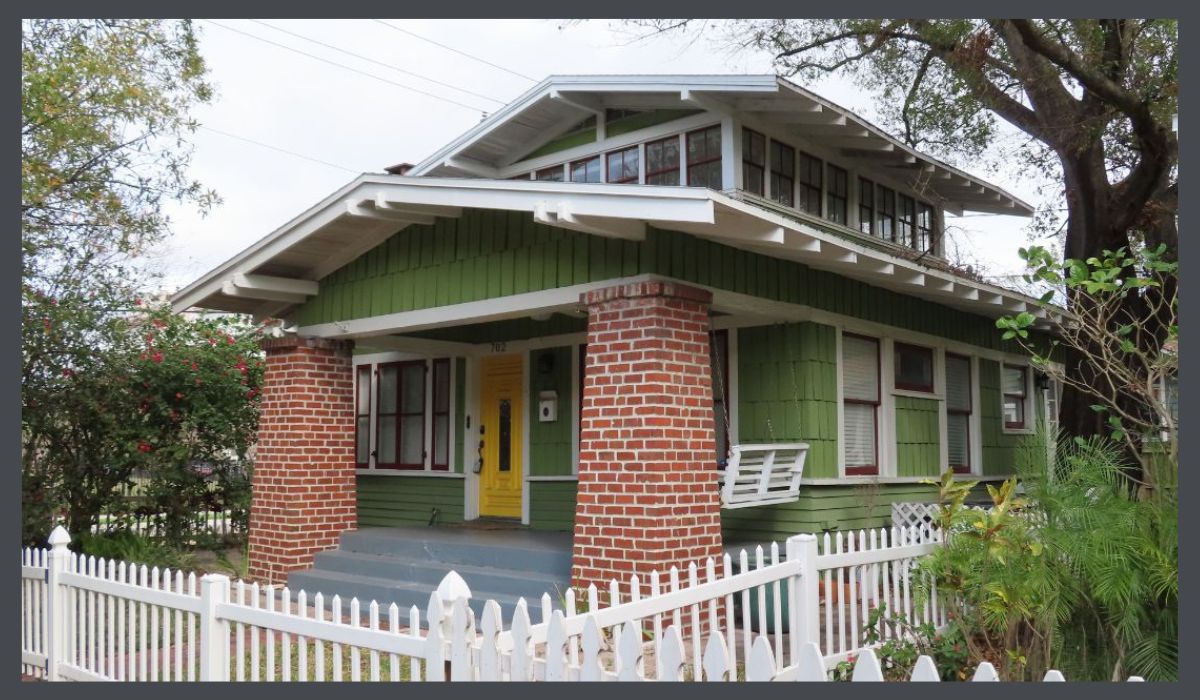
Here’s an airplane bungalow gem on our tour of Bungalow Terrace, in Hyde Park, Tampa Florida. You can see the care that went into designing this court by the use of multiple materials- stout red brick columns, use of both shingles & lap siding, paired outriggers, and multiple window styles.
Though the first ones in the court were built in 1913, the records show that this one was not built until 1939.
DESCRIPTION OF CHARACTERISTICS
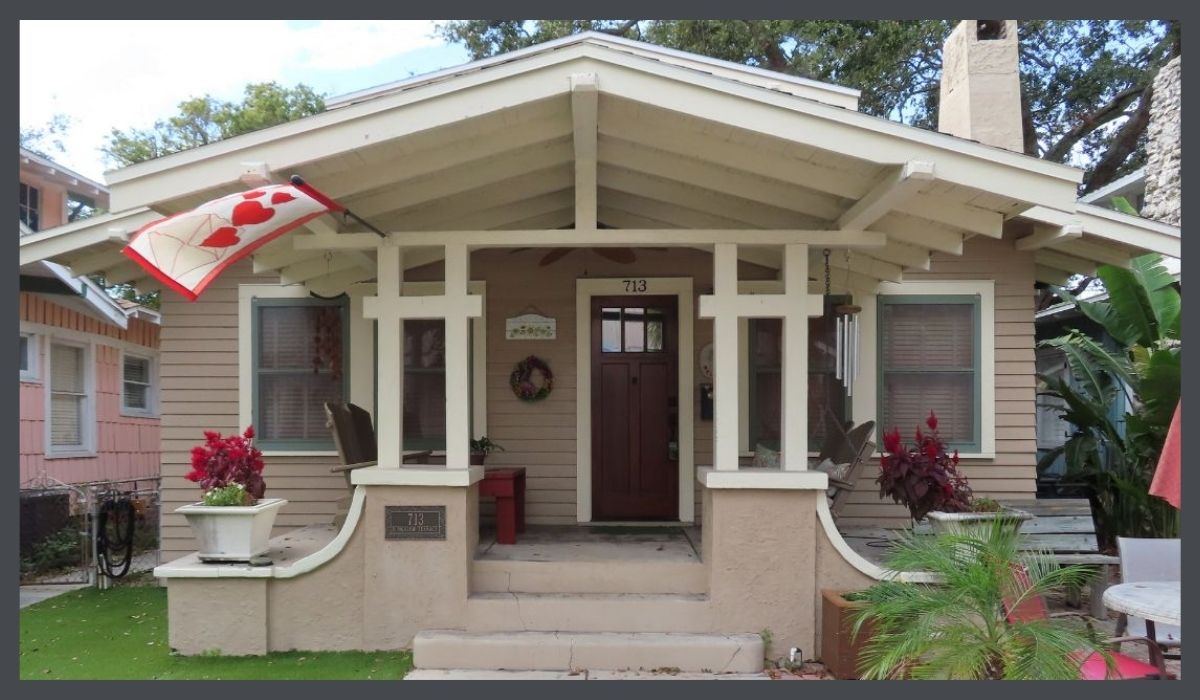
I have a huge weakness for unusual columns, particularly when paired with such a large overhang. I do love chunky ones, but I especially like it that the developer of this bungalow court in Tampa, Florida took a few minutes to say, “Let’s not make little houses that look all the same,” half a century before Pete Seeger sang about suburban houses made of tick-tacky.
DESCRIPTION OF CHARACTERISTICS
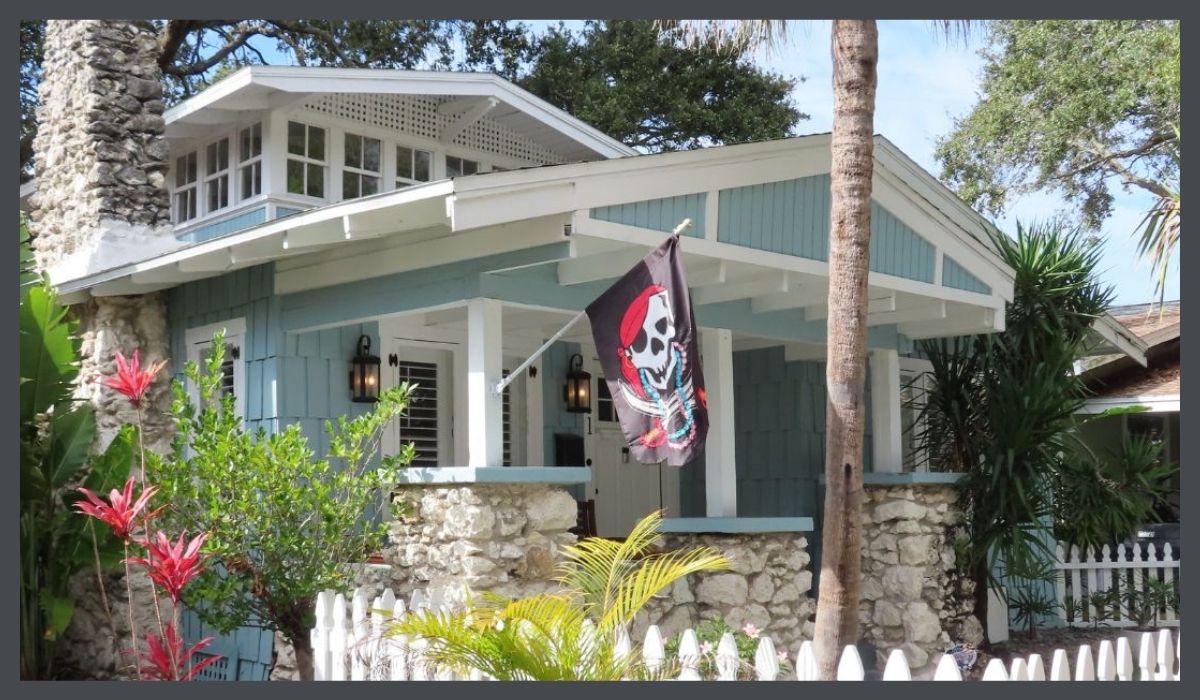
This cute little airplane bungalow, features a sleeping porch with a 360 degree panoramic view, shingle siding (unfortunately painted) & limerock columns & a big honkin’ stone chimney!
Its lot size is 38×63 & the house itself, with 2 bedrooms & 2 baths & the house is 1,360 sq ft. Small but packed with great architectural features!
Go Bucs!
DESCRIPTION OF CHARACTERISTICS
Once again, the original developers used some great detail in this smaller (1,236 sq. ft.) airplane bungalow home in Bungalow Terrace in Hyde Park, Tampa, Florida. The bold paint job emphasizes the structural elements of the roof overhang.
DESCRIPTION OF CHARACTERISTICS
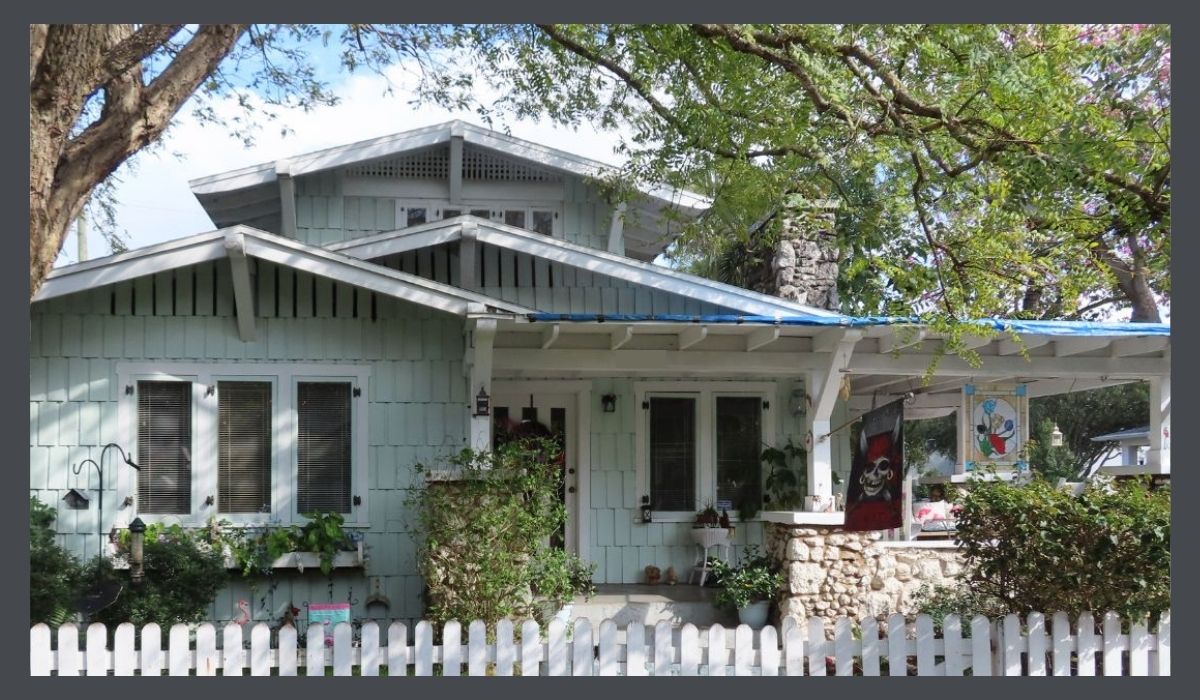
A bungalow court triplex converted from a single family home, in Bungalow Terrace, Hyde Park, Tampa, Florida.
Built in 1916, like several of the others, it has a pop-up sleeping porch & wonderful stone columns & chimney. Unfortunately, what appears to have originally been an open porch has been closed in.
Once again, the original developers used some great detail in this smaller (1,236 sq. ft.) airplane bungalow home in Bungalow Terrace. The bold paint job emphasizes the structural elements of the roof overhang.
DESCRIPTION OF CHARACTERISTICS
This is another of the delightful homes in the Hyde Park Bungalow Terrace neighborhood. The composition of the front facade is wonderfully balanced with multiple front facing gables that pull the eyes from shape to shape & detail to detail.
Developed over several decades, the neighborhood of Hyde Park in which the court is located, was built as an upscale district with a variety of architectural styles. Today it is a beautiful example of how historic preservation can benefit a community, financially, aesthetically & culturally.
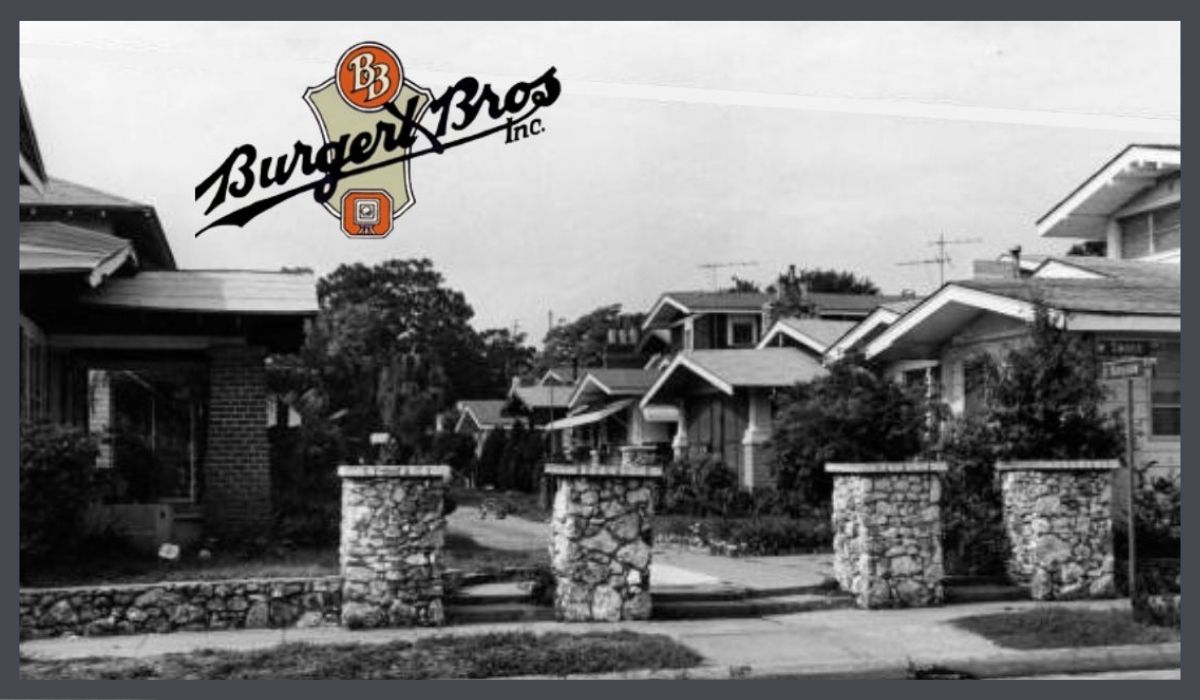
BUNGALOW TERRACE LONG AGO
Burgert Brothers was Tampa’s leading commercial photographic firm from 1917 to the early 1960s. Established by brothers Al & Jean, the studio focused primarily on photographing the Tampa Bay & surrounding areas. We are indeed fortunate to have the Burgert Brothers’ photographs which tell the tale of Tampa’s development from small town to major city. I made good use of them in the film I produced for my Tampa bungalow neighborhood.
I hope that you have the opportunity to visit this charming community, looking very much like the historic image above, yourself some day.
TIP: To learn more about the value of preservation, visit my page HERE!
STAY IN THE BUNGALOW KNOW!!!
Sign up for our newsletter & receive our FREE E-book, 7 VITAL Things to Do Before You Hire a Contractor.
A bungalow is the sum of its parts- its shape, its size. its layout, its materials. All these things are called “character defining features” & are the reason why we love bungalows.
I greatly enjoy cruising around, happily snapping pictures of bungalows. Though sharing characteristics, each one is unique unto itself & displays its own personality. My Eagle Rock bungalow & my Tampa bungalow were unalike as 2 bungalows could be, but when you looked at each of them, they were immediately identifiable as bungalows. In fact, they had pretty much identical lay-outs which is why I chose the one in Tampa.
Each month on Facebook, Jo-Anne describes the unique details 8 bungalows. At the end of the month, these bungalow details are immortalized in the blog. We encourage you to use the GLOSSARY to look up any terms with which you might not be familiar.
LET’S LOOK AT SOME BUNGALOWS!
DESCRIPTION OF CHARACTERISTICS
A double barrel shotgun bungalow. This house was built as a duplex with two long, narrow units, each having a hallway running from front to back. It was later relocated and remodeled as a single-family residence.
DESCRIPTION OF CHARACTERISTICS
A set of twins. It’s not uncommon for a builder to use the same set of plans to build homes, sometimes on adjacent lots and sometimes scattered throughout a neighborhood or town (builders certainly still do this today). It’s interesting to see the alterations over time with these two Folk Victorian bungalows. As with a previous image we posted, these homes were relocated in the Ybor City National Historic Landmark District in Tampa.
DESCRIPTION OF CHARACTERISTICS
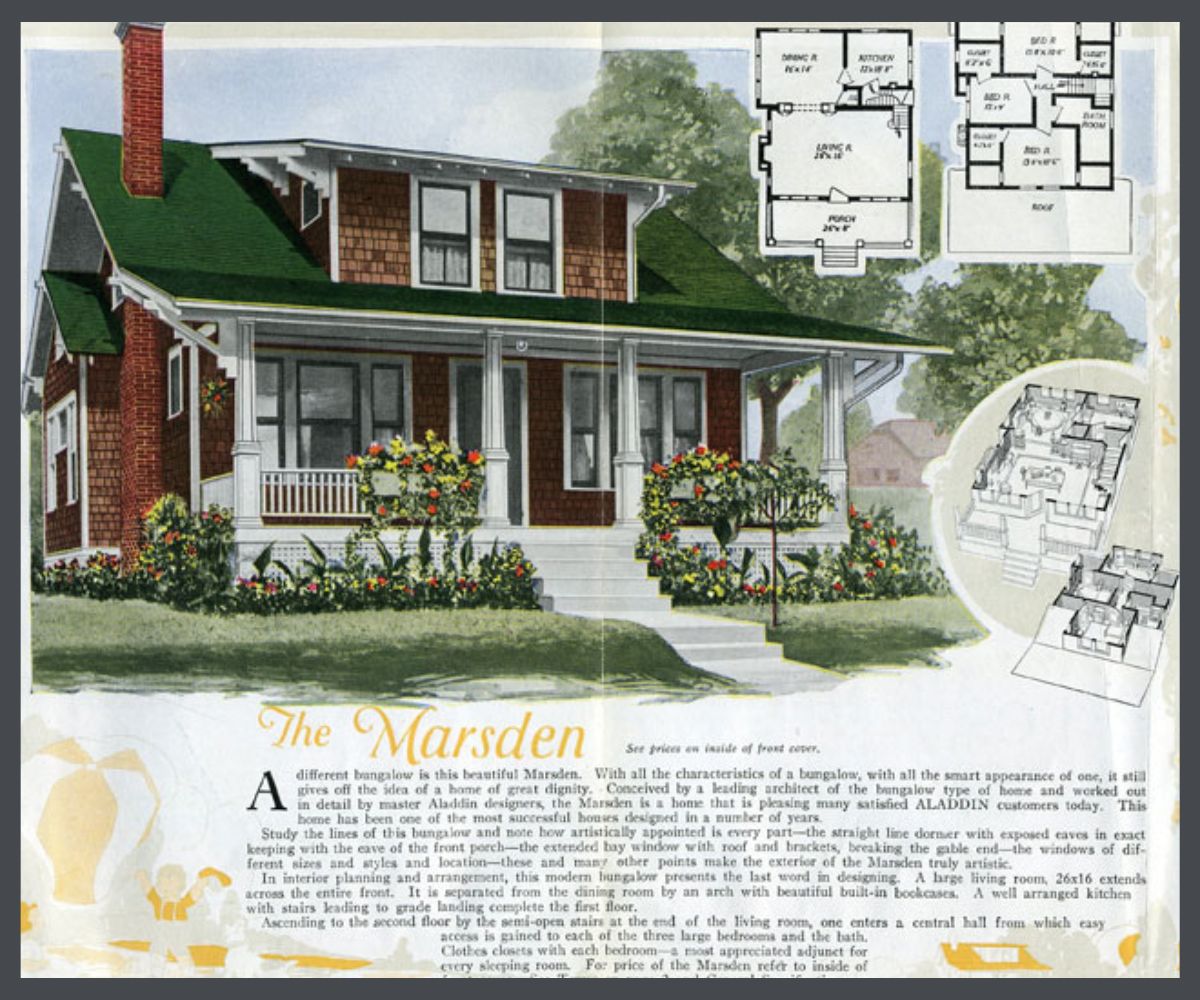
There is so much to learn by studying historic plan books. The floor plans are so informative, but never have as many bathrooms as everyone seems to want nowadays. And often they are a bit shy of modern closet space preferences.
I find the colorized images are great for getting a sense of period colors, as well as where colors are applied. Here we have a color for the wall shingles, a color for trim, and a different color for the window screens. The green roof is the prominent color in the image, which is not something we see too often in new home construction. My own house, built in 1911 has vivid green metal shingles originally. I was a bit surprised by how bright the green was when we found them under the second story porch.
DESCRIPTION OF CHARACTERISTICS
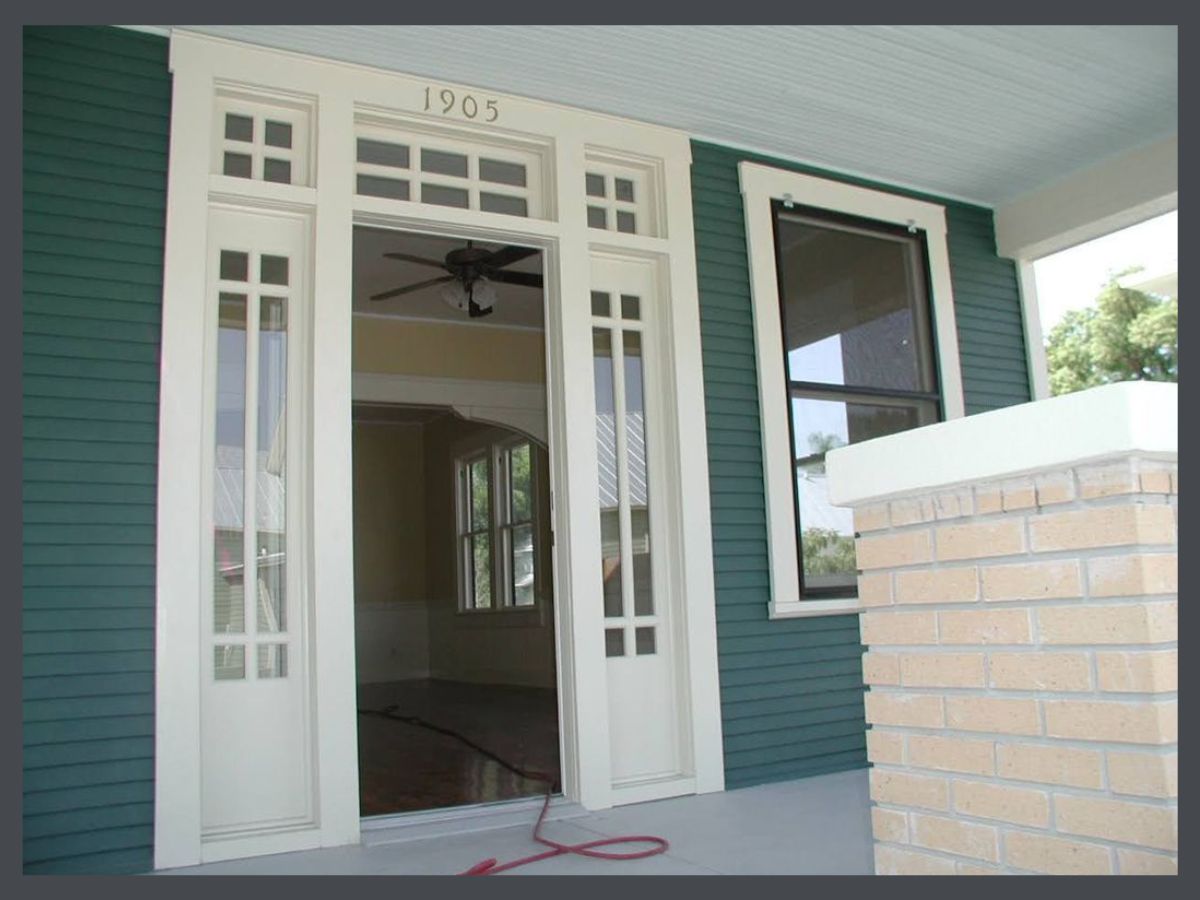
A delightful doorway with sidelights and transom. Wood window screens with appropriate hardware. These are a few of my favorite things.
DESCRIPTION OF CHARACTERISTICS
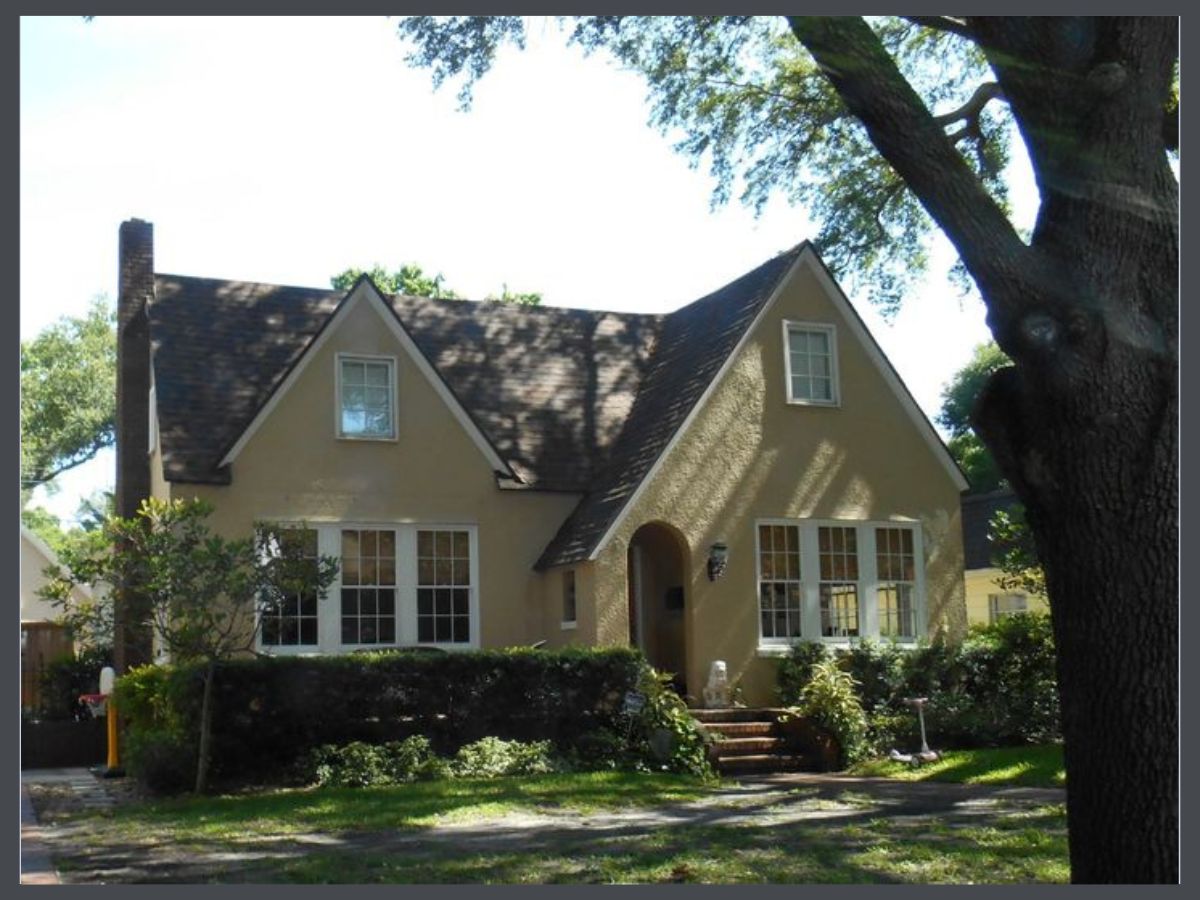
This home doesn’t have any half-timbering, but the steep roof pitch and stucco exterior definitely shows its Tudor Revival styling. It’s shielded by a privacy hedge, but there is a nice open terrace in front of this house along with that darling integral arched portico. I am always drawn to this story-book style until I think about having to roof it.
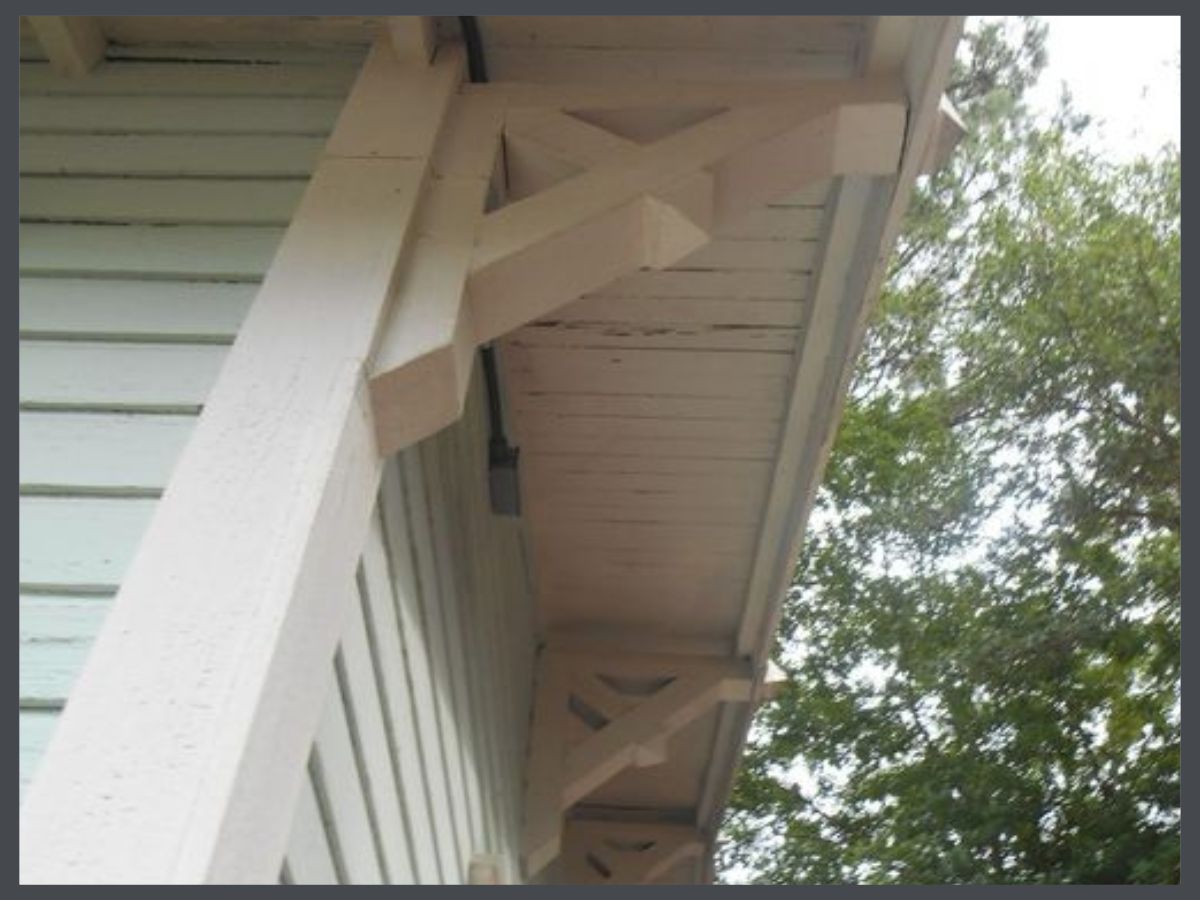
DESCRIPTION OF CHARACTERISTICS
More bungalow eave brackets to love. This is a detail I will definitely use on a design for new construction at some point. Simple, elegant, and less than ordinary.
DESCRIPTION OF CHARACTERISTICS
When your average tapered Craftsman column just isn’t enough, you go bigger!
From Suzanne- My baby brother was a major chunkster & every time I see a house with elephantine columns I see his cheery little self running toward me on his chubby little legs.
DESCRIPTION OF CHARACTERISTICS
A row of bungalows in Ybor City just because I like them. Believe it or not, these homes were all relocated and renovated as part of a highway improvement project in Tampa, FL. 64 historic buildings were relocated out of the way of the proposed highway, most of which were bungalows. At some point I will post a lot of photos of these homes from relocation through renovation.
This article was written by Jo-Anne Peck of Preservation Resource, Inc. & Historic Shed. Jo-Anne is a historic preservation professional with a degree in Building Science, a Master’s of Fine Arts in Historic Preservation & a licensed Florida Building Contractor with over 25 years experience in preservation. She has kindly provided these photos & this information based on her vast knowledge of bungalows.
TIP: Read Jo-Anne’s other articles on bungalow details in our Features section, HERE!
STAY IN THE BUNGALOW KNOW!!!
Sign up for our newsletter & receive our FREE E-book, 7 VITAL Things to Do Before You Hire a Contractor.
 “Organic buildings are the strength and lightness of the spiders’ spinning, buildings qualified by light, bred by native character to environment, married to the ground.”
 STAY IN THE BUNGALOW KNOW!!!
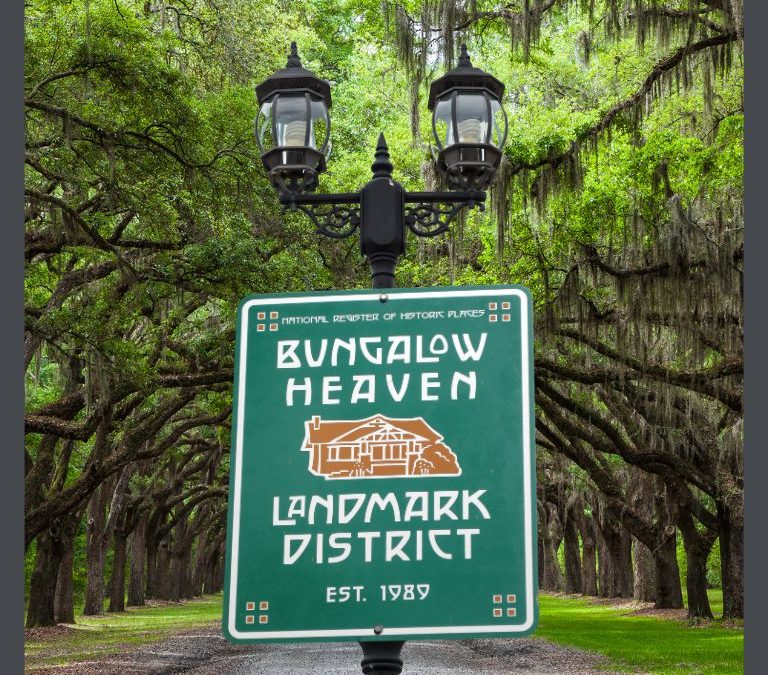
 Bungalow Heaven, a neighborhood of 800+ historic homes in Pasadena, CA, truly is a paradise. Listed in the National Register of Historic Places, the area was built between 1900 & 1930 & designated in 1989, as a local landmark district. Thankfully, this status has been instrumental in protecting it from the pop design of HGTV.
 Like the rest of the organization, it was finely-tuned & well-oiled. The tour, only one of the group’s many activities, is a massive undertaking due to the amount of volunteer coordination & the directing of the hoards of attendees. They also have to ensure the protection & comfort of the homeowners, so each task is clearly delineated & drilled in the weeks before the tour. It was great to receive this training & experience & provided us with the template that we used to form our own fledgling committee.
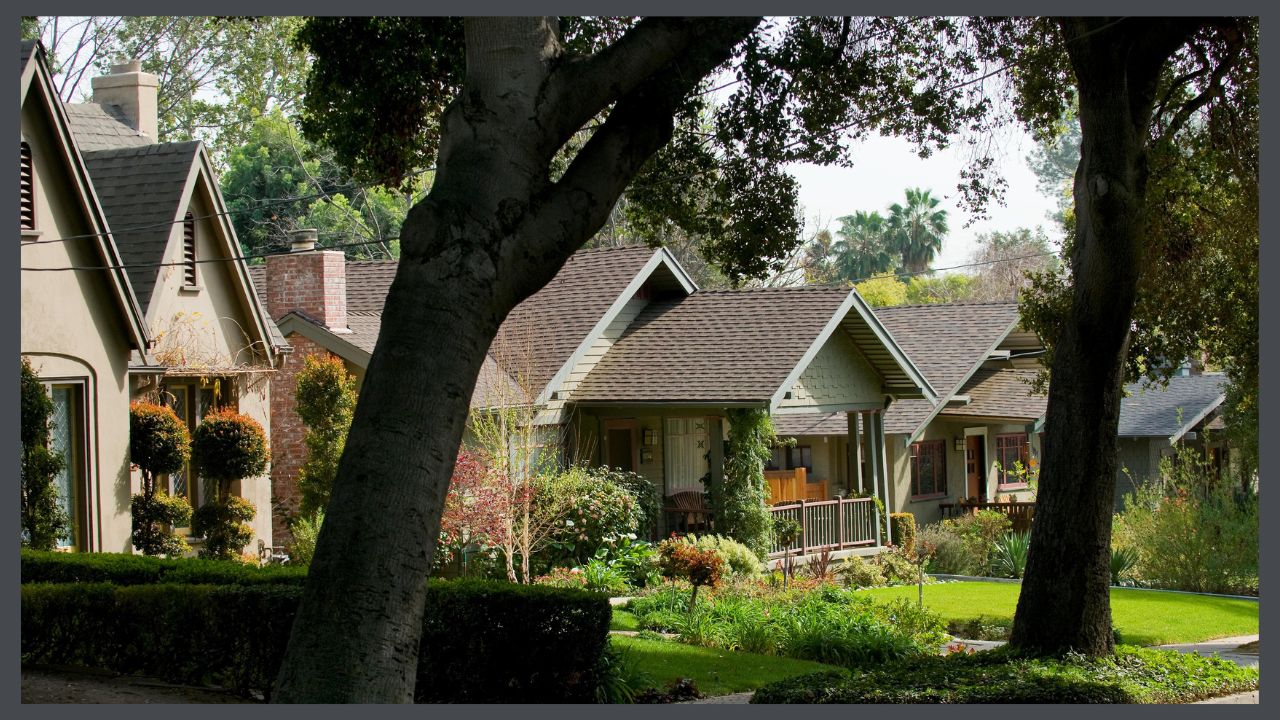
 Additionally, the modest homes of Bungalow Heaven were within the reach of the working class. People of moderate means could afford to live in a beautiful city with views of the San Gabriel Mountains, enjoy well-built homes with a variety of attractive details & friendly front porches, & had the added benefit of being near transportation, commerce & job opportunities.
 Brothers Charles & Henry Greene can be understood as men through the study of their
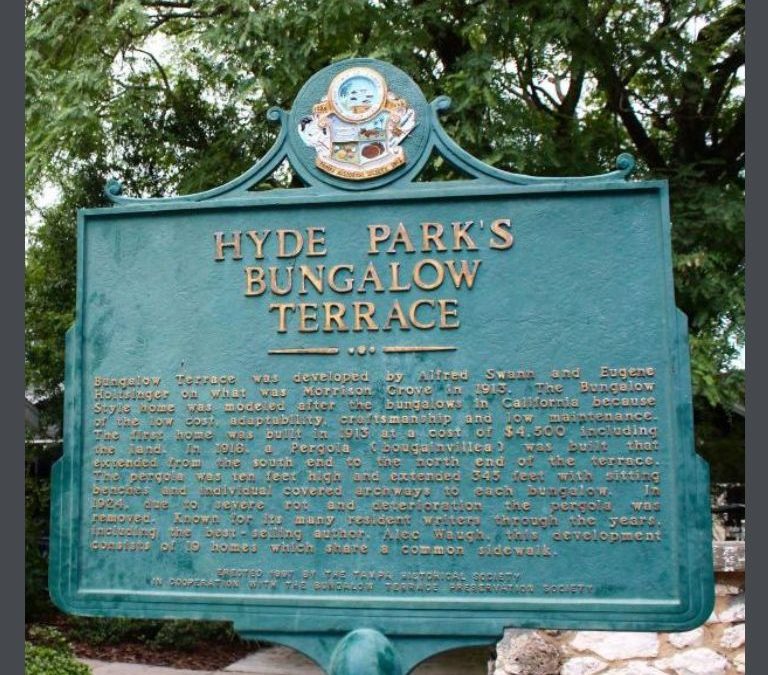
 INSCRIPTION:
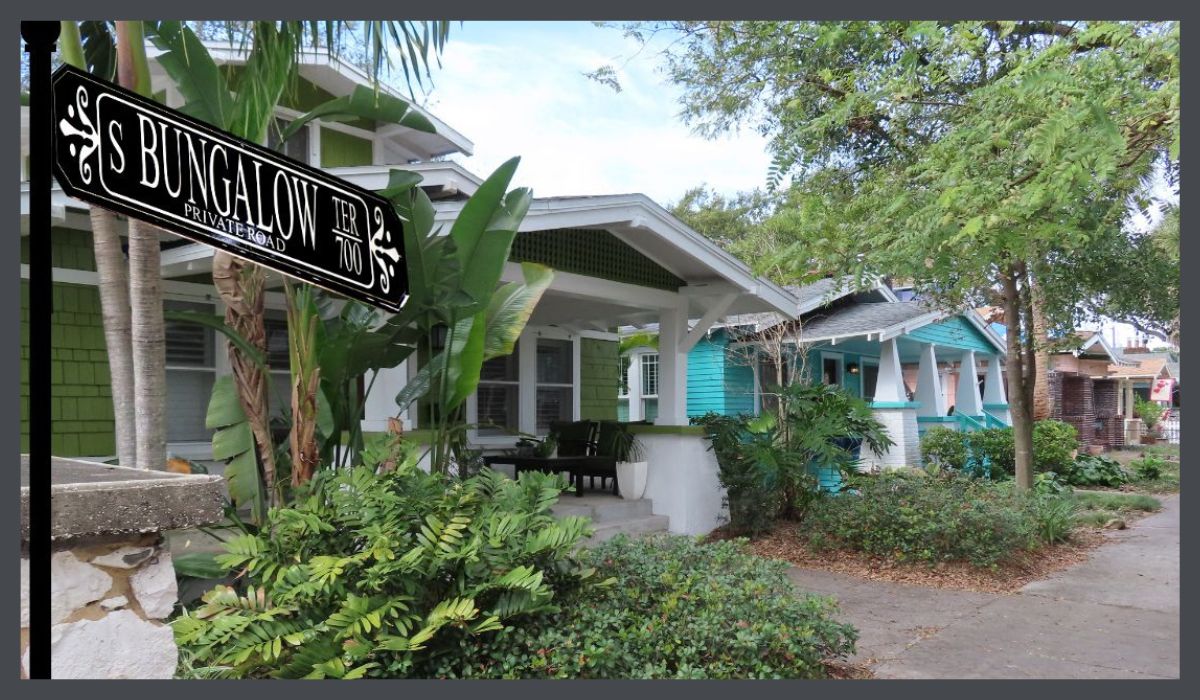

 A bungalow is the sum of its parts- its shape, its size. its layout, its materials. All these things are called “character defining features” & are the reason why we love bungalows.