
by bungalow101 | May 28, 2022 | Wood floors
by Dennis Prieur, 40 year veteran of the wood flooring industry, writes about how to decide when to refinish the wood floors in your bungalow.
 Dennis was a 25 year member of the National Wood Flooring Association where he sent his craftsmen for certification & was himself an NWFA Certified Sales Consultant. Popular speaker at Historic Homes Workshop. Supporter of my preservation activities from writing the checks to drying the tears & celebrating the victories. All around wonderful person.
The first floor I ever refinished was in 1981. It was in a bungalow near downtown Phoenix. I went to the library and read books about how to refinish floors. The floor was maple, notoriously difficult to stain, but I didn’t know any of this and just sanded away with the equipment rented from Home Depot, using the stain and finishes I got from the paint store. I have a background in chemistry, which helped, but otherwise, I was just wingin’ it!
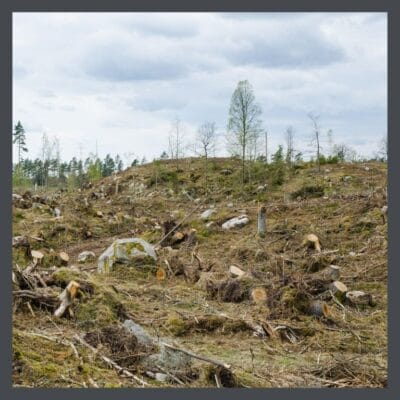
Since then, I have refinished or supervised the refinishing well over 1,000 historic floors. My aim was always to preserve and protect historic materials, beyond making pretty floors. The old growth forests are long gone and their beautiful wood will never be available again.
So here’s the important question- Do your wood floors really need refinishing?
THIS ARTICLE IS FULL OF TECHNICAL TERMS. PLEASE USE OUR GLOSSARY IF YOU RUN INTO ANY WORDS THAT ARE NEW OR UNFAMILIAR TO YOU.
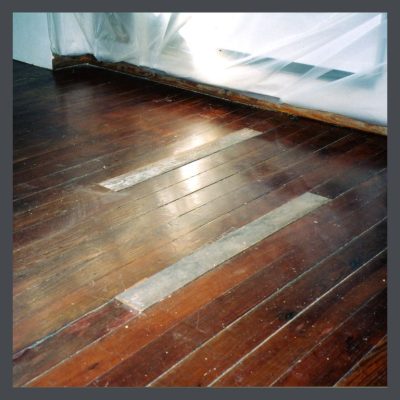
The first thing I’d like to do is to help you establish if your floors should be sand and refinished, if they can be sanded, or if they should just be cleaned and left as-is. I will also discuss recoating as an option for floors in relatively good condition, or where further sanding is not possible.
MAYBE, MAYBE NOT!
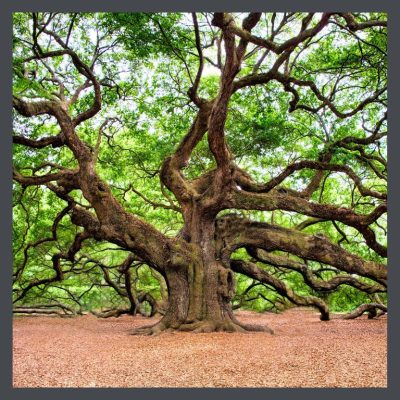
 The original wood of bungalow floors is what is termed, old-growth wood. This wood is from the ancient forests that were here when our country was first settled. The forests were clear-cut to near extinction by the beginning of the 20th Century. Old-growth wood is denser, tends to be darker and is much richer in appearance than the wood that is harvested today. It is to be treasure and preserved.
Consequently, old-growth wood floors need to be sanded down to raw wood and refinished only when they are heavily worn, and the wear includes one of two factors. The first, is dents or deep gouges into the wood. If you aren’t sure, get on your knees and run a fingernail into the dent. If it catches, and seems more than 1/32”, it is a scratch into the wood and will only be removed by sanding the wood floors. Scratches that stay in the finish layer are generally 1/64” or less. A floor with this lesser type of surface scratches and abrasions, or where the sheen has worn off, can be recoated (described below) without a full sanding. The other factor, requiring a floor to be sanded, is where the finish has worn off in some or many areas and dirt is worn into the grain of the wood. Wood is a soft and porous material, so leaving it unprotected causes your bungalow wood floor to degrade with traffic.
A wood color change requires a full floor re-sanding (with one possible exception discussed in the recoating section below). However, wood floors in your bungalow (and houses built earlier) were traditionally finished to a natural wood color with no stain. Although it is possible to change the color and stain older floors, please consider that this color change will change the character of your home, and move you away from an original look. Additionally, it will shorten the life of your floor, buzzing away that beautiful, irreplaceable, old-growth wood.
One time where a color change is often required, with older wood floors, is where there is significant wood discoloring due to water stains and pet urine stains. Water and urine stains are usually quite dark. The discolored boards need to be removed and replaced, if you want a natural color refinish. If there are just a few discolored areas, you may choose to live with these age marks. Bleaching isn’t a good solution. It lightens most stains, but doesn’t bring the wood back to the look of the rest of the floor. Also, bleach- no matter how carefully applied- will wick and spread past the discolored wood and lighten un-discolored boards. You end up with 3 shades- the look of the undamaged wood, the lightened boards that were discolored, and a thin band of bleached wood that separates these areas. Additionally, the boards’ integrity is already compromised by the damaging water and more so by pet stains which are usually quite acidic. Bleach or even hydrogen peroxide can further degrade the boards decreasing their strength. This is not such an issue when there’s a nice subfloor underneath, but you want to protect the boards of a floor that is laid directly over joists so that they remain strong & safe.
PATCHING YOUR BUNGALOW WOOD FLOOR
 Boards can be replaced so the patching is almost invisible. Ideally, this is done with salvaged, matching, old-growth wood flooring boards. This is best left to a professional who knows how to match wood color and grain. Red oak used to patch a white oak floor stands out badly. Newly harvested white oak used to patch a 100 year old floor also stands out and will be much lighter in color and usually coarser in grain. I commonly see the wrong wood species used to patch floors, and even boards of a wider or narrower width. All floor repairs should be done with tongue and groove flooring materials. When we patch an old white oak floor, and don’t have old salvaged flooring, we select and use only tight, straight grained pieces and stain them after installation for a better match to the historic wood floor.
The most important point is that on a floor with no subfloor, the new pieces need to be placed so that their ends nail to the joists. We have discovered boards or sections of boards hanging in air, waiting for the exactly placed heavy step or the new piano to cause them to fail. Old joists are usually at least 1 & ¾” wide. We end the repair halfway over a joist on both sides so it is supported well.
INSPECTING A BUNGALOW WOOD FLOOR
Here is what I do when I inspect a wood floor that a homeowner wants to refinish. I first notice whether the floors were installed directly over the floor joists, or over a subfloor that is nailed onto the joists. The easiest way to tell this from the floor surface is to look for the butt ends of boards. A floor nailed to the joists will generally have all board butt ends over the floor joists. Joists are normally 16” apart, but can be 2’ or even wider on very old floors. If you look across a floor and see that the butt joints line up in these spaced intervals, there is no subfloor. A wood floor over a wood subfloor will have randomly staggered butt ends, since all boards are laid over a layer of solid wood which creates stability.
Another way to tell whether you have a subfloor, is to go into the crawl space under your house and look up. A wood subfloor under your wood subfloor is normally laid at a 45 degree angle to the wood floor, but can occasionally be at a 180 degree angle. While under the house, see the direction of the floor boards nailed on the joists. If they are the same as the surface wood floor, and are the same width, you are seeing the bottom of the wood floor that has been installed directly on the joists. Subfloor boards were normally around 5 & ½” wide or occasionally wider. Finished wood flooring in older homes was most often 3” or less in width. Another way to tell, from the surface, is that a floor laid over the joists with no subfloor, almost always has much more movement and sag than a floor nailed to a separate subfloor. You also might notice cracks through which you can see daylight!
IS MY WOOD FLOOR TOO THIN TO SAND?
Next, I want to see how much wood remains from the surface of a board, down to the tongue and groove. Newly installed wood floors had around ¼” of wood to the tongue. A wood floor needs at least 1/8” between the surface and the top of the tongue to be sanded. (Some wood flooring professionals often can and will resand a floor that is slightly under 1/8”, but you will have to live with some defects.)
One way I determine this depth is to look for boards with gaps on the sides, wider than the thickness of a credit card. On my hands and knees, I slide a credit card down and measure with my thumbnail about how far down the card goes before it hits the tongue. I check several boards in different areas to get an average depth to the tongue. (If you get a depth over ¼” you may have a section that has no tongue and your card will go down to hit the sub floor.) Oak and other hardwood floors normally have a tongue and groove on all sides of the flooring boards, however, many older softwood floors (like pine or fir) do not have tongue and grooves on the butt joints, just on the two long sides.
It’s best to measure on the long edges of the boards. I will check butt ends if I find no other wide gaps. but know that if my card goes down almost ¾” that there is no tongue here and that there is no way to tell if the floor can be sanded from this spot.
If the thin section of wood above the tongue is thinner than 1/8”, it will often start to crack and split off when sanded, leaving a ¼” wide gap and exposing the tongue. These gaps can be filled if there is a subfloor, but this won’t look great and the filler usually won’t stay in well. If you have a floor laid over the floors with no subfloor, a floor is potentially dangerous when sanded too thin, and your foot may go through the boards.
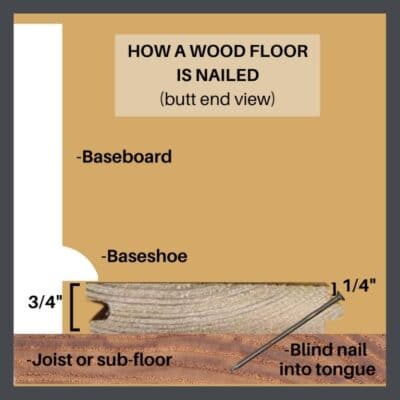 The second method to check wood thickness to determine if the floors can be re-sanded, is to look for exposed nails in the joint between two boards. All wood floors had a tongue and groove on the length of the boards and were generally “blind nailed” by positioning the nail at a slant and nailing on top of the tongue to secure it to the joist or the subfloor. (See diagram.)
When a floor has been sanded many times and there is 1/8” or less from the board surface to the top of the tongue, you will see some exposed nail heads between two boards. These nail holes must be between two boards for this to be a valid test of wood thickness. Here’s why- many older wood floors may have been top nailed to “handle” squeaks or loose boards. Also, in certain areas of the Western United States, old wood floors had no tongue and groove. They were top nailed. These nails are never at the edges of the boards, and you will see a regular, repeating pattern, if you have these floors.
If you do have some nails showing between the boards, a wood flooring professional may still determine your floor can be sanded. Sometimes, these nails can be set down and filled, which will be visible in the finished floor. If small finish nails were used to lay the floor, it looks better to leave them and just sand the floors. You will see these exposed nail heads, but the floors will still look great. I have sanded many floors where homeowners had previously been told they could not be sanded again, to great result. If I find that the floor is borderline to resand (less than 1/8” wood remaining above the tongue and groove) I discuss the options. Usually a refinish can be done that will make the floors look amazing, even if some age related blemishes exist. However, some floors cannot be resanded. I always let a homeowner know what I think can be done, and what he can expect to achieve.
RECOATING YOUR BUNGALOW WOOD FLOOR
 This is a good option for any wood floor that isn’t too badly worn. A recoat allows the finish coats to be renewed for a great improvement in appearance. It works well for a floor that is too thin to be resanded but can be aesthetically improved and be better protected by a recoat. One to two coats are all that is ever needed.
The wood floor must be properly prepared before any coats are done. This is normally done using a light duty stripper designed to remove wax, oils, and other household cleaning products that may have been applied to the floor. Follow the recommendations of your selected finish manufacturer for how to do this, and what product to use. If this step is omitted, the finish often will adhere poorly to the old finish, and either peel off or scratch easily. Once you have a peeling recoat, a full resanding is normally the only solution.
After any cleaning and prep work are done, the floors are normally lightly sanded using a floor buffer and a sanding screen, clog-resistant nylon discs in 80-120 grit. Always follow the grain and direction of the floorboards. The floor is then vacuumed and tacked down well, and is ready for your recoat.
Apply the 1-2 coats per manufacturer instructions for the finish you are using. Also, follow dry time and abrasion instructions if a second coat is planned, and to determine when you can walk on and use the floors.
A recoat doesn’t remove anything in the wood, so you will see any dents, deep scratches, and discoloration on the floor after the recoat is done. If your floor is too thin to sand, a recoat will always improve the appearance, but may not be satisfactory for a badly worn floor that could have been sanded.
CHANGING THE COLOR WITHOUT RE-SANDING
An American Company, Basic Coatings, has developed a product called HyperTone stain. These are water-based floor finishes with tint added, in 14 different colors. They are designed to be used as undercoats followed by 2 coats of their Professional Street Shoe water-based finish. Tricky to use, they can give a blotchy look, but when done correctly, change the color of a floor and look great. Their main drawback is that they will cover up some of the grain and color variation of your original bungalow floors, which is why I recommend these only for a floor that is too thin to resand. But what I most recommend is to leave your floors stain free.
OTHER OPTIONS
Bob Yapp of Belevedere School offers other options. I’m going to let him tell you about them. Bob is a giant in the world of historic preservation & if you want to learn how to restore your own floors, he will teach you!
REFINISHING YOUR BUNGALOW FLOORS: SUMMARY
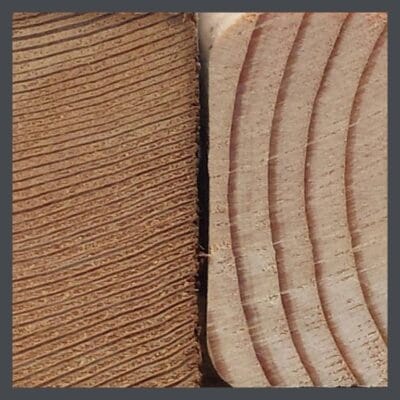
 Original wood floors were milled from trees from our old-growth forests. They have a luminous and lively appearance that is not present in wood that is farmed, harvested and milled today. The old trees were often hundreds of years old when they were cut. Grown naturally, they may show as many as 10 times the number of growth rings per inch. In addition to being more beautiful, this wood is more dense and more pest and decay resistant and also shows greater stability, meaning that tt is less likely to warp.
The purpose of finish is to preserve the wood, a soft and porous material underneath. We urge you to forgo sanding if your floor has a good, protective coat on it. If it is showing little wear, we encourage recoating rather than re-finishing. Once your floor is ground down to the tongue and groove, it is effectively over, especially if you have no subfloor to support weight on the thin boards.
A floor that is properly cared for will last several hundred years. The old growth forest will never come again. The supply of wood from them is finite. Let’s protect what we have.
TIP: READ OUR ARTICLE ABOUT WOOD FLOORING FINISH CHOICES HERE.
 STAY IN THE BUNGALOW KNOW!!!
Sign up for our newsletter & receive our FREE E-book, 7 VITAL Things to Do Before You Hire a Contractor.
by bungalow101 | May 28, 2022 | Other areas, Wood floors
by Dennis Prieur (usually known as Hubby) & Carol Goodwin, of the Goodwin Heart Pine Company
 Heart pine floors in bungalows is one of the most appreciated features of our charming homes here in the South, where they are deservedly revered. They gleam a warm welcome as you come in the door, bringing an element of the natural world into the built environment. But what is “heart pine?”
Carol Goodwin of Goodwin Company has been working with heart pine since 1976. They pride themselves with being an eco-friendly company, rescuing logs or using only wood that has been sustainably harvested throughout the Southeast.
Goodwin Heart Pine is famous for its recovery & milling of pine logs from the bottoms of the rivers on which they were floated to the mills over 100 years ago. If you should need extensive patching of your floor, or wish to add an area, they can provide the material for you that will match the existing.wood in your house. This is a terrific video about how they recover the logs.
Carol is a lover and student of history and a supporter of historic preservation. One of my favorite projects of theirs was an adaptive re-use of a barn built in the 1930’s for which they provided over 2,000 square feet of reclaimed wood.
HEART PINE FLOORS IN BUNGALOWS
 The “heart” of the pine tree is the solid, inside core of the tree. It contains no sap, the watery fluid that circulates through the tree, carrying nutrients to the leaves and various tissues. Heartwood is wood that has died with age. As the tree grows, more heartwood is formed. The heartwood becomes more resistant to decay and termites as a result of genetically programmed chemical changes in the wood, causing the clogging of the nutrient tubes with resin and pitch. If you were to cut a cross section of a tree, you would see heartwood as a darker colored circle, usually following the annual rings in shape.
True heart pine floors in your bungalow are only from the long leaf pine, also known as long needle, long straw, southern yellow, hard, pitch, heart pine and Georgia pine, among other names. The natural range of longleaf pine extends from southeastern Virginia to east Texas in a belt approximately 150 miles wide adjacent to the coasts of the Atlantic Ocean and the Gulf of Mexico. It dips as far south as central Florida and widens northward into west central Georgia and east central Alabama. This type of pine is called “heart” because when it reaches maturity the tree is mostly heartwood, taking 200 years for a tree to become 2/3 heartwood.
Long leaf heart pine contains almost twice the resin content of other types of pine and has much higher structural strength. It was used for the tall masts of sailing ships and was referred to as “The Kings Pine” when this country was owned by England.
HEART PINE- OUR COUNTRY’S BACKBONE
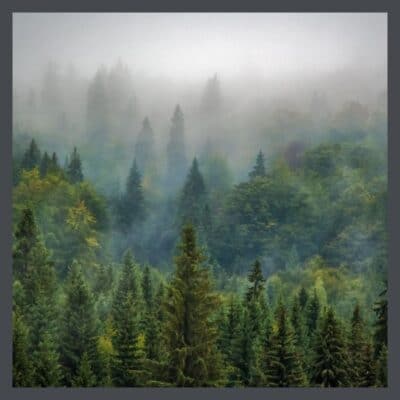
 Heart pine is generally considered to be timber from first generation trees, trees that were standing when the first settlers landed in this country in the 1600s. Many of these trees had been standing for over 300 years! There were approximately 80,000,000 acres of these trees. This wood was the primary building material for our bungalows and factories here in the South and was shipped to the Northeast and Europe as well. It was abundant, hard, straight, and long and its timbers offered excellent resistance to decay.
The economy of the Southeast centered on the export of longleaf pine products. After the Revolutionary War, intense cutting of the virgin longleaf pine timber began on the Atlantic seaboard and moved inland, then southward, increasing with the development of the railroad system in the late 1800’s.
By 1930 virtually all of the virgin longleaf pine forest succumbed to overcutting. Less than 1,000 acres of virgin timber remains today, with the longleaf pine ecosystem covering less than 3.3 million acres, a greater than 96% loss. The pine forests of the South have been cut several times over and this newly harvested wood exhibits very few of the qualities that made heart pine the wood of choice up until the early 20th century.
Read more about old growth forests here.
GROWING OLD GRACEFULLY
The heart pine floors of our bungalows are a mix of pine heart and sap woods. The heart is a deeper red in color, with the sapwood being lighter. Some of the boards are a mix of these two woods producing a stripy effect.
Sadly, some of our bungalow heart pine floors have been chewed by termites, and are at the ends of their lives. However, many have generations of usefulness left in them with some patching (think spare wood in closets, or a quick call to Carol!) and a gentle refinishing. We happen to think that they look beautiful when showing the patina of age, like any other precious antique. When possible, we prefer just to re-coat them with a new layer of finish which protects the wood from wear. A well maintained floor can be enjoyed for at least another 100 years!
STAY IN THE BUNGALOW KNOW!!!
Sign up for our newsletter & receive our FREE E-book, 7 VITAL Things to Do Before You Hire a Contractor.
by bungalow101 | May 25, 2022 | Paint
THE COLOR LESSON
 This is a lesson in choosing the right bungalow paint colors, which can be a huge challenge. Most articles give you a few examples, & the paint manufactureres provide pitifully few Arts & Crafts combinations, but they don’t actually teach you anything about the design history of bungalows or about the use of color to best enhance your home. If you want to learn the how & the why of color choices, stick around & read my series of articles, & then you’ll be able to figure it out for yourself & have a custom color scheme, based on your favorite colors, that you will love.
Read in the order they are presented. Each one builds upon the ones previous.
I’m going to start the choosing bungalow colors lesson with some basic terms, so basic that some of you may know them, but have patience, gentle readers, some may not. If you run into a term in a definition that you don’t know, look for it on the list. If it’s not there, let me know so that I can add it. In this lesson, the list is in teaching order, with images, so that the concepts build, one to the next. You can use this list of terms as a glossary in the next articles that will cover more complex colors, explain the Arts & Crafts palette & the final ones that help you choose colors for your own bungalow.
CHOOSING BUNGALOW COLORS- THE BUILDING BLOCKS LESSON
Color
A quality of an object which is caused due to the light being reflected by this object.
Color wheel
A tool that shows every color in the full range of colors, by gradients.
Hue
A true color with no white, grey or black added.
Primary Colors
The building blocks of color- red, yellow, blue. These colors & are cheerful & great for kids’ toys.
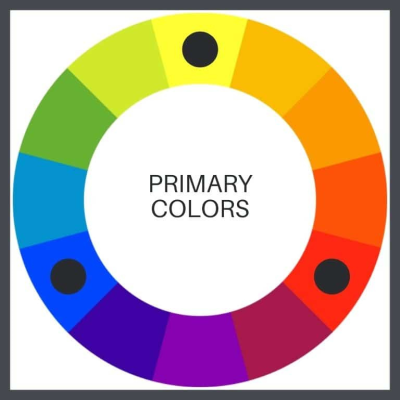
Secondary Colors
Combining 2 primary colors in equal amounts gives you green, orange, violet.
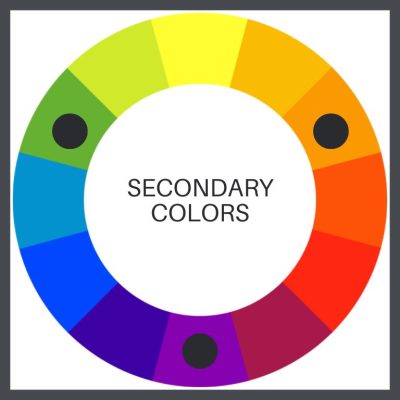
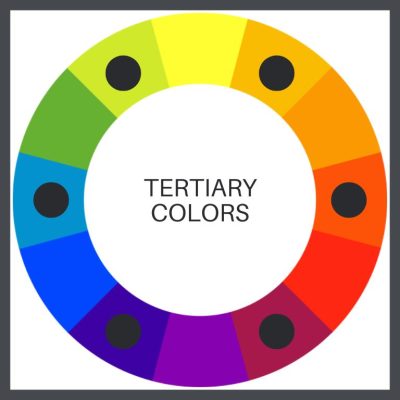
Tertiary Colors
Combining different amounts of the 2 primary colors- gives you red-orange, red-violet, yellow-orange, yellow-green, blue-violet, blue-green. I love this combination of hippy colors!
Remember that at the turn of the last century, they were still using natural materials as tints, so these plastic colors would not have even been possible to create. But, the wheel of the day would have still included a variation of these tones.
You can go on to mix tertiary colors to achieve different colors. The closer that different colors you mix together are on the color wheel, the more compatible they are, and the more intense the resulting color will be when the colors are mixed. The further they are, the more muted & less intense the resulting color will be.
CHOOSING BUNGALOW COLORS-THE COLOR GROUPS LESSON
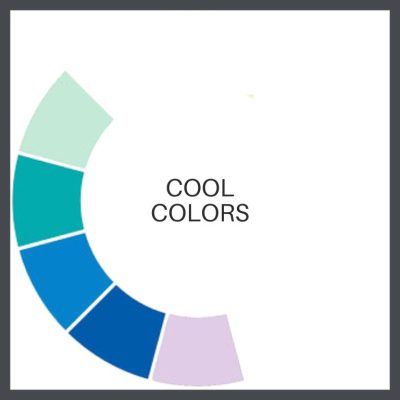
Cool/Water Colors
Do not include any red. Cool colors do include green, blue, & purple, & variations of those three colors. Blue is the only primary color within the cool spectrum. Greens can take on some of the attributes of yellow & still remain cool. Purple takes on some of the attributes of red & still remain warm. As pastels, they can be more subdued than warm colors, but can be more vivid in the jewel tones.
Cool colors tend to be soothing & calming, like a trickling brook.
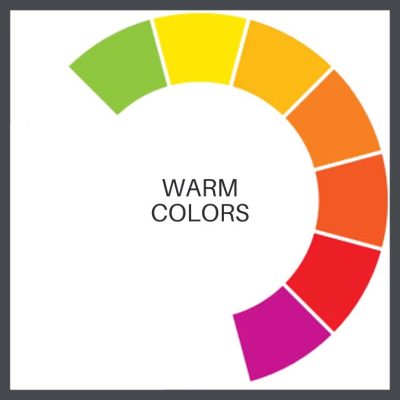
Warm/Fire Colors
Do not include any blue. Warm colors are of orange, red, yellow, & combinations of these. They tend to make you think of warm things, such as sunlight, fire, heat & friendliness.
Visually, warm colors look as though they come closer, or advance which is why they’re often used to make large rooms feel smaller & cozier. They are exciting & their use might raise your blood pressure a little!
Pastels
These are colors which have white added to them. They can be primary, secondary or tertiary. Happy Easter!

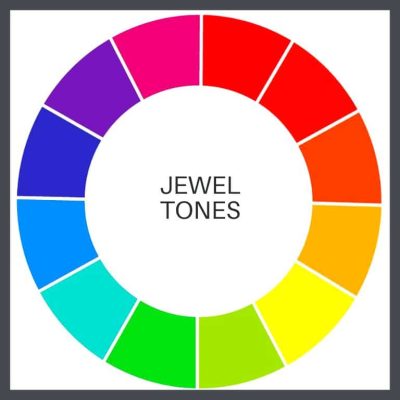
Jewel Tones
Any deep or vivid color suggestive of that of a gemstone; ruby, emerald, sapphire, amethyst, etc. I have actually seen bungalows painted in these wild colors. I live in Florida & I don’t mind them on a Key West style house. In Key West.
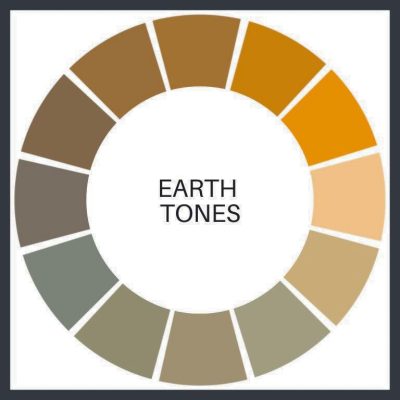
Earth Tones
A group of colors that contain brown, the color of earth or soil. In its larger sense, (& how it will be used here) is colors that are found in nature- soil, grass, trees, berries, flowers, clouds, the sun.
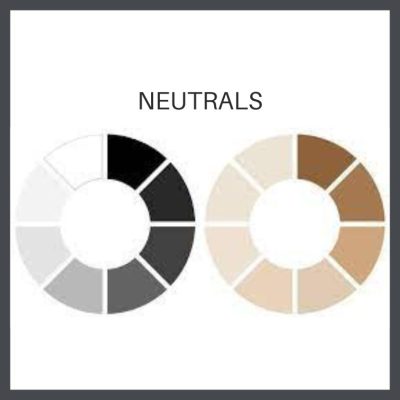
Neutral Colors
Colors that are not found on the color wheel such as gray, beige and brown. Neutral colors are muted shades that appear to lack color but often have underlying hues that change with different lighting. The lighter ones can reflect the colors around them. Though not on the color wheel, they complement primary & secondary colors.
Neutral colors can be complex in tone, as mixing different colors creates unique shades. For example, greige is a mix of light gray and beige, with yellow hues in natural light and gray in fluorescent lighting. (Natural light refers to lighting generated from a natural source like the sun.)
I do not mind an all-neutral palette for a bungalow, but landscaping must be planned to liven it up a little, without overwhelming, & make it look more an extension of nature.
A key issue in color is paint quality.I always recommend Ben Moore because their paints are easy to apply & long lasting. Their colors are well formulated so they are clear & vibrant. They have a great website so that you can search & try colors on a photo of your house, & their customer service is some of the finest in the land.
We are getting closer, but there are still more things to consider before we’re fully submerged in the Arts & Crafts palette.
KEEP READING!
 Part 2, COLOR HARMONY
Combining colors to please the eye.
Part 3, THE ARTS & CRAFTS MESSAGE
The philosophy behind the beauty.
Part 4, OLD BUNGALOW COLORS
Color choices when our houses were constructed.
Part 5, WHAT ABOUT PAINT COLORS FOR YOUR HOUSE?
How to use everything you know about color to pick your dream colors.
Part 6, PAINTING YOUR BUNGALOW EXTERIOR CHECKLIST
Making the big choices.
Part 7, IT’S ALL ABOUT THE CHEMISTRY- LEAD PAINT IN BUNGALOWS
Because I think I’m everybody’s mama.
STAY IN THE BUNGALOW KNOW!!!
Sign up for our newsletter & receive our FREE E-book, 7 VITAL Things to Do Before You Hire a Contractor.
by bungalow101 | May 24, 2022 | Paint
COLOR HARMONY
 HARMONY DEFINED: The degree of harmony is determined by how well the separate parts of a piece of art work together, & have some sort of logical progression in their relationship.
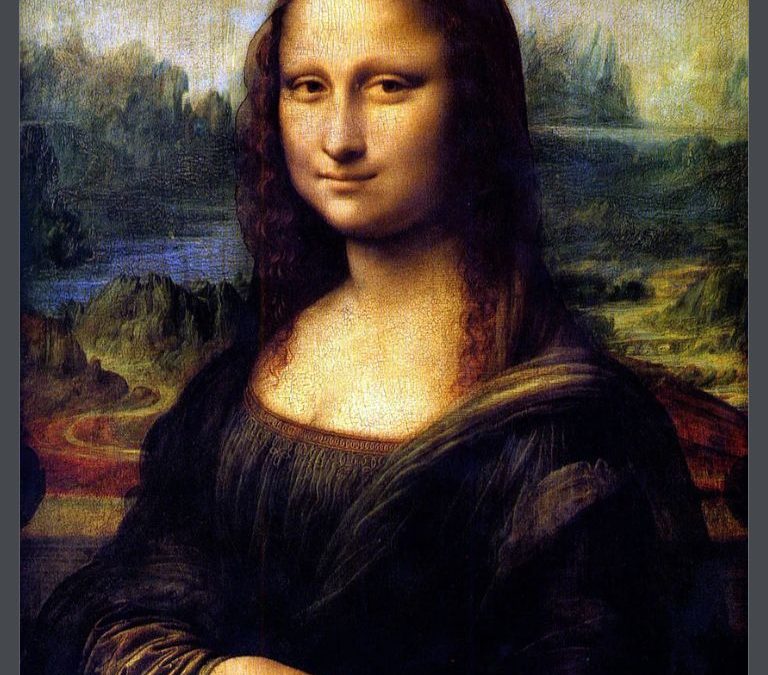
Not just a concept used in music, harmony forms the basis of any visual design in which pleasing color relationships are used to convey a message & create a particular look or feel. We will look at the message of the Arts & Crafts philosophy in Part 3, but for now let’s just concentrate on pleasing color arrangements. Gazing at the Mona Lisa, I am drawn into her beauty & serenity. A great deal of this is created by the colors that are used for the figure & the natural background.
We’re going to assume that you are going to choose to employ several hues, probably 3-ish, on your bungalow because it is traditional to use different colors to point out the different materials- stone, wood, concrete, or elements such as windows, window frames, door, columns, siding etc.
Eye-pleasing combinations are based on different geometric relationships on the color wheel. They can be moved around the color wheel to get different combinations. Let’s look at them.
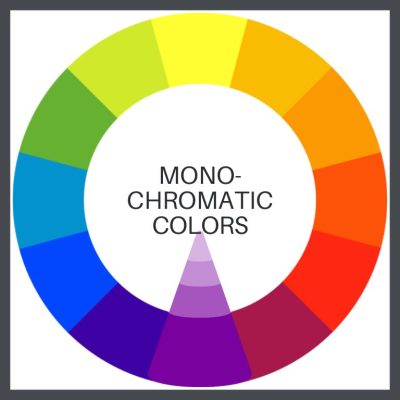
Monochromatic
A color scheme using one color or several colors close to it. This color combination can be very soothing and calming. Maybe not in purple!
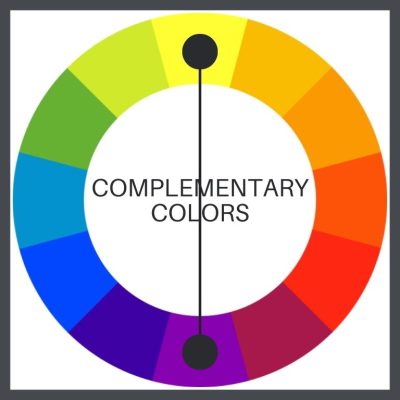
Complementary
Two colors that are opposite each other on the color wheel (example: red and green.) Complementaries can make each other appear brighter. Green next to red makes the red look “redder” & vice versa.
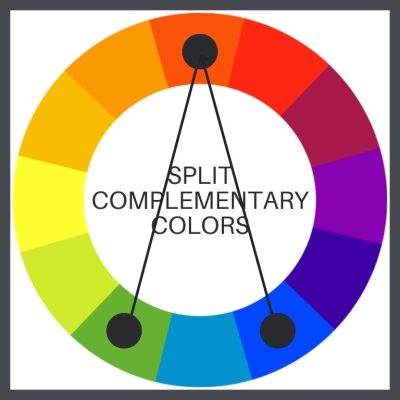
Split complementary
A split-complementary color scheme takes up a primary color & two secondary colors.
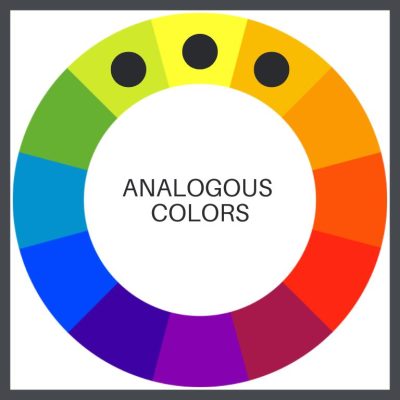
Analogous
Any three colors side-by-side on the color wheel. Analogous colors are often found in nature and can be very pleasing to the eye. Usually, one color is more dominant than the others.
Triadic
Three colors that are equidistant from each other on the color wheel (example: the primary colors, red, yellow and blue.) Think alphabet blocks.

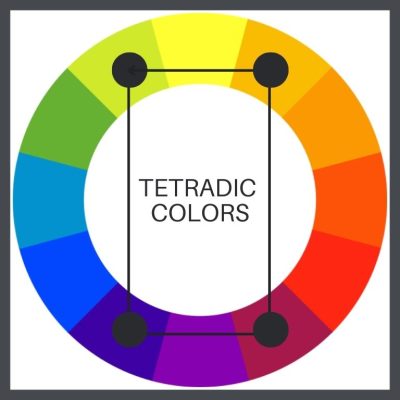
Tetradic
Four colors that form a rectangle from each other on the color wheel. I’m not fond of more than 3 colors on a bungalow. It’s no more appropriate than adding gingerbread to the front gable.
Any of these combinations can be used with any types of color- primary, secondary or tertiary. You can also throw in the variations below. (This is why I want to take you beyond the historic color palettes offered by the paint manufacturers. They are very limiting.)
BUNGALOW COLOR HARMONY- MANIPULATING COLOR
Tints
Adding white to colors.

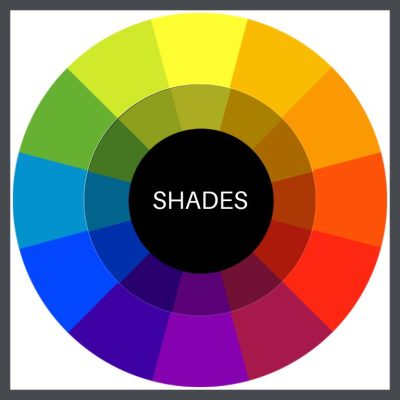
Shades
Adding black to a pure hue.
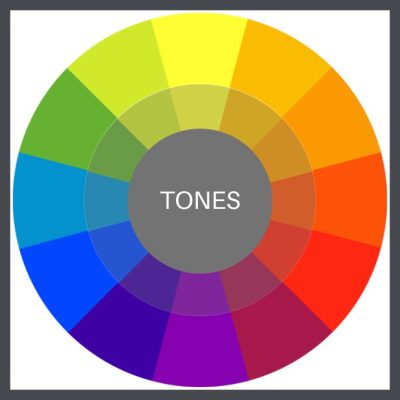
Tones
Requires adding both black & white. The resulting colors are more natural than shades and tints & pure color.
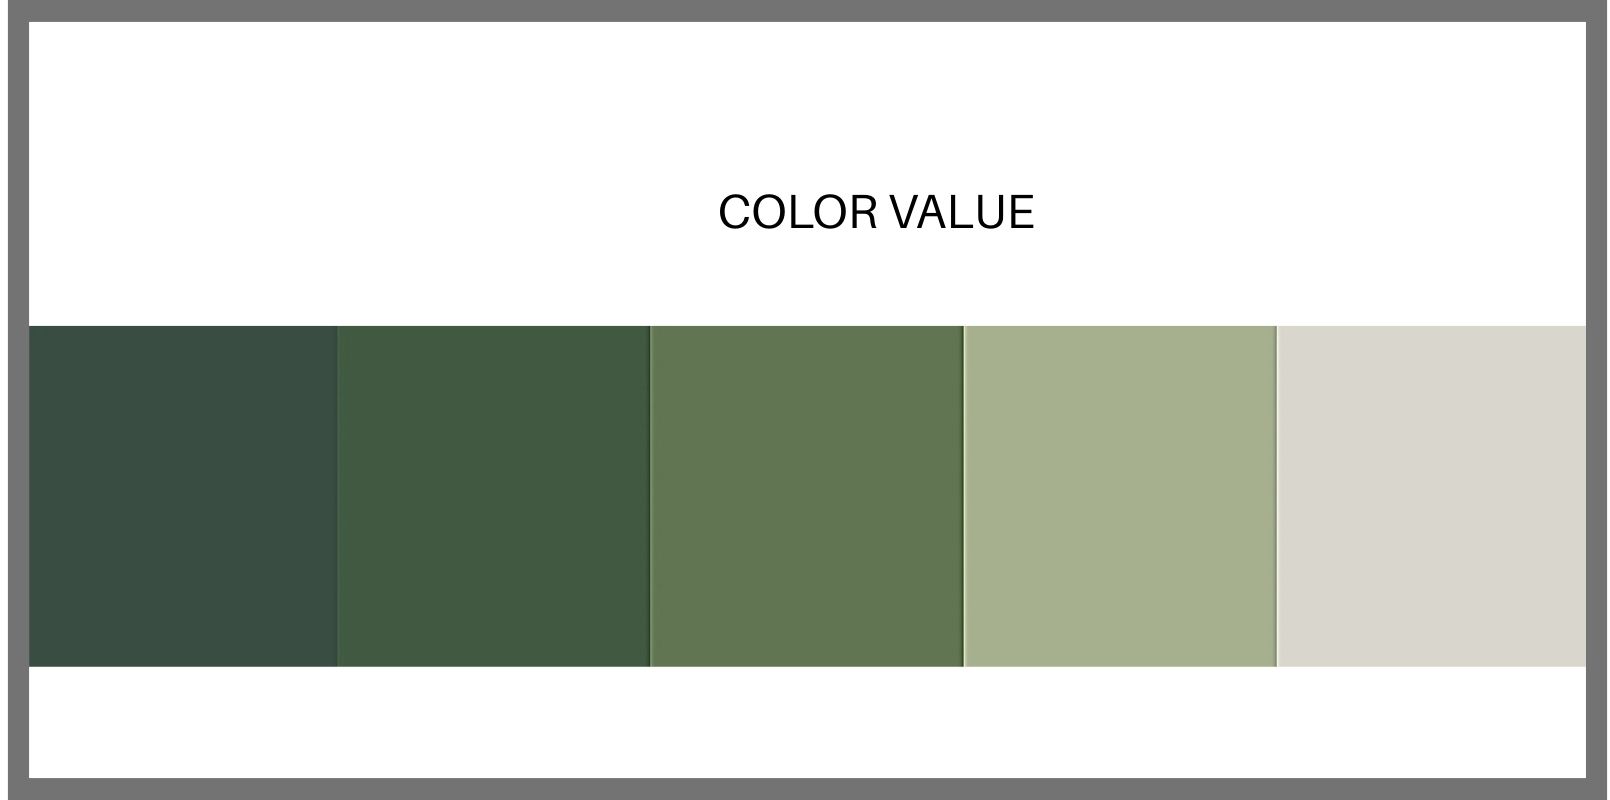
Value
The relative lightness or darkness of a color, which is held constant. A paint color sample strip, showing a color from lighter to darker, is a perfect example of changing value.
We are so-o-o-o much closer to looking at actual, historically appropriate colors, but, there’s more! We’re going for the Full Monty of bungalow color.
A FEW MORE BUNGALOW COLOR TERMS
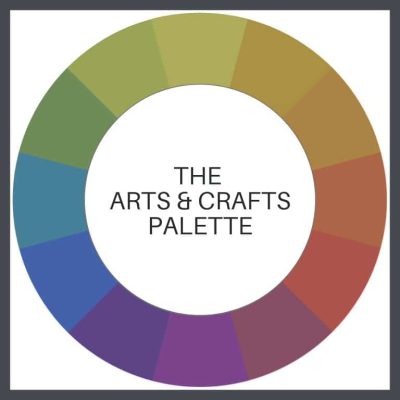
Palette
A particular range, quality, or use of color, resulting in harmony.
Example- the Arts & Crafts palette- the colors used by the artists & craftspeople of the Arts & Crafts Movement.
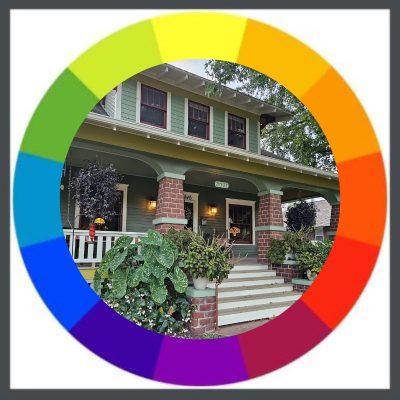
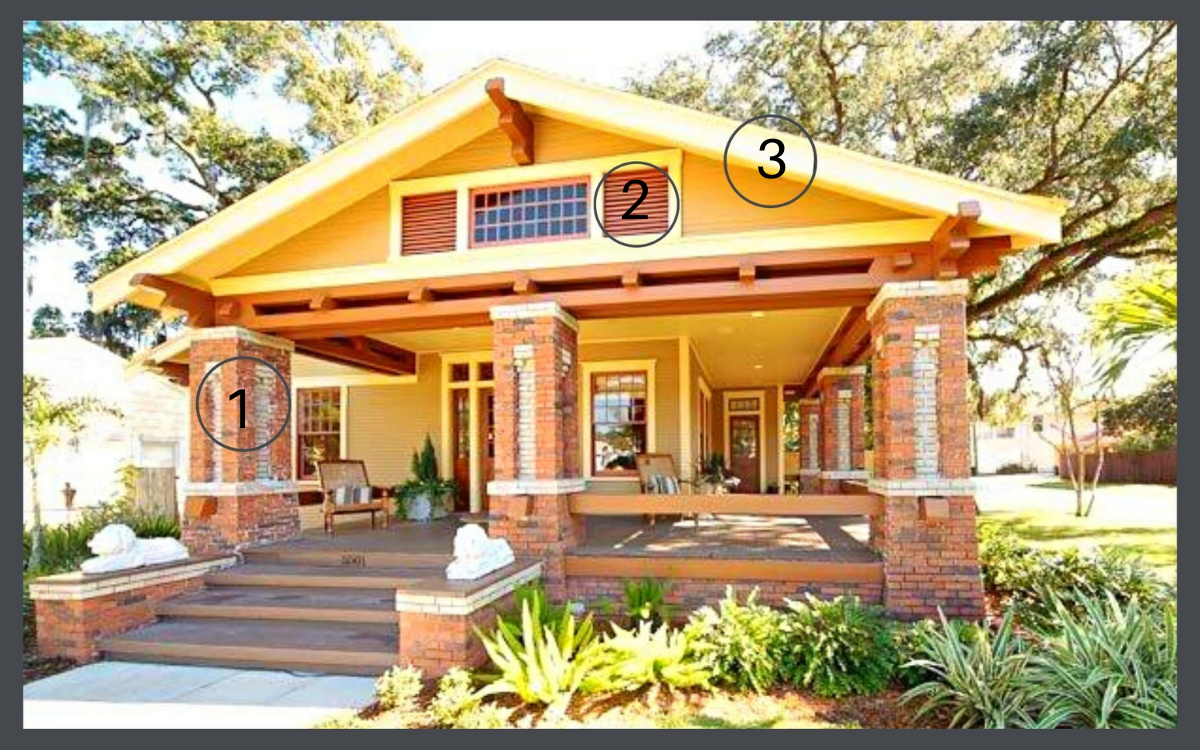
Key color (1 below)
The most important color of your design. It’s the color you can’t change, such as grass or wood or brick or stone, or the color of the element to which you want to draw attention. You need to know your key color before you can determine your color harmony. This will be your starting point.
Accent color (2 below)
One used in comparatively small quantities in a space, to add impact & interest. A classic decor rule that states that 60% of the space/object should be a dominant color, 30% should be the secondary color & the last 10% should be an accent. (70, 20 & 10 work well too.)
You can easily take a perfect combination of colors, & by using them in the wrong proportion, create a gaudy mess.
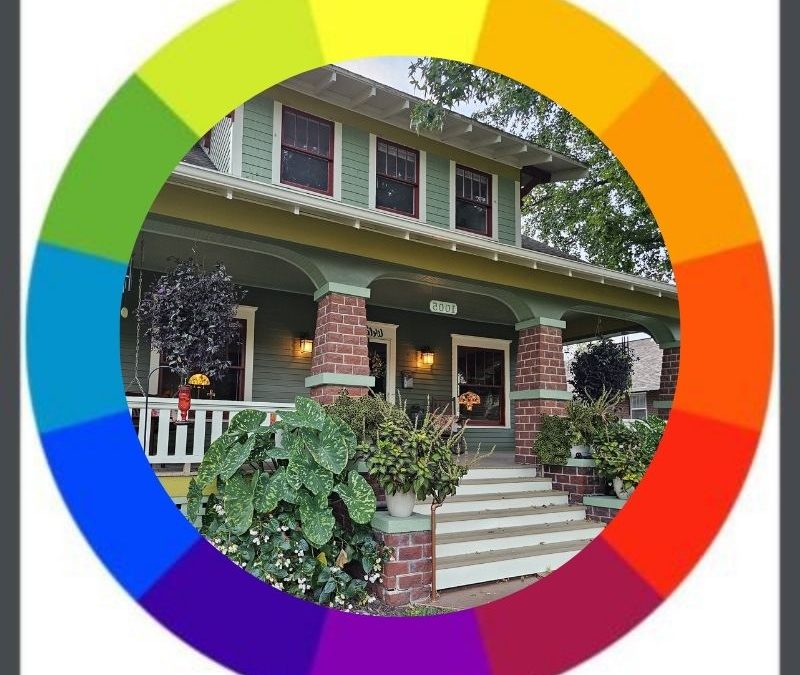
Contrast (3 below)
The arranging of opposite elements, such as light versus dark. The house shown below is textbook perfect bungalow color harmony.
ONE MORE TIP
Here’s a video that you can view to see all these combinations in action. Please watch it twice, but come back! There’s more!
Before you pick up your keys to head to the paint store, I also suggest that you buy & use the color wheel shown in the video-a great tool that you can just fool around with & learn a huge amouint about color.
KEEP READING!
Part 1, THE COLOR LESSON
How to combine colors on your bungalow to most enhance its features.
Part 3, THE ARTS & CRAFTS MESSAGE
The philosophy behind the beauty.
Part 4, OLD BUNGALOW COLORS
Color choices when our houses were constructed.
Part 5, WHAT ABOUT PAINT COLORS FOR YOUR HOUSE?
How to use everything you know about color to pick your dream colors.
Part 6, PAINTING YOUR BUNGALOW EXTERIOR CHECKLIST
Making the big choices.
Part 7, IT’S ALL ABOUT THE CHEMISTRY- LEAD PAINT IN BUNGALOWS
Because I think I’m everybody’s mama.
STAY IN THE BUNGALOW KNOW!!!
Sign up for our newsletter & receive our FREE E-book, 7 VITAL Things to Do Before You Hire a Contractor.
by bungalow101 | May 23, 2022 | Paint
THE ARTS & CRAFTS MESSAGE
 The Arts & Crafts message is evident in every piece of design that flowed from the masters of the Movement 100 years ago & is passed on by those in today’s Revival.
The motivation & purpose of art is communication, the passing of an idea from one person to another. Going back to the drawings of the early cave dwellers which may have been the works of shamans, illustrating their visions, humankind has used symbols to communicate ideas & emotions & to influence the thoughts & behavior of others, even the gods.
 Who has not been moved to tears by a mournful song or invigorated by a joyful tune? Though we have never met the songwriters or the singers, (Well, I actually did. I was a groupie!) we feel intimately connected with them. We hear them & we respond to them. That communication has an emotion & hearing it changes our own emotions.
We perceive visual images daily, be they advertising, art or our friends’ latest antics on Facebook. It’s all communication- the passing of ideas from one person to another.
THE MESSAGE & CULTURE
 The communication of design both expresses & influences culture. Let’s define culture as the customs, arts, social institutions, technologies & achievements of a particular nation, people, or other social group, at a particular time. They are intertwined & build on one another. The art of a culture expresses that culture & at the same time, the voice of the artist guides the culture.
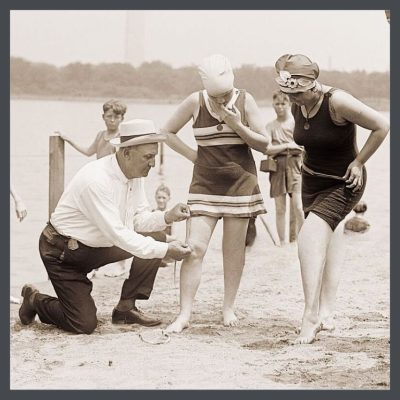
This image conveys woman from the viewpoint of the 1920’s & communicates to them from that viewpoint. It says that she should be on display, with her best leg forward, thin & young, but not too much on display- a man should determine the appropriateness of the length of her beach attire. Nobody is objecting to this demeaning treatment. It’s the reality, the law, of the times. It is further solidified by the image. (Disclaimer- I’m not advocating here for being unhealthy, unattractive nor for parading oneself like a piece of meat. There’s a happy medium here. No pun intended.)
So how does this relate to our good buddy, the bungalow?
THE ARTS & CRAFTS MESSAGE & YOUR BUNGALOW
 What does your bungalow want to say?
Your bungalow’s design sprouted from the Arts & Crafts Movement in England, a reaction to the shoddy quality goods & the disruption of society that came about during the Industrial Revolution. The Movement was founded on a belief in good craftsmanship, which stresses the inherent beauty of the material, the importance of nature as inspiration, & the values of simplicity, utility, & beauty.
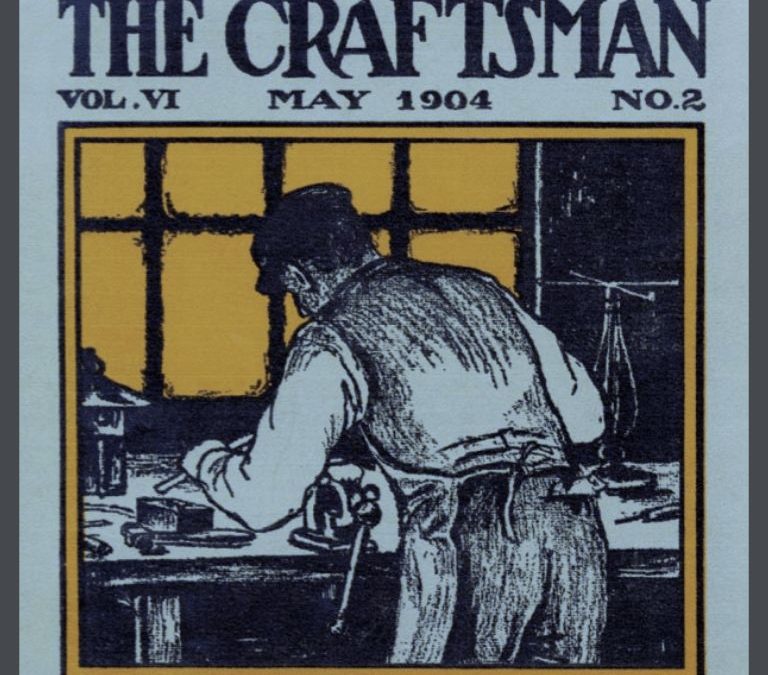
In 1889, Gustav Stickley traveled to Europe & brought the philosophy & the design aesthetic to America, created a furniture line & starting a magazine which focused on Arts & Crafts, American style. This dinky paragraph is a hugely glibbed story of the Movement & Stickley’s influence so I urge you to learn more about the Movement. I have curated some amazing videos that will immerse you in the subject, including some about Stickley. Watch them & I promise that you will never look at your bungalow the same way again.
So, your home is most beautiful when the colors you choose reflect the Movement. These colors create a harmony, with one another, with the design & the material elements of your bungalow, & with Mother Earth herself. Let’s take these elements & figure out the best /most harmonious, color scheme for your house. Part 5 is all about houses, (Stay with me here.) but we’re going to look at color theory just a bit more. It is beautifully demonstrated in the pottery of the era/Movement.
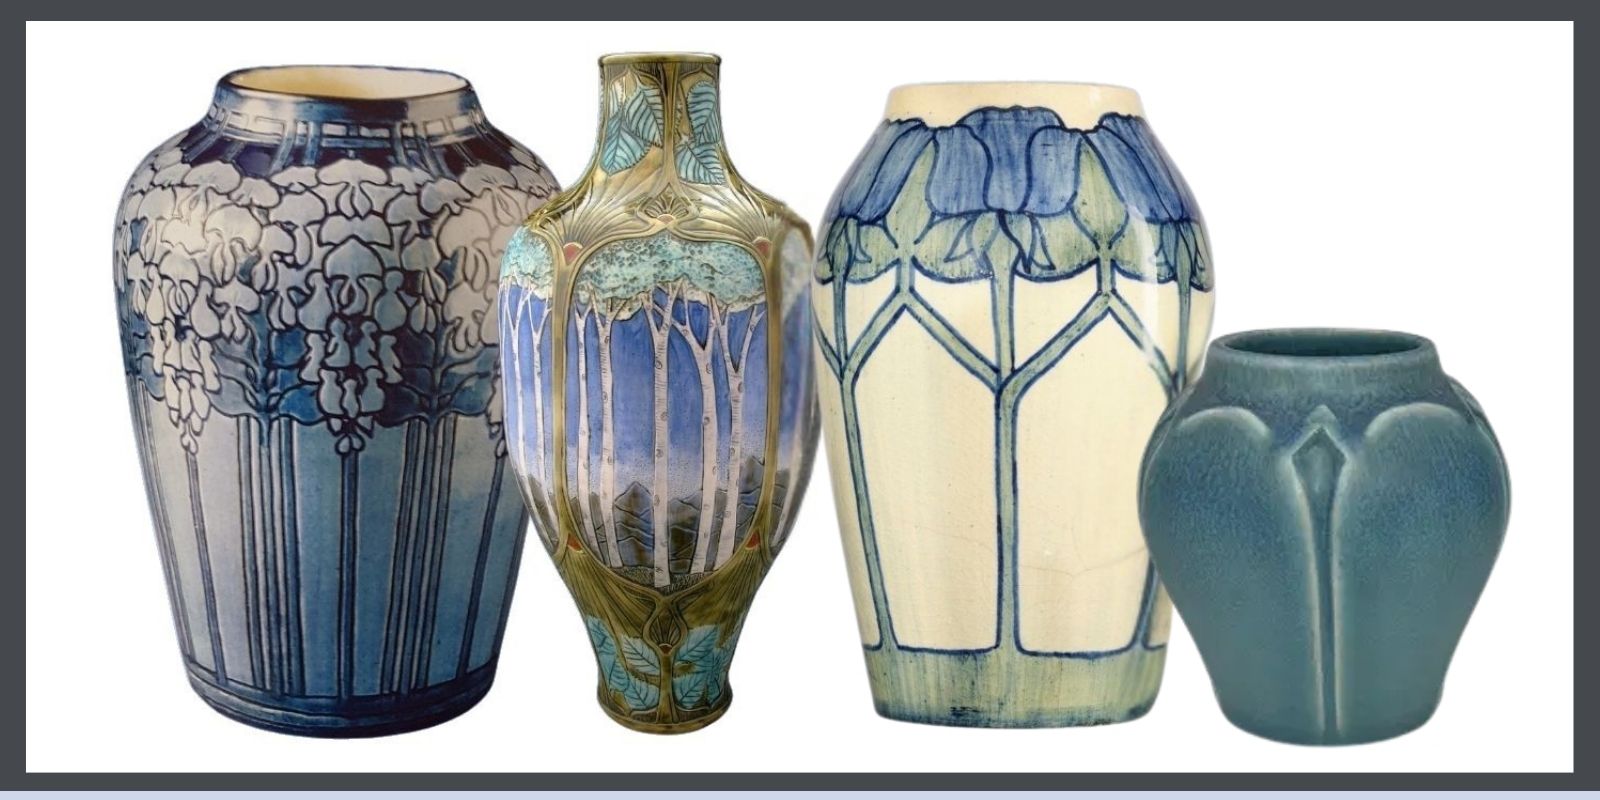
ARTS & CRAFTS COLOR THEORY IN ACTION
William Henry Grueby displayed his art pottery in 1897 for the first time in the exhibition of The Society of Arts & Crafts of Boston. The popularity of his work grew quickly because of its simple designs & the beautiful, nature inspired, matte glazes that he had developed. This pottery had little ornamentation other than form because of these the stunning, natural beauty of these glazes, which motivated David Rago, an expert in American art pottery, to write, “a good piece of their work looks more harvested than potted.”
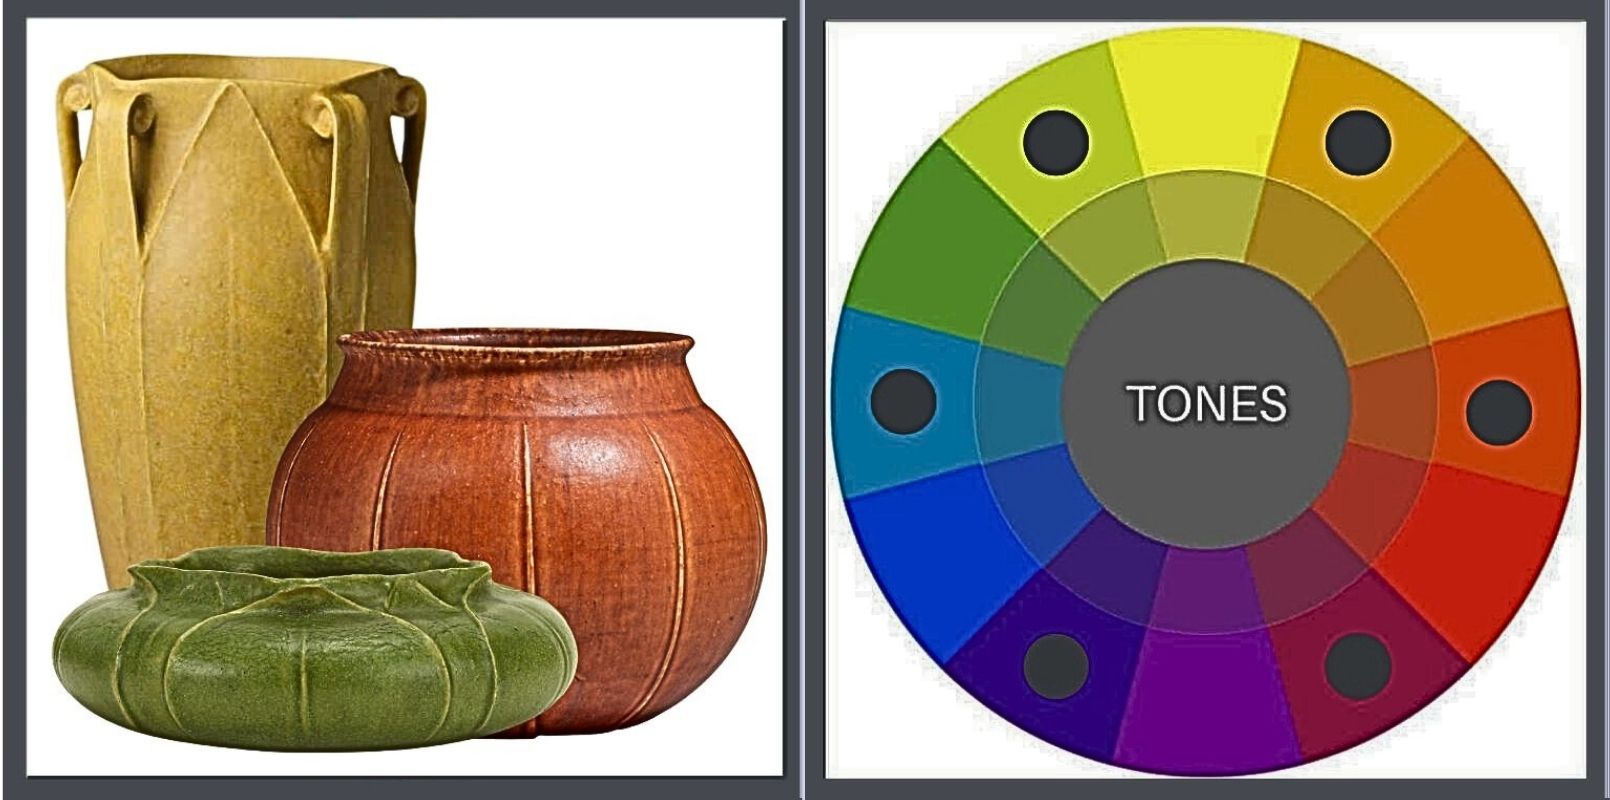
Grueby pottery is a clear voice for the Movement. In every way it expresses:
- A reverence for fine craftsmanship. That feature rings out loud & clear, both from the exquisite design & from the glazes that Grueby worked years to perfect.
- Inherent beauty of the material. The glaze changes the raw look of the bare clay very little, other than adding color.
- As far as being nature inspired, I agree with Rago’s statement that it looks like it was harvested & I’m going to add, “organic, local & fresh!”
No doubt about its simplicity or its beauty.
Now, let’s look at their colors. Each piece is a poster child for the colors of Mother Earth, tending to feature tertiary tones. They are not clear primary or secondary tones & are further muted by the addition of black & white.
I’m going to shift over to the more ornamented Newcomb pottery so that we can look at color harmony.
They deliver the same message, from a different, equally harmonious voice. Trend alert! Notice that they too are tertiary colors, toned by black & white.
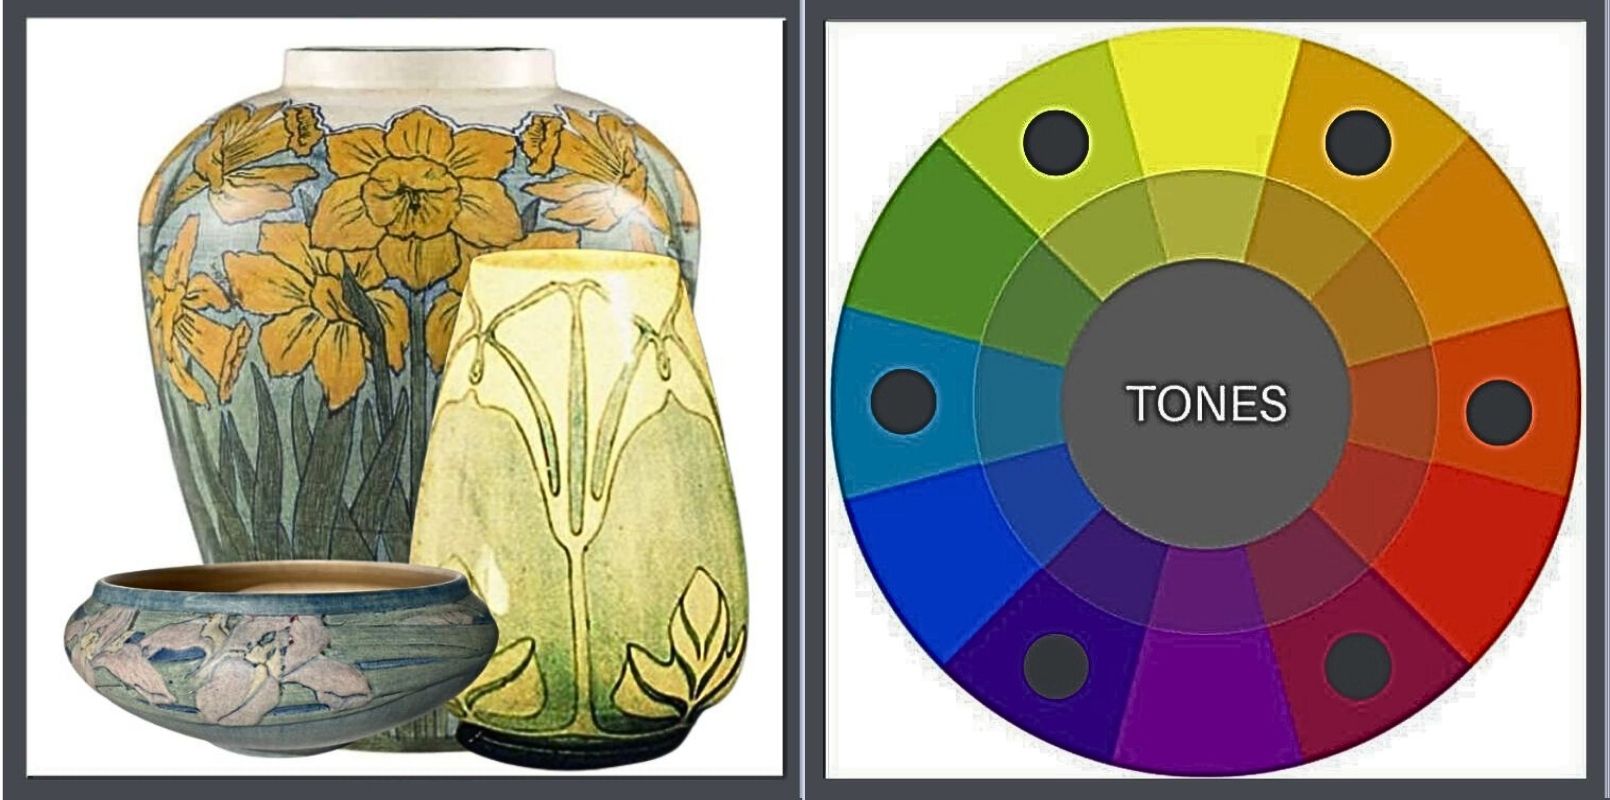
American Arts & Crafts pottery produced from 1895 to 1940, they were thrown by hand (by men) & decorated (by women), each one unique. They were all required to be functional, as dinnerware or vases, but the aesthetic aspects of nature & fine craftsmanship were regarded as highly important. Each piece was formed of local clay & their subject matter reflected the natural world around them. And there is no doubt that they are enchantingly beautiful. I offer them to you as a way to further train your eye.
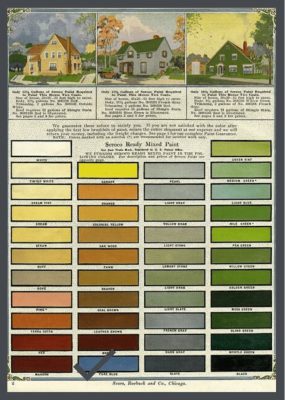
WHAT ABOUT BLUE?
Blue is a found in the A&C palette, as seen in the Seroco palette (Pure Blue.) It is a color often used in pottery. It’s the color of the sky & you’d be hard-pressed to find something more natural than the sky. It complements brick beautifully, as well as off-white & greens & grays.
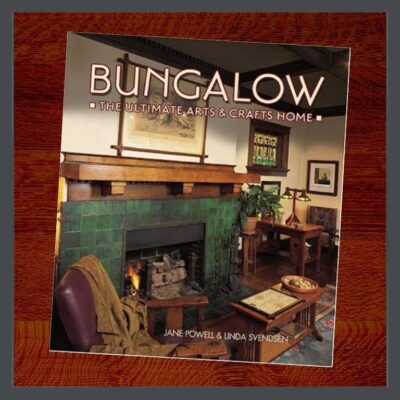
Jane Powell’s BUNGALOW:The Ultimate Arts & Crafts Home (page 70) shows a very cool Gothic Revival in Denver that is painted 2 shades of blue. In my mind’s eye there’s another blue one, I believe in Portland, but I’m failing to locate it. Dang!
I would paint an A&C house blue.
I’M GOING TO GO YOU ONE CRAZIER
“The happiest omen for a New Year is first Mount Fuji, then the falcon, & lastly eggplant.”
-A famous Japanese proverb
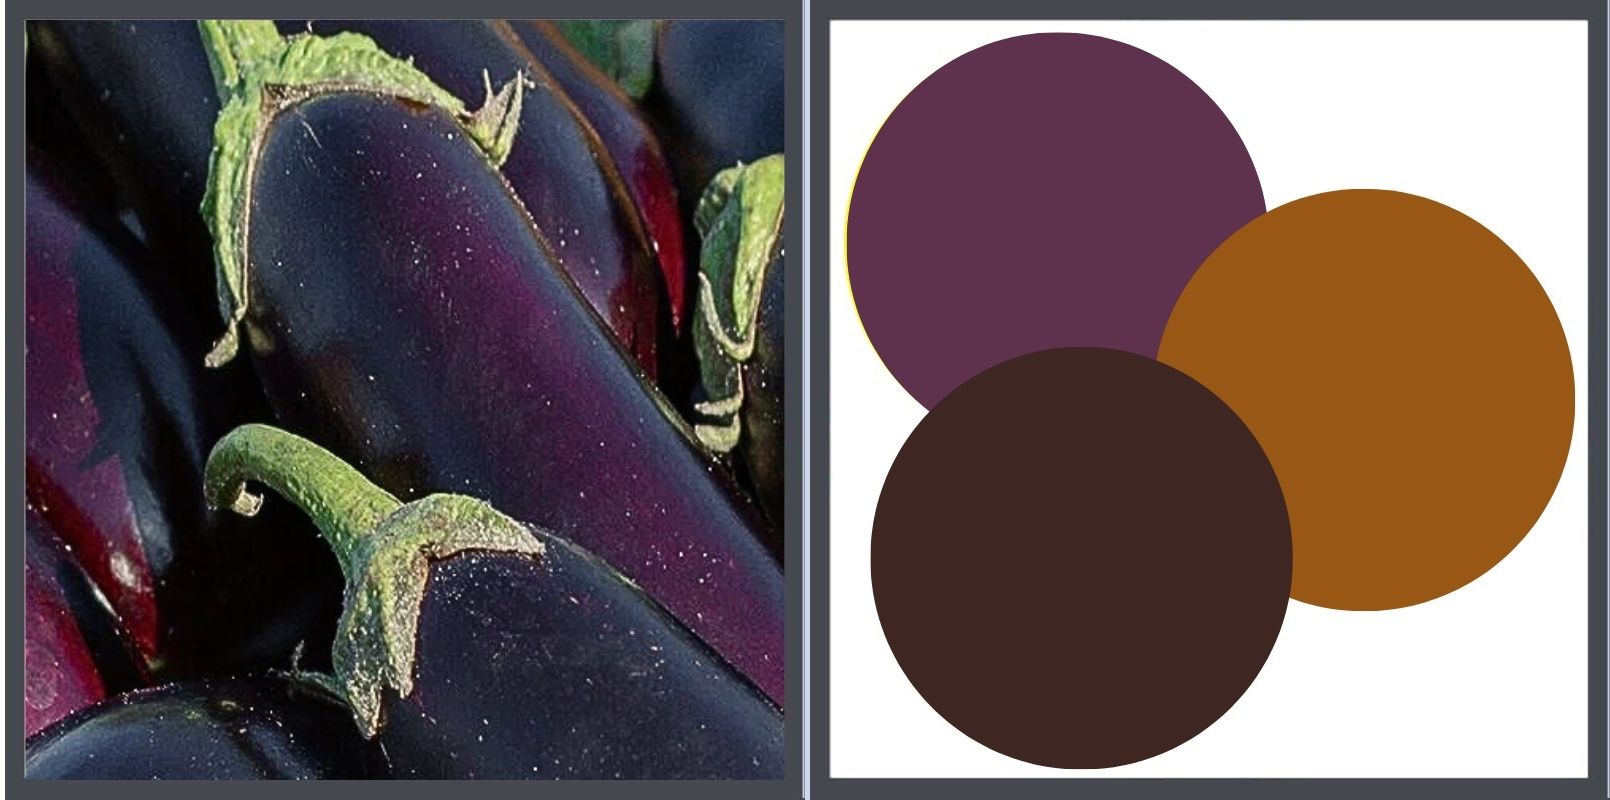
One of my favorite bungalow ACCENT colors is eggplant. Allow me to ‘splain.
Firstly, purple was my favorite color for many years. It was Jane Powell’s favorite color & she drove a purple P.T. Cruiser. (Mine was red.)
Solanum melongena, eggplant, aubergine, bringal (India) is a member of the Nightshade family, Solanaceae. At one time, it was believed to be highly poisonous & indeed, if consumed in large quantities, its flowers & leaves are toxic.
 Jane always felt that anything was permissible with a good backstory. Here’s mine. The colors of the A&C palette were inspired by nature. To be inspired by something, you need to see it, hear it, smell it, etc. However, eggplant was difficult to grow in England. It likes warmer, sunnier climates so its fruit is reluctant to ripen even in warmer areas. Being considered poisonous, why would you waste valuable greenhouse space? So, nobody saw it to be inspired by it because in my heart-of-hearts, I believe they would have been.
But 100 years later, I saw an eggplant & I feel that its color conveys the Arts & Crafts message clearly & beautifully. Combined as an accent, with brown & deep gold, it creates a lovely, natural palette. Have I seen it on any paint cards? No. Do I care? No again, but I’m still looking. I’m thinkin’ Jane might have felt the same way.
SO WHAT DOES THE ARTS & CRAFTS MESSAGE HAVE TO DO WITH MY BUNGALOW’S COLORS?
KEEP READING!
Part 1, THE COLOR LESSON
How to combine colors on your bungalow to most enhance its features.
Part 2, COLOR HARMONY
Combining colors to please the eye.
Part 4, OLD BUNGALOW COLORS
Color choices when our houses were constructed.
Part 5, WHAT ABOUT PAINT COLORS FOR YOUR HOUSE?
How to use everything you know about color to pick your dream colors.
Part 6, PAINTING YOUR BUNGALOW EXTERIOR CHECKLIST
Making the big choices.
Part 7, IT’S ALL ABOUT THE CHEMISTRY- LEAD PAINT IN BUNGALOWS
Because I think I’m everybody’s mama.
STAY IN THE BUNGALOW KNOW!!!
Sign up for our newsletter & receive our FREE E-book, 7 VITAL Things to Do Before You Hire a Contractor.